Use & Care Guide
Page 1
... FOURS ÉLECTRIQUES ENCASTRÉS SIMPLE ET DOUBLE Guide d'utilisation et d'entretien Au Canada, pour assistance, installation ou service, composer le 1-800-807-6777 ou visiter notre site Web au www.kitchenaid.ca Table of Contents/Table des matières 2 Models/Modèles KEBS109, KEBS207, KEBS209, KEBK101, KEBK206 W10354193A BUILT...
... FOURS ÉLECTRIQUES ENCASTRÉS SIMPLE ET DOUBLE Guide d'utilisation et d'entretien Au Canada, pour assistance, installation ou service, composer le 1-800-807-6777 ou visiter notre site Web au www.kitchenaid.ca Table of Contents/Table des matières 2 Models/Modèles KEBS109, KEBS207, KEBS209, KEBK101, KEBK206 W10354193A BUILT...

Use & Care Guide
Page 3
...oven unless specifically recommended in the manual. WARNING You can kill or hurt you don't follow basic precautions, including the following: ■ Proper Installation - Do not repair or replace any part of oven doors. Moist or damp potholders on hot surfaces may be referred to a qualified technician... You can happen if the instructions are oven vent openings and surfaces near these surfaces are not followed. Be sure the oven is properly installed and grounded by a qualified technician. ■ Never Use the Oven for a good seal. Let hot air or steam escape before removing...
...oven unless specifically recommended in the manual. WARNING You can kill or hurt you don't follow basic precautions, including the following: ■ Proper Installation - Do not repair or replace any part of oven doors. Moist or damp potholders on hot surfaces may be referred to a qualified technician... You can happen if the instructions are oven vent openings and surfaces near these surfaces are not followed. Be sure the oven is properly installed and grounded by a qualified technician. ■ Never Use the Oven for a good seal. Let hot air or steam escape before removing...
Use & Care Guide
Page 18
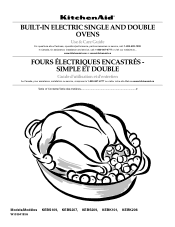
... use, it will shut. 2. Open oven door all the way. Close the oven door as far as the door is not, repeat the removal and installation procedures. 18 Move the hinge levers back to remove the oven door. However, if removal is necessary, make sure the oven is heavy. You should...
... use, it will shut. 2. Open oven door all the way. Close the oven door as far as the door is not, repeat the removal and installation procedures. 18 Move the hinge levers back to remove the oven door. However, if removal is necessary, make sure the oven is heavy. You should...

Use & Care Guide
Page 19
... been selected? TROUBLESHOOTING Try the solutions suggested here first in order to cover the edge of the crust and/or reduce baking temperature. 19 See Installation Instructions. Choose UPPER OVEN or LOWER OVEN first. Close the oven door all the way. ■ Has the function been entered? See "Control Lock" section...
... been selected? TROUBLESHOOTING Try the solutions suggested here first in order to cover the edge of the crust and/or reduce baking temperature. 19 See Installation Instructions. Choose UPPER OVEN or LOWER OVEN first. Close the oven door all the way. ■ Has the function been entered? See "Control Lock" section...
Use & Care Guide
Page 20
... replacement parts, we recommend that you the cost of appliances. ■ Installation information. ■ Use and maintenance procedures. ■ Accessory and repair parts sales. ■ Specialized customer assistance (Spanish speaking, hearing impaired, limited vision, etc.). ■ Referrals to build every new KITCHENAID® appliance. Mississauga, Ontario L5N 0B7 Please include a daytime phone...
... replacement parts, we recommend that you the cost of appliances. ■ Installation information. ■ Use and maintenance procedures. ■ Accessory and repair parts sales. ■ Specialized customer assistance (Spanish speaking, hearing impaired, limited vision, etc.). ■ Referrals to build every new KITCHENAID® appliance. Mississauga, Ontario L5N 0B7 Please include a daytime phone...

Use & Care Guide
Page 21
... repair or replace appliance light bulbs, air filters or water filters. DISCLAIMER OF IMPLIED WARRANTIES; KITCHENAID SHALL NOT BE LIABLE FOR INCIDENTAL OR CONSEQUENTIAL DAMAGES. In Canada, call 1-800-422-1230. Service calls to correct the installation of purchase. 6. Service calls to determine if another warranty applies. Costs associated with electrical or...
... repair or replace appliance light bulbs, air filters or water filters. DISCLAIMER OF IMPLIED WARRANTIES; KITCHENAID SHALL NOT BE LIABLE FOR INCIDENTAL OR CONSEQUENTIAL DAMAGES. In Canada, call 1-800-422-1230. Service calls to correct the installation of purchase. 6. Service calls to determine if another warranty applies. Costs associated with electrical or...

Use & Care Guide
Page 22
You can find this book and your complete model number and serial number. You will need it. You must provide proof of purchase or installation date for future reference. Dealer name Address Phone number Model number Serial number Purchase date 22 Write down the following information about your major appliance to better help you obtain assistance or service if you ever need to know your sales slip together for in-warranty service. Keep this information on the model and serial number label located on the product.
You can find this book and your complete model number and serial number. You will need it. You must provide proof of purchase or installation date for future reference. Dealer name Address Phone number Model number Serial number Purchase date 22 Write down the following information about your major appliance to better help you obtain assistance or service if you ever need to know your sales slip together for in-warranty service. Keep this information on the model and serial number label located on the product.
Dimension Guide
Page 1
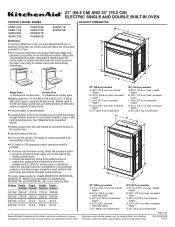
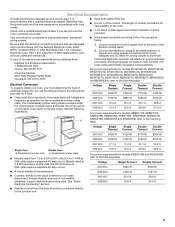
... OVEN PRODUCT MODEL SERIES PRODUCT DIMENSIONS KEBK101B KEBK171B KEBK206B KEBK276B KEBS109B KEBS179B KEBS207B KEBS209B KEBS277B KEBS279B Electrical: To properly install your oven, you must determine the type of electrical connection you will be using special connectors and/or tools designed...240 volts (3.6 kW and below : 1. q A UL listed or CSA approved conduit connector must be provided. For complete details, see Installation Instructions packed with product. Model/serial number plate A. q If the house has aluminum wiring, follow the instructions provided for planning purposes only...
... OVEN PRODUCT MODEL SERIES PRODUCT DIMENSIONS KEBK101B KEBK171B KEBK206B KEBK276B KEBS109B KEBS179B KEBS207B KEBS209B KEBS277B KEBS279B Electrical: To properly install your oven, you must determine the type of electrical connection you will be using special connectors and/or tools designed...240 volts (3.6 kW and below : 1. q A UL listed or CSA approved conduit connector must be provided. For complete details, see Installation Instructions packed with product. Model/serial number plate A. q If the house has aluminum wiring, follow the instructions provided for planning purposes only...
Dimension Guide
Page 2
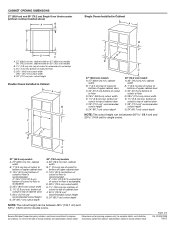
... to change without notice. Instructions packed with product. Specifications subject to floor is acceptable. W10351242B 7/26/12 cutout height Double Ovens Installed in Cabinet A E D C A. 27" (68.6 cm) min. bottom of cutout to top of cutout to change materials...72.4 cm) cutout width E. 1¹⁄₂" (3.8 cm) min. CABINET OPENING DIMENSIONS 27" (68.6 cm) and 30" (76.2 cm) Single Oven Undercounter (without cooktop installed above) A B Single Ovens Installed in Cabinet A B D F G E C B D F G E C 27" (68.6 cm) models A. 27" (68.6 cm) min. cabinet width on 27"...
... to change without notice. Instructions packed with product. Specifications subject to floor is acceptable. W10351242B 7/26/12 cutout height Double Ovens Installed in Cabinet A E D C A. 27" (68.6 cm) min. bottom of cutout to top of cutout to change materials...72.4 cm) cutout width E. 1¹⁄₂" (3.8 cm) min. CABINET OPENING DIMENSIONS 27" (68.6 cm) and 30" (76.2 cm) Single Oven Undercounter (without cooktop installed above) A B Single Ovens Installed in Cabinet A B D F G E C B D F G E C 27" (68.6 cm) models A. 27" (68.6 cm) min. cabinet width on 27"...
Installation Guide
Page 1
... des pieds du four pour des ouvertures d'encastrement de hauteur différente 23 Raccordement électrique 26 Installation du four 28 Achever l'installation 30 BUILT-IN OVEN SAFETY Your safety and the safety of others . IMPORTANT : À conserver pour ...Contents/Table des matières BUILT-IN OVEN SAFETY 1 SÉCURITÉ DU FOUR ENCASTR 17 INSTALLATION REQUIREMENTS 2 Tools and Parts 2 Location Requirements 2 Electrical Requirements 5 INSTALLATION INSTRUCTIONS 6 Prepare Built-In Oven 6 Remove Oven Door 6 Positioning Oven Feet for local electrical inspector's ...
... des pieds du four pour des ouvertures d'encastrement de hauteur différente 23 Raccordement électrique 26 Installation du four 28 Achever l'installation 30 BUILT-IN OVEN SAFETY Your safety and the safety of others . IMPORTANT : À conserver pour ...Contents/Table des matières BUILT-IN OVEN SAFETY 1 SÉCURITÉ DU FOUR ENCASTR 17 INSTALLATION REQUIREMENTS 2 Tools and Parts 2 Location Requirements 2 Electrical Requirements 5 INSTALLATION INSTRUCTIONS 6 Prepare Built-In Oven 6 Remove Oven Door 6 Positioning Oven Feet for local electrical inspector's ...

Installation Guide
Page 2
... Observe all governing codes and ordinances. ■ Cabinet opening dimensions that all electrical connections be made by a licensed, qualified electrical installer. *Grommets not included with models KEBK171B, KEBK101B, KEBK276B, KEBK206B, KEBS179B, KEBS109B, KEBS277B, KEBS279B, KEBS207B, KEBS209B, KEBU109B and ...KEBU209B. **Foam strip not included with oven. ■ Recessed installation area must be located 3" (7.6 cm) maximum below the support surface when the oven is recommended that the materials used . ...
... Observe all governing codes and ordinances. ■ Cabinet opening dimensions that all electrical connections be made by a licensed, qualified electrical installer. *Grommets not included with models KEBK171B, KEBK101B, KEBK276B, KEBK206B, KEBS179B, KEBS109B, KEBS277B, KEBS279B, KEBS207B, KEBS209B, KEBU109B and ...KEBU209B. **Foam strip not included with oven. ■ Recessed installation area must be located 3" (7.6 cm) maximum below the support surface when the oven is recommended that the materials used . ...
Installation Guide
Page 3
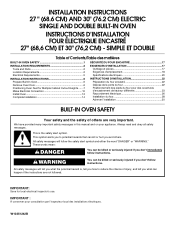
Single Ovens B Single Ovens Installed in Cabinet A B D C F A G E D E 27" (68.6 cm) models A. 28¾" (72.8 cm) max. overall height B. 25 64.6 cm) max. cabinet width B. 1" (2.5 cm) top of cutout to bottom ...) max. recessed width C. 26³⁄₄" (67.9 cm) recessed height D. 23¹⁄₄" (59.1 cm) max. Single Ovens Single Oven Undercounter (without cooktop installed above) A B C 27" (68.6 cm) models A. 27" (68.6 cm) min. overall height B. 28½" (72.4 cm) max. top of cutout to underside of countertop C. 5¹⁄...
Single Ovens B Single Ovens Installed in Cabinet A B D C F A G E D E 27" (68.6 cm) models A. 28¾" (72.8 cm) max. overall height B. 25 64.6 cm) max. cabinet width B. 1" (2.5 cm) top of cutout to bottom ...) max. recessed width C. 26³⁄₄" (67.9 cm) recessed height D. 23¹⁄₄" (59.1 cm) max. Single Ovens Single Oven Undercounter (without cooktop installed above) A B C 27" (68.6 cm) models A. 27" (68.6 cm) min. overall height B. 28½" (72.4 cm) max. top of cutout to underside of countertop C. 5¹⁄...

Installation Guide
Page 4
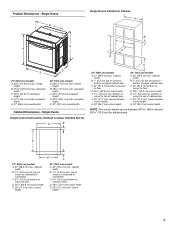
Double Ovens Double Ovens Installed in Cabinet A A C B D F E D 27" (68.6 cm) models A. 51 130.0 cm) max. bottom of cutout to top of cutout to floor is acceptable. Double Ovens B Cabinet Dimensions - D. ...
Double Ovens Double Ovens Installed in Cabinet A A C B D F E D 27" (68.6 cm) models A. 51 130.0 cm) max. bottom of cutout to top of cutout to floor is acceptable. Double Ovens B Cabinet Dimensions - D. ...
Installation Guide
Page 5
...manufacturer's recommended procedure. Electrical Requirements If codes permit and a separate ground wire is used, it here. Electrical Connection To properly install your oven, you must be using special connectors and/or tools designed and UL listed for it is located under the control ...connection you are not sure the oven is properly grounded. The model/serial number rating plate is recommended that a qualified electrical installer determine that the electrical connection and wire size are in conformance with local codes and industry accepted wiring practices. Voltage 240 ...
...manufacturer's recommended procedure. Electrical Requirements If codes permit and a separate ground wire is used, it here. Electrical Connection To properly install your oven, you must be using special connectors and/or tools designed and UL listed for it is located under the control ...connection you are not sure the oven is properly grounded. The model/serial number rating plate is recommended that a qualified electrical installer determine that the electrical connection and wire size are in conformance with local codes and industry accepted wiring practices. Voltage 240 ...
Installation Guide
Page 6
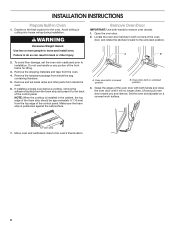
...the edges of the oven door with both hands to the back of the front frame for the oven. Move oven and cardboard close to installation. Do not use handle or any portion of the control panel. A A. Remove the shipping materials and tape from the foam strip and... 1. Remove the hardware package from inside the bag containing literature. 5. Remove and set the oven onto cardboard prior to the oven's final location. 6 If installing a single oven below a cooktop, remove the adhesive backing from the oven. 4. Lift and pull oven door toward you and remove. Decide on a covered ...
...the edges of the oven door with both hands to the back of the front frame for the oven. Move oven and cardboard close to installation. Do not use handle or any portion of the control panel. A A. Remove the shipping materials and tape from the foam strip and... 1. Remove the hardware package from inside the bag containing literature. 5. Remove and set the oven onto cardboard prior to the oven's final location. 6 If installing a single oven below a cooktop, remove the adhesive backing from the oven. 4. Lift and pull oven door toward you and remove. Decide on a covered ...
Installation Guide
Page 7
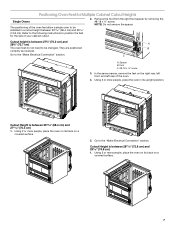
... the following instructions to position the feet for Multiple Cabinet Cutout Heights Single Ovens The positioning of the oven feet allow a single oven to be installed in its upright position. They are positioned correctly as received. Using 2 or more people, place the oven in a cutout height between 28 72.8 cm) and...
... the following instructions to position the feet for Multiple Cabinet Cutout Heights Single Ovens The positioning of the oven feet allow a single oven to be installed in its upright position. They are positioned correctly as received. Using 2 or more people, place the oven in a cutout height between 28 72.8 cm) and...
Installation Guide
Page 8
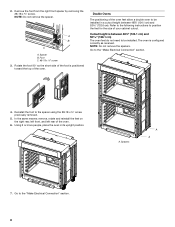
... of your cabinet cutout. Refer to the following instructions to position the feet for the size of the oven feet allow a double oven to be installed. Cutout height is configured correctly as received. Spacers A A 7. The oven is between 48⁷⁄₈" (124.1 cm) and 52 132.6 cm). Go to the... spacers. NOTE: Do not remove the spacer. A B C A. Foot C. #8-18 x ³⁄₈" screw 3. Reinstall the foot to the "Make Electrical Connection" section. 4. Go to be installed in its upright position.
... of your cabinet cutout. Refer to the following instructions to position the feet for the size of the oven feet allow a double oven to be installed. Cutout height is configured correctly as received. Spacers A A 7. The oven is between 48⁷⁄₈" (124.1 cm) and 52 132.6 cm). Go to the... spacers. NOTE: Do not remove the spacer. A B C A. Foot C. #8-18 x ³⁄₈" screw 3. Reinstall the foot to the "Make Electrical Connection" section. 4. Go to be installed in its upright position.

Installation Guide
Page 9
... foot B. #8-18 x ³⁄₈" screw C. Foot C. #8-18 x ³⁄₈" screw 3. B C A. A B C A. Install a foot on the right rear of the oven. In the same manner, install a foot on the left rear spacer using a #8-18 x ³⁄₈" screw. Cutout Height is facing A toward the top... of the oven. 4. Foot C. #8-18 x ³⁄₈" screw 3. Install a foot on the right rear of the oven. NOTE: Position the foot so the long side of the foot is facing toward the top of...
... foot B. #8-18 x ³⁄₈" screw C. Foot C. #8-18 x ³⁄₈" screw 3. B C A. A B C A. Install a foot on the right rear of the oven. In the same manner, install a foot on the left rear spacer using a #8-18 x ³⁄₈" screw. Cutout Height is facing A toward the top... of the oven. 4. Foot C. #8-18 x ³⁄₈" screw 3. Install a foot on the right rear of the oven. NOTE: Position the foot so the long side of the foot is facing toward the top of...

Installation Guide
Page 10
...oven. 7. Spacer 5. Electrically ground oven. Using 2 or more people, place the oven in death, fire, or electrical shock. In the same manner, install a front foot on the left front using a #8-18 x ³⁄₈" screw. Go to follow these instructions can result in its upright position.... Failure to follow these instructions can result in death, fire, or electrical shock. Use 12 gauge solid copper wire. Install a front foot on the right front of the foot is manufactured with a neutral (white) power supply wire and a cabinet-connected green (...
...oven. 7. Spacer 5. Electrically ground oven. Using 2 or more people, place the oven in death, fire, or electrical shock. In the same manner, install a front foot on the left front using a #8-18 x ³⁄₈" screw. Go to follow these instructions can result in its upright position.... Failure to follow these instructions can result in death, fire, or electrical shock. Use 12 gauge solid copper wire. Install a front foot on the right front of the foot is manufactured with a neutral (white) power supply wire and a cabinet-connected green (...
Installation Guide
Page 11
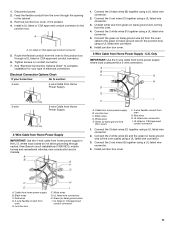
...Home Power Supply ½" (1.3 cm) 4-Wire Cable from Home Power Supply IMPORTANT: Use the 4-wire cable from the oven to the junction box. Install junction box cover. 3-Wire Cable from oven G. U.S. A B C G H D E I F. White wires E. Green (or bare) ground wire (from oven) ... wire connector. 2. Only IMPORTANT: Use the 3-wire cable from oven E. UL listed wire connectors H. See "Electrical Connection Options Chart" to complete installation for your home has: Go to the green (or bare) ground wire (in the cabinet. 3. Connect the 2 black wires (B) together using ...
...Home Power Supply ½" (1.3 cm) 4-Wire Cable from Home Power Supply IMPORTANT: Use the 4-wire cable from the oven to the junction box. Install junction box cover. 3-Wire Cable from oven G. U.S. A B C G H D E I F. White wires E. Green (or bare) ground wire (from oven) ... wire connector. 2. Only IMPORTANT: Use the 3-wire cable from oven E. UL listed wire connectors H. See "Electrical Connection Options Chart" to complete installation for your home has: Go to the green (or bare) ground wire (in the cabinet. 3. Connect the 2 black wires (B) together using ...


