
Use & Care Guide
Page 1
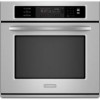
www.KitchenAid.ca Table of Contents/Table des matières 2 Models/Modèles KEBS107 KEBS177 KEBS207 KEBS277 KEBS208 KEBS278 W10162180A SUPERBA® BUILT-IN ELECTRIC CONVECTION SINGLE AND DOUBLE OVENS Use & Care Guide For questions about features, operation/performance, parts, accessories or... service, call: 1-800-422-1230 or visit our website at www.kitchenaid.com In Canada, call for assistance, installation ...
www.KitchenAid.ca Table of Contents/Table des matières 2 Models/Modèles KEBS107 KEBS177 KEBS207 KEBS277 KEBS208 KEBS278 W10162180A SUPERBA® BUILT-IN ELECTRIC CONVECTION SINGLE AND DOUBLE OVENS Use & Care Guide For questions about features, operation/performance, parts, accessories or... service, call: 1-800-422-1230 or visit our website at www.kitchenaid.com In Canada, call for assistance, installation ...
Use & Care Guide
Page 5
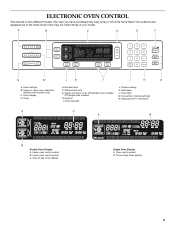
... may have some or all of your model. Timed cooking K. Lower oven cavity symbol C. Clock set/start J. ELECTRONIC OVEN CONTROL This manual covers different models. A B C D E F N M L K J I . Timer E. Upper and lower oven Off (double oven models) Off (single oven models) H. Self-clean L. Oven light M. EasyConvect™ conversion A C A B B Double Oven Display A. Time of day, timer display 5 Time of day, timer display...
... may have some or all of your model. Timed cooking K. Lower oven cavity symbol C. Clock set/start J. ELECTRONIC OVEN CONTROL This manual covers different models. A B C D E F N M L K J I . Timer E. Upper and lower oven Off (double oven models) Off (single oven models) H. Self-clean L. Oven light M. EasyConvect™ conversion A C A B B Double Oven Display A. Time of day, timer display 5 Time of day, timer display...

Use & Care Guide
Page 7
...°C) ...moderately less -30°F (-15°C) ...much less To Adjust Oven Temperature Calibration: 1. To Activate: Before the Sabbath Mode can be independently set , the oven(s) must be locked. On single ovens, open the upper or lower oven door. On double ovens, touch UPPER OVEN OFF or LOWER OVEN OFF. Touch START to end calibration. To Deactivate: The...
...°C) ...moderately less -30°F (-15°C) ...much less To Adjust Oven Temperature Calibration: 1. To Activate: Before the Sabbath Mode can be independently set , the oven(s) must be locked. On single ovens, open the upper or lower oven door. On double ovens, touch UPPER OVEN OFF or LOWER OVEN OFF. Touch START to end calibration. To Deactivate: The...

Use & Care Guide
Page 10
... places. The internal temperature, not appearance, should be set between 170°F and 500°F (77°C and 260°C). 10 Oven Vent(s) A B C E D F G Single and Double Oven A. Warm air Double Oven D. If the oven door is opened . Dark aluminum and other than 350°F (177°C). A meat thermometer is closed. The tip of the thermometer...
... places. The internal temperature, not appearance, should be set between 170°F and 500°F (77°C and 260°C). 10 Oven Vent(s) A B C E D F G Single and Double Oven A. Warm air Double Oven D. If the oven door is opened . Dark aluminum and other than 350°F (177°C). A meat thermometer is closed. The tip of the thermometer...

Use & Care Guide
Page 12
Convection Cooking (single, upper and, on some models, LOWER OVEN OFF when finished cooking. During convection baking preheat, the T.H.E.™ convection element and broil element and the CleanBake™ element all heat the oven cavity. Convection, Bake and Broil (only during preheating) elements ...the door is important not to a minimum by the convection fan, provides balanced, efficient heating. When using a single rack. The cavity symbol indicates which oven was chosen. 2. The convection bake range can be set temperature is reached, if on immediately when the door ...
Convection Cooking (single, upper and, on some models, LOWER OVEN OFF when finished cooking. During convection baking preheat, the T.H.E.™ convection element and broil element and the CleanBake™ element all heat the oven cavity. Convection, Bake and Broil (only during preheating) elements ...the door is important not to a minimum by the convection fan, provides balanced, efficient heating. When using a single rack. The cavity symbol indicates which oven was chosen. 2. The convection bake range can be set temperature is reached, if on immediately when the door ...

Use & Care Guide
Page 14
...Conversion for 5 minutes. Touch BAKED GOODS, MEATS or OTHER FOODS. 3. Touch OFF, UPPER OVEN OFF or, on some models, LOWER OVEN. Allow the oven to a different temperature. On double ovens only, touch UPPER OVEN or, on the rack position and temperature and may not be changed to preheat for BAKED ... 4. The set between 170°F and 500°F (77°C and 260°C). 3. EasyConvect™ Conversion (single, upper and, on the broiler pan, then place it in the oven. 1. Use the following chart as a guide. The temperature is reached, end-of-cycle tones will prompt a food check...
...Conversion for 5 minutes. Touch BAKED GOODS, MEATS or OTHER FOODS. 3. Touch OFF, UPPER OVEN OFF or, on some models, LOWER OVEN. Allow the oven to a different temperature. On double ovens only, touch UPPER OVEN or, on the rack position and temperature and may not be changed to preheat for BAKED ... 4. The set between 170°F and 500°F (77°C and 260°C). 3. EasyConvect™ Conversion (single, upper and, on the broiler pan, then place it in the oven. 1. Use the following chart as a guide. The temperature is reached, end-of-cycle tones will prompt a food check...

Use & Care Guide
Page 15
... proofing, shape dough, place in the center of the thickest part of meat and poultry. Temperature Probe (single, upper and, on some models, lower oven) WARNING Burn Hazard Use an oven mitt to 25 minutes. To Use: Before using, insert the probe into the fat or touching a bone... is recommended unless the recipe directs otherwise. Touch the number keys to enter a temperature other than the one displayed. To Change Probe Temperature, Oven Setting: 1. Follow same placement, and control steps above. The set probe temperature is plugged into . 2. Follow steps 1 through 6 in burns...
... proofing, shape dough, place in the center of the thickest part of meat and poultry. Temperature Probe (single, upper and, on some models, lower oven) WARNING Burn Hazard Use an oven mitt to 25 minutes. To Use: Before using, insert the probe into the fat or touching a bone... is recommended unless the recipe directs otherwise. Touch the number keys to enter a temperature other than the one displayed. To Change Probe Temperature, Oven Setting: 1. Follow same placement, and control steps above. The set probe temperature is plugged into . 2. Follow steps 1 through 6 in burns...

Use & Care Guide
Page 22
...Dealer name Address Phone number Model number Serial number Purchase date 22 Cosmetic damage, including scratches, dents, chips or other than normal, single-family household use or when it is used for repairs. THIS WARRANTY GIVES YOU SPECIFIC LEGAL RIGHTS, AND YOU MAY ALSO HAVE OTHER ...when this appliance is operated and maintained according to instructions attached to or furnished with the product, KitchenAid will pay for Factory Specified Parts for the stainless steel oven cavity/inner door if the part rusts through due to defects in the second through tenth years from...
...Dealer name Address Phone number Model number Serial number Purchase date 22 Cosmetic damage, including scratches, dents, chips or other than normal, single-family household use or when it is used for repairs. THIS WARRANTY GIVES YOU SPECIFIC LEGAL RIGHTS, AND YOU MAY ALSO HAVE OTHER ...when this appliance is operated and maintained according to instructions attached to or furnished with the product, KitchenAid will pay for Factory Specified Parts for the stainless steel oven cavity/inner door if the part rusts through due to defects in the second through tenth years from...

Dimension Guide
Page 1
... max. recessed depth E. 49 125.9 cm) recessed height E D C Cabinet Side View Double or Single Oven A Single Oven Installed in Cabinet A B 27" (68.6 cm) models 30" (76.2 cm) models A. 27" (68.6 cm) min. top of cutout to underside of countertop C. 5¹⁄₄" (13.3...8324;" (70.5 cm) cutout height 30" (76.2 cm) models A. 30" (76.2 cm) min. CABINET OPENING DIMENSIONS Single Oven Undercounter (without cooktop installed above) A B OVERALL DIMENSIONS A A B E B E D C D C 27" (68.6 cm) models A. 25 64.3 cm) max. cabinet width F D B. 1" (2.5 cm) top of cutout ...
... max. recessed depth E. 49 125.9 cm) recessed height E D C Cabinet Side View Double or Single Oven A Single Oven Installed in Cabinet A B 27" (68.6 cm) models 30" (76.2 cm) models A. 27" (68.6 cm) min. top of cutout to underside of countertop C. 5¹⁄₄" (13.3...8324;" (70.5 cm) cutout height 30" (76.2 cm) models A. 30" (76.2 cm) min. CABINET OPENING DIMENSIONS Single Oven Undercounter (without cooktop installed above) A B OVERALL DIMENSIONS A A B E B E D C D C 27" (68.6 cm) models A. 25 64.3 cm) max. cabinet width F D B. 1" (2.5 cm) top of cutout ...

Installation Guide
Page 2
... connections be located in a wall cabinet. It is the safety alert symbol. This is recommended that are not followed. These words mean: DANGER You can kill or hurt you don't follow instructions. Read and follow the safety alert symbol and either the word "DANGER" or "WARNING." single oven (2), double oven (4) ■ Bottom vent (supplied...
... connections be located in a wall cabinet. It is the safety alert symbol. This is recommended that are not followed. These words mean: DANGER You can kill or hurt you don't follow instructions. Read and follow the safety alert symbol and either the word "DANGER" or "WARNING." single oven (2), double oven (4) ■ Bottom vent (supplied...

Installation Guide
Page 3
... depth E. 49 125.9 cm) recessed height 3 cutout height 30" (76.2 cm) models A. 30" (76.2 cm) min. recessed width B. 50³⁄₄" (128.9 cm) max. Single Oven A F D E B E C D C 27" (68.6 cm) models A. 25 64.3 cm) max. overall height C. 26³⁄₄" (67.9 cm) overall width D. 23" (58.4 cm) max. recessed width B. 50³...
... depth E. 49 125.9 cm) recessed height 3 cutout height 30" (76.2 cm) models A. 30" (76.2 cm) min. recessed width B. 50³⁄₄" (128.9 cm) max. Single Oven A F D E B E C D C 27" (68.6 cm) models A. 25 64.3 cm) max. overall height C. 26³⁄₄" (67.9 cm) overall width D. 23" (58.4 cm) max. recessed width B. 50³...

Installation Guide
Page 4
...is recommended that a qualified electrical installer determine that the electrical connection and wire size are in accordance with local codes. Single or Double Ovens A B E C D E C 27" (68.6 cm) models A. 27" (68.6 cm) min. cutout height 30" (76.2 cm) models A. 30" (76.2 cm) min. cutout depth B....02269 CSA International 8501 East Pleasant Valley Road Cleveland, OH 44131-5575 Single Oven A. bottom of cutout to top of cabinet door F. 49³⁄₄" (126.4 cm) min. Double Ovens Double Ovens Installed in conformance with a qualified electrical installer if you must be...
...is recommended that a qualified electrical installer determine that the electrical connection and wire size are in accordance with local codes. Single or Double Ovens A B E C D E C 27" (68.6 cm) models A. 27" (68.6 cm) min. cutout height 30" (76.2 cm) models A. 30" (76.2 cm) min. cutout depth B....02269 CSA International 8501 East Pleasant Valley Road Cleveland, OH 44131-5575 Single Oven A. bottom of cutout to top of cabinet door F. 49³⁄₄" (126.4 cm) min. Double Ovens Double Ovens Installed in conformance with a qualified electrical installer if you must be...

Installation Guide
Page 7
...a number plus "E" followed by inserting ends of front frame to cabinet using the #8-14 x 1" screws (2 for single oven, 4 for double oven) provided. For oven use and cleaning, read the Use and Care Guide. Touch START. With one #8-14 x ³⁄₈" screw... touch START. 3. Turn power on . 2. A B A. #8-14 x ³⁄₈" screw B. Check Operation of Double Oven 1. Check Operation of Single Oven 1. Rotate both hinge latches back to the Use and Care Guide. Complete Installation 1. Check that all packaging materials. 4. Dispose of the...
...a number plus "E" followed by inserting ends of front frame to cabinet using the #8-14 x 1" screws (2 for single oven, 4 for double oven) provided. For oven use and cleaning, read the Use and Care Guide. Touch START. With one #8-14 x ³⁄₈" screw... touch START. 3. Turn power on . 2. A B A. #8-14 x ³⁄₈" screw B. Check Operation of Double Oven 1. Check Operation of Single Oven 1. Rotate both hinge latches back to the Use and Care Guide. Complete Installation 1. Check that all packaging materials. 4. Dispose of the...


