
Use & Care Guide
Page 1
... KEBS277 KEBS208 KEBS278 W10162180A SUPERBA® BUILT-IN ELECTRIC CONVECTION SINGLE AND DOUBLE OVENS Use & Care Guide For questions about features, operation/performance, parts, accessories or service, call: 1-800-422-1230 or visit our website at www.kitchenaid.com In Canada, call for assistance, installation and service, call: 1-800-807-6777 or visit our...
... KEBS277 KEBS208 KEBS278 W10162180A SUPERBA® BUILT-IN ELECTRIC CONVECTION SINGLE AND DOUBLE OVENS Use & Care Guide For questions about features, operation/performance, parts, accessories or service, call: 1-800-422-1230 or visit our website at www.kitchenaid.com In Canada, call for assistance, installation and service, call: 1-800-807-6777 or visit our...

Use & Care Guide
Page 3
... Only Dry Potholders - All safety messages will follow basic precautions, including the following: ■ Proper Installation - Moist or damp potholders on any part of the oven. ■ Clean Only Parts Listed in color. No commercial oven cleaner or oven liner protective coating of any kind should be used in or around any part of...
... Only Dry Potholders - All safety messages will follow basic precautions, including the following: ■ Proper Installation - Moist or damp potholders on any part of the oven. ■ Clean Only Parts Listed in color. No commercial oven cleaner or oven liner protective coating of any kind should be used in or around any part of...

Use & Care Guide
Page 19
...surface of ¹ ₂ cup (125 mL) ammonia to turn light on when the oven door is not, repeat the removal and installation procedures. 19 BROILER PAN AND GRID (on each side. 3. They will come on or off...oven door all the way. 2. The oven lights will shut. 4. Reconnect power. IMPORTANT: Oven Door To avoid oven door glass breakage: ■ Do not close . However, if removal is necessary, make sure the oven is heavy. The oven door is off . Porcelain enamel only, not chrome ■ Dishwasher Oven Lights The oven lights are not fully inserted into wall...
...surface of ¹ ₂ cup (125 mL) ammonia to turn light on when the oven door is not, repeat the removal and installation procedures. 19 BROILER PAN AND GRID (on each side. 3. They will come on or off...oven door all the way. 2. The oven lights will shut. 4. Reconnect power. IMPORTANT: Oven Door To avoid oven door glass breakage: ■ Do not close . However, if removal is necessary, make sure the oven is heavy. The oven door is off . Porcelain enamel only, not chrome ■ Dishwasher Oven Lights The oven lights are not fully inserted into wall...

Use & Care Guide
Page 20
... Is the display showing a letter followed by a number reappears, call for service. Clear the display. See "Oven Temperature Control" section. ■ Was the oven preheated? See "Positioning Racks and Bakeware" section. ■ Is there proper air circulation around bakeware? Nothing will...reliable cookbook. ■ Is the proper oven temperature calibration set ? Double-check the recipe in the pan. ■ Is the proper length of an unnecessary service call an electrician. ■ Is the appliance wired properly? See Installation Instructions. See "Timed Cooking" section. ...
... Is the display showing a letter followed by a number reappears, call for service. Clear the display. See "Oven Temperature Control" section. ■ Was the oven preheated? See "Positioning Racks and Bakeware" section. ■ Is there proper air circulation around bakeware? Nothing will...reliable cookbook. ■ Is the proper oven temperature calibration set ? Double-check the recipe in the pan. ■ Is the proper length of an unnecessary service call an electrician. ■ Is the appliance wired properly? See Installation Instructions. See "Timed Cooking" section. ...

Use & Care Guide
Page 21
...warranty does not apply. To locate the KitchenAid designated service company in your area, you can write to KitchenAid Canada with : ■ Features and specifications on "applianceaccessories.com." KITCHENAID® BUILT-IN OVEN & MICROWAVE WARRANTY LIMITED WARRANTY For one ... and textiles are trained to build every new KITCHENAID® appliance. KitchenAid designated service technicians are made with any questions or concerns at www.kitchenaid.com and click on our full line of appliances. ■ Installation information. ■ Use and maintenance procedures. ...
...warranty does not apply. To locate the KitchenAid designated service company in your area, you can write to KitchenAid Canada with : ■ Features and specifications on "applianceaccessories.com." KITCHENAID® BUILT-IN OVEN & MICROWAVE WARRANTY LIMITED WARRANTY For one ... and textiles are trained to build every new KITCHENAID® appliance. KitchenAid designated service technicians are made with any questions or concerns at www.kitchenaid.com and click on our full line of appliances. ■ Installation information. ■ Use and maintenance procedures. ...

Use & Care Guide
Page 22
... of purchase, when this major appliance is operated and maintained according to instructions attached to or furnished with the product, KitchenAid will need to know your complete model number and serial number. Repairs to parts or systems resulting from warranty coverage. ...installation of your major appliance if it is installed in an inaccessible location or is not installed in accordance with published installation instructions. 10. Cosmetic damage, including scratches, dents, chips or other than normal, single-family household use or when it is used for the stainless steel oven...
... of purchase, when this major appliance is operated and maintained according to instructions attached to or furnished with the product, KitchenAid will need to know your complete model number and serial number. Repairs to parts or systems resulting from warranty coverage. ...installation of your major appliance if it is installed in an inaccessible location or is not installed in accordance with published installation instructions. 10. Cosmetic damage, including scratches, dents, chips or other than normal, single-family household use or when it is used for the stainless steel oven...

Dimension Guide
Page 1
... width B. 28³⁄₄" (73.0 cm) max. recessed depth E. 49 125.9 cm) recessed height E D C Cabinet Side View Double or Single Oven A Single Oven Installed in Cabinet A B 27" (68.6 cm) models 30" (76.2 cm) models A. 27" (68.6 cm) min. bottom of cutout to top of cutout to bottom of upper cabinet door C. 32" (81.3 cm) bottom of...
... width B. 28³⁄₄" (73.0 cm) max. recessed depth E. 49 125.9 cm) recessed height E D C Cabinet Side View Double or Single Oven A Single Oven Installed in Cabinet A B 27" (68.6 cm) models 30" (76.2 cm) models A. 27" (68.6 cm) min. bottom of cutout to top of cutout to bottom of upper cabinet door C. 32" (81.3 cm) bottom of...

Installation Guide
Page 2
... provide minimum clearance with bottom of cabinet cutout. NOTE: For undercounter installation, it is installed in this manual and on rear wall behind oven, the junction box must be used. BUILT-IN OVEN SAFETY Your safety and the safety of others . This symbol alerts you to support a single oven weight of 154 lbs (70 kg) or a double...
... provide minimum clearance with bottom of cabinet cutout. NOTE: For undercounter installation, it is installed in this manual and on rear wall behind oven, the junction box must be used. BUILT-IN OVEN SAFETY Your safety and the safety of others . This symbol alerts you to support a single oven weight of 154 lbs (70 kg) or a double...

Installation Guide
Page 3
...;" (67.9 cm) overall width D. 23" (58.4 cm) max. recessed depth E. 27¹⁄₂" (69.9 cm) recessed height Cabinet Dimensions - Single Oven Single Oven Undercounter (without cooktop installed above ): Single Ovens Installed in Cabinet Ovens approved for cutout dimensions and approved oven cooktop combinations (separate sheet). bottom of cabinet door F. 27³⁄₄" (70.5 cm) cutout height Product Dimensions - cutout height...
...;" (67.9 cm) overall width D. 23" (58.4 cm) max. recessed depth E. 27¹⁄₂" (69.9 cm) recessed height Cabinet Dimensions - Single Oven Single Oven Undercounter (without cooktop installed above ): Single Ovens Installed in Cabinet Ovens approved for cutout dimensions and approved oven cooktop combinations (separate sheet). bottom of cabinet door F. 27³⁄₄" (70.5 cm) cutout height Product Dimensions - cutout height...

Installation Guide
Page 4
... Double Oven A. Cabinet Dimensions - Single or Double Ovens A B E C D E C 27" (68.6 cm) models A. 27" (68.6 cm) min. cutout height 30" (76.2 cm) models A. 30" (76.2 cm) min. The model/serial number rating plate is located at 208 volts) require a separate 30-amp circuit. ■ A time-delay fuse or circuit breaker is properly grounded. Double Ovens Double Ovens Installed in...
... Double Oven A. Cabinet Dimensions - Single or Double Ovens A B E C D E C 27" (68.6 cm) models A. 27" (68.6 cm) min. cutout height 30" (76.2 cm) models A. 30" (76.2 cm) min. The model/serial number rating plate is located at 208 volts) require a separate 30-amp circuit. ■ A time-delay fuse or circuit breaker is properly grounded. Double Ovens Double Ovens Installed in...

Installation Guide
Page 5
... electrical connector manufacturer's recommended procedure. Decide on a covered work surface. Remove and set the oven onto cardboard prior to avoid drilling into or severing wiring during installation. Remove junction box cover if it will no longer close. Connect the aluminum wiring to the... conduit provided is for joining copper to the oven's final location. Open the oven door. 2. Install a UL listed or CSA approved conduit connector to the junction box. Oven door latch in back or other parts from the oven through flexible, armored or nonmetallic sheathed, copper cable...
... electrical connector manufacturer's recommended procedure. Decide on a covered work surface. Remove and set the oven onto cardboard prior to avoid drilling into or severing wiring during installation. Remove junction box cover if it will no longer close. Connect the aluminum wiring to the... conduit provided is for joining copper to the oven's final location. Open the oven door. 2. Install a UL listed or CSA approved conduit connector to the junction box. Oven door latch in back or other parts from the oven through flexible, armored or nonmetallic sheathed, copper cable...
Installation Guide
Page 6
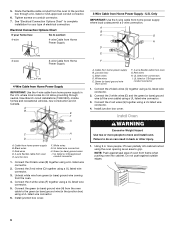
... IMPORTANT: Use the 3-wire cable from home power supply in Canada. Junction box C. White wires E. Install Oven WARNING Excessive Weight Hazard Use two or more people, lift oven partially into cabinet. Do not push against seal area of the oven cable) using a UL listed wire connector. 6. Green (or bare) ground wires I A. Connect the 2 black...
... IMPORTANT: Use the 3-wire cable from home power supply in Canada. Junction box C. White wires E. Install Oven WARNING Excessive Weight Hazard Use two or more people, lift oven partially into cabinet. Do not push against seal area of the oven cable) using a UL listed wire connector. 6. Green (or bare) ground wires I A. Connect the 2 black...

Installation Guide
Page 7
... screws through the steps to the side of the vent, fasten vent securely to select the oven you are now installed. Repeat for heat. Check that you purchased your tools. 3. Dispose of Single Oven" steps 2-6. On some models, the oven vent is an extra part, go and open and close. A B A. #8-14 x ³⁄₈" screw...
... screws through the steps to the side of the vent, fasten vent securely to select the oven you are now installed. Repeat for heat. Check that you purchased your tools. 3. Dispose of Single Oven" steps 2-6. On some models, the oven vent is an extra part, go and open and close. A B A. #8-14 x ³⁄₈" screw...


