Use & Care Guide
Page 1
... For questions about features, operation/performance, parts accessories or service, call: 1-800-422-1230 In Canada, for assistance, installation and service, call: 1-800-807-6777 or visit our website at... www.kitchenaid.com or www.kitchenaid.ca FOURS ÉLECTRIQUES ENCASTRÉS SIMPLE ET DOUBLE Guide d'utilisation et d'entretien Au Canada, pour assistance...
... For questions about features, operation/performance, parts accessories or service, call: 1-800-422-1230 In Canada, for assistance, installation and service, call: 1-800-807-6777 or visit our website at... www.kitchenaid.com or www.kitchenaid.ca FOURS ÉLECTRIQUES ENCASTRÉS SIMPLE ET DOUBLE Guide d'utilisation et d'entretien Au Canada, pour assistance...

Use & Care Guide
Page 3
...a towel or other flammable materials contact heating elements or interior surfaces of injury, and tell you what the potential hazard is properly installed and grounded by a qualified technician. ■ Never Use the Oven for a good seal. IMPORTANT SAFETY INSTRUCTIONS WARNING: To reduce... burns. This is cool. WARNING You can kill or hurt you don't follow basic precautions, including the following: ■ Proper Installation - All safety messages will follow instructions. Children should never be killed or seriously injured if you and others are oven vent openings...
...a towel or other flammable materials contact heating elements or interior surfaces of injury, and tell you what the potential hazard is properly installed and grounded by a qualified technician. ■ Never Use the Oven for a good seal. IMPORTANT SAFETY INSTRUCTIONS WARNING: To reduce... burns. This is cool. WARNING You can kill or hurt you don't follow basic precautions, including the following: ■ Proper Installation - All safety messages will follow instructions. Children should never be killed or seriously injured if you and others are oven vent openings...
Use & Care Guide
Page 18
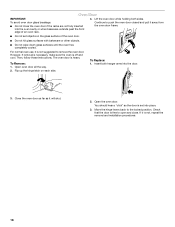
... each side. 3. To Remove: 1. Open oven door all the way. Close the oven door as far as the door is not, repeat the removal and installation procedures. 18 Check that the door is heavy. To avoid oven door glass breakage: ■ Do not close . Then, follow these instructions. The oven door...
... each side. 3. To Remove: 1. Open oven door all the way. Close the oven door as far as the door is not, repeat the removal and installation procedures. 18 Check that the door is heavy. To avoid oven door glass breakage: ■ Do not close . Then, follow these instructions. The oven door...

Use & Care Guide
Page 19
... a reliable cookbook. ■ Is the proper oven temperature calibration set ? See "Positioning Racks and Bakeware" section. ■ Is there proper air circulation around bakeware? See Installation Instructions. See "Control Lock" section. ■ Is the Sabbath Mode set ? See "Oven Temperature Control" section. ■ Was the oven preheated? Oven will not operate...
... a reliable cookbook. ■ Is the proper oven temperature calibration set ? See "Positioning Racks and Bakeware" section. ■ Is there proper air circulation around bakeware? See Installation Instructions. See "Control Lock" section. ■ Is the Sabbath Mode set ? See "Oven Temperature Control" section. ■ Was the oven preheated? Oven will not operate...
Use & Care Guide
Page 20
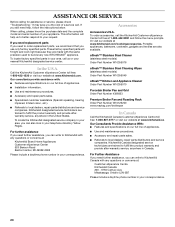
...afterwarranty service, anywhere in Canada. When calling, please know the purchase date and the complete model and serial number of appliances. ■ Installation information. ■ Use and maintenance procedures. ■ Accessory and repair parts sales. ■ Specialized customer assistance (Spanish speaking, hearing ... follow the menu prompts. Or visit our website at 1-800-442-9991 and follow the instructions below. To locate the KitchenAid designated service company in your area, you need help us or your correspondence. 20 Mississauga, Ontario L5N 0B7 Please include ...
...afterwarranty service, anywhere in Canada. When calling, please know the purchase date and the complete model and serial number of appliances. ■ Installation information. ■ Use and maintenance procedures. ■ Accessory and repair parts sales. ■ Specialized customer assistance (Spanish speaking, hearing ... follow the menu prompts. Or visit our website at 1-800-442-9991 and follow the instructions below. To locate the KitchenAid designated service company in your area, you need help us or your correspondence. 20 Mississauga, Ontario L5N 0B7 Please include ...

Use & Care Guide
Page 21
... limited warranty. This major appliance is designed to be provided by KitchenAid. 5. DISCLAIMER OF IMPLIED WARRANTIES; Consumable parts are excluded from accident, alteration, misuse, abuse, fire, flood, acts of God, improper installation, installation not in accordance with electrical or plumbing codes, or use your... -home service is covered by calling KitchenAid. Costs associated with the removal from your home of your major appliance is used in the country in which it is installed in an inaccessible location or is not installed in materials or workmanship. This warranty...
... limited warranty. This major appliance is designed to be provided by KitchenAid. 5. DISCLAIMER OF IMPLIED WARRANTIES; Consumable parts are excluded from accident, alteration, misuse, abuse, fire, flood, acts of God, improper installation, installation not in accordance with electrical or plumbing codes, or use your... -home service is covered by calling KitchenAid. Costs associated with the removal from your home of your major appliance is used in the country in which it is installed in an inaccessible location or is not installed in materials or workmanship. This warranty...

Use & Care Guide
Page 22
You will need it. Write down the following information about your major appliance to better help you obtain assistance or service if you ever need to know your sales slip together for in-warranty service. You can find this book and your complete model number and serial number. Dealer name Address Phone number Model number Serial number Purchase date 22 You must provide proof of purchase or installation date for future reference. Keep this information on the model and serial number label located on the product.
You will need it. Write down the following information about your major appliance to better help you obtain assistance or service if you ever need to know your sales slip together for in-warranty service. You can find this book and your complete model number and serial number. Dealer name Address Phone number Model number Serial number Purchase date 22 You must provide proof of purchase or installation date for future reference. Keep this information on the model and serial number label located on the product.
Dimension Guide
Page 1
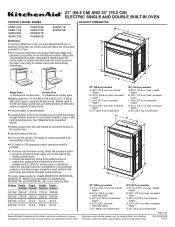
...we reserve the right to change without notice. 27" (68.6 cm) models A. 28 72.8 cm) max. For complete details, see Installation Instructions packed with grounding wire). q Oven must be using special connectors and/or tools designed and UL listed for it here. q Connect ... BUILT-IN OVEN PRODUCT MODEL SERIES PRODUCT DIMENSIONS KEBK101B KEBK171B KEBK206B KEBK276B KEBS109B KEBS179B KEBS207B KEBS209B KEBS277B KEBS279B Electrical: To properly install your oven, you must determine the type of electrical connection you will be connected to the proper electrical voltage and frequency ...
...we reserve the right to change without notice. 27" (68.6 cm) models A. 28 72.8 cm) max. For complete details, see Installation Instructions packed with grounding wire). q Oven must be using special connectors and/or tools designed and UL listed for it here. q Connect ... BUILT-IN OVEN PRODUCT MODEL SERIES PRODUCT DIMENSIONS KEBK101B KEBK171B KEBK206B KEBK276B KEBS109B KEBS179B KEBS207B KEBS209B KEBS277B KEBS279B Electrical: To properly install your oven, you must determine the type of electrical connection you will be connected to the proper electrical voltage and frequency ...
Dimension Guide
Page 2
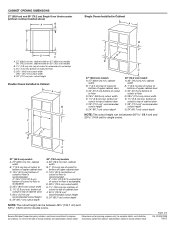
...Oven Undercounter (without notice. cabinet width on 30" (76.2 cm) models B. 1¹⁄₂" (3.8 cm) min. For complete details, see Installation our products, we reserve the right to top of cabinet door F. 28" (71.2 cm)* recommended cutout height G. 24" (60.7 cm) ...) cutout depth 30" (76.2 cm) models A. 30" (76.2 cm) min. bottom of cutout to top of cutout to change materials and specifications without cooktop installed above) A B Single Ovens Installed in Cabinet A B D F G E C B D F G E C 27" (68.6 cm) models A. 27" (68.6 cm) min. D. 28¹⁄₂" (72...
...Oven Undercounter (without notice. cabinet width on 30" (76.2 cm) models B. 1¹⁄₂" (3.8 cm) min. For complete details, see Installation our products, we reserve the right to top of cabinet door F. 28" (71.2 cm)* recommended cutout height G. 24" (60.7 cm) ...) cutout depth 30" (76.2 cm) models A. 30" (76.2 cm) min. bottom of cutout to top of cutout to change materials and specifications without cooktop installed above) A B Single Ovens Installed in Cabinet A B D F G E C B D F G E C 27" (68.6 cm) models A. 27" (68.6 cm) min. D. 28¹⁄₂" (72...
Installation Guide
Page 1
... you and others are not followed. IMPORTANT: Save for Multiple Cabinet Cutout Heights .......7 Make Electrical Connection 10 Install Oven 12 Complete Installation 14 EXIGENCES D'INSTALLATION 17 Outillage et pièces 17 Exigences d'emplacement 18 Spécifications électriques 20 INSTRUCTIONS...Positionnement des pieds du four pour des ouvertures d'encastrement de hauteur différente 23 Raccordement électrique 26 Installation du four 28 Achever l'installation 30 BUILT-IN OVEN SAFETY Your safety and the safety of injury, and tell you what the potential hazard ...
... you and others are not followed. IMPORTANT: Save for Multiple Cabinet Cutout Heights .......7 Make Electrical Connection 10 Install Oven 12 Complete Installation 14 EXIGENCES D'INSTALLATION 17 Outillage et pièces 17 Exigences d'emplacement 18 Spécifications électriques 20 INSTRUCTIONS...Positionnement des pieds du four pour des ouvertures d'encastrement de hauteur différente 23 Raccordement électrique 26 Installation du four 28 Achever l'installation 30 BUILT-IN OVEN SAFETY Your safety and the safety of injury, and tell you what the potential hazard ...

Installation Guide
Page 2
... supply. double oven ■ Two front feet - Refer to make sure that the junction box be made by a licensed, qualified electrical installer. *Grommets not included with models KEBK171B, KEBK101B, KEBK276B, KEBK206B, KEBS179B, KEBS109B, KEBS277B, KEBS279B, KEBS207B, KEBS209B, KEBU109B and KEBU209B. **...: Observe all electrical connections be located in the right rear or left cabinet. See "Electrical Requirements." NOTE: For undercounter installation, it is recommended that are shown must provide complete enclosure around the recessed portion of 194°F (90°C). IMPORTANT...
... supply. double oven ■ Two front feet - Refer to make sure that the junction box be made by a licensed, qualified electrical installer. *Grommets not included with models KEBK171B, KEBK101B, KEBK276B, KEBK206B, KEBS179B, KEBS109B, KEBS277B, KEBS279B, KEBS207B, KEBS209B, KEBU109B and KEBU209B. **...: Observe all electrical connections be located in the right rear or left cabinet. See "Electrical Requirements." NOTE: For undercounter installation, it is recommended that are shown must provide complete enclosure around the recessed portion of 194°F (90°C). IMPORTANT...
Installation Guide
Page 3
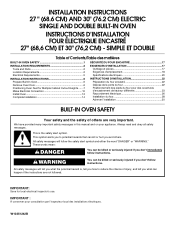
Single Ovens B Single Ovens Installed in Cabinet A B D C F A G E D E 27" (68.6 cm) models A. 28¾" (72.8 cm) max. bottom of cabinet door F. 28" (71.2 cm)* recommended cutout height G. 24" (60.7 cm) cutout ... single ovens. recessed depth E. 27" (68.6 cm) overall width 30" (76.2 cm) models A. 28¾" (72.8 cm) max. Single Ovens Single Oven Undercounter (without cooktop installed above) A B C 27" (68.6 cm) models A. 27" (68.6 cm) min. recessed depth E. 30" (76.2 cm) overall width Cabinet Dimensions - cabinet width B. 1¹⁄₂" (3.8 cm) min...
Single Ovens B Single Ovens Installed in Cabinet A B D C F A G E D E 27" (68.6 cm) models A. 28¾" (72.8 cm) max. bottom of cabinet door F. 28" (71.2 cm)* recommended cutout height G. 24" (60.7 cm) cutout ... single ovens. recessed depth E. 27" (68.6 cm) overall width 30" (76.2 cm) models A. 28¾" (72.8 cm) max. Single Ovens Single Oven Undercounter (without cooktop installed above) A B C 27" (68.6 cm) models A. 27" (68.6 cm) min. recessed depth E. 30" (76.2 cm) overall width Cabinet Dimensions - cabinet width B. 1¹⁄₂" (3.8 cm) min...

Installation Guide
Page 4
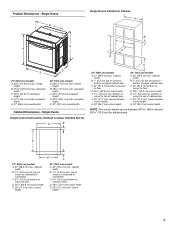
Double Ovens Double Ovens Installed in Cabinet A A C B D F E D 27" (68.6 cm) models A. 51 130.0 cm) max. overall height B. 25 64.6 cm) max. overall height B. 28½" (72.4 cm) max. cabinet width B. 1" (2.5 ...
Double Ovens Double Ovens Installed in Cabinet A A C B D F E D 27" (68.6 cm) models A. 51 130.0 cm) max. overall height B. 25 64.6 cm) max. overall height B. 28½" (72.4 cm) max. cabinet width B. 1" (2.5 ...
Installation Guide
Page 5
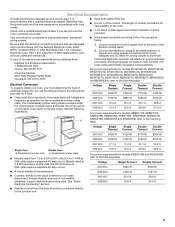
...W 3122 W 6190 W 6212 W 240 VAC 17.1 A 17.2 A 34.1 A 34.2 A Single Oven Double Oven A. Check with a qualified electrical installer if you will be provided. ■ If the house has aluminum wiring, follow the instructions provided for models WOS51EC7A, WOS51EC0A, WOD51EC7A, WOD51EC0A, WOS92EC7A, WOS92EC0A,...electrical voltage and frequency as specified on double ovens. For power requirements for it is recommended that a qualified electrical installer determine that the electrical connection and wire size are adequate and in accordance with local codes. See "Make Electrical ...
...W 3122 W 6190 W 6212 W 240 VAC 17.1 A 17.2 A 34.1 A 34.2 A Single Oven Double Oven A. Check with a qualified electrical installer if you will be provided. ■ If the house has aluminum wiring, follow the instructions provided for models WOS51EC7A, WOS51EC0A, WOD51EC7A, WOD51EC0A, WOS92EC7A, WOS92EC0A,...electrical voltage and frequency as specified on double ovens. For power requirements for it is recommended that a qualified electrical installer determine that the electrical connection and wire size are adequate and in accordance with local codes. See "Make Electrical ...
Installation Guide
Page 6
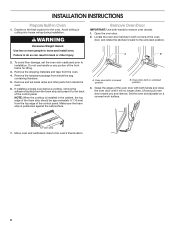
...;" (10 mm) from inside the bag containing literature. 5. Move oven and cardboard close . Avoid drilling or cutting into house wiring during installation. Remove Oven Door IMPORTANT: Use both hands to the oven's final location. 6 Remove and set the oven onto cardboard prior to the ... oven. To avoid floor damage, set aside racks and other injury. Oven door latch in locked position B. Open the oven door. 2. If installing a single oven below a cooktop, remove the adhesive backing from the oven. 4. Oven door latch in unlocked position 3. Remove the shipping materials...
...;" (10 mm) from inside the bag containing literature. 5. Move oven and cardboard close . Avoid drilling or cutting into house wiring during installation. Remove Oven Door IMPORTANT: Use both hands to the oven's final location. 6 Remove and set the oven onto cardboard prior to the ... oven. To avoid floor damage, set aside racks and other injury. Oven door latch in locked position B. Open the oven door. 2. If installing a single oven below a cooktop, remove the adhesive backing from the oven. 4. Oven door latch in unlocked position 3. Remove the shipping materials...
Installation Guide
Page 7
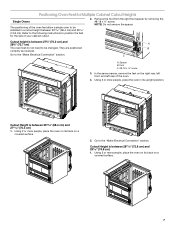
... the following instructions to position the feet for Multiple Cabinet Cutout Heights Single Ovens The positioning of the oven feet allow a single oven to be installed in its back on a covered surface. 5.
... the following instructions to position the feet for Multiple Cabinet Cutout Heights Single Ovens The positioning of the oven feet allow a single oven to be installed in its back on a covered surface. 5.
Installation Guide
Page 8
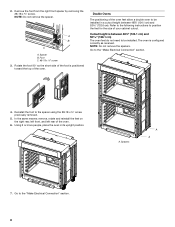
..., left front, and left rear of the oven. Go to position the feet for the size of the oven feet allow a double oven to be installed. Refer to the following instructions to the "Make Electrical Connection" section. 4. NOTE: Do not remove the spacers. Using 2 or more people, place the oven in...
..., left front, and left rear of the oven. Go to position the feet for the size of the oven feet allow a double oven to be installed. Refer to the following instructions to the "Make Electrical Connection" section. 4. NOTE: Do not remove the spacers. Using 2 or more people, place the oven in...

Installation Guide
Page 9
... foot so the short side of the foot is facing A toward the top of the oven. Spacer 5. Foot C. #8-18 x ³⁄₈" screw 3. Install a foot on the left front spacer using a #8-18 x ³⁄₈" screw. Foot C. #8-18 x ³⁄₈" screw 3. NOTE: Position the...NOTE: Position the foot so the long side of the oven. Front foot B. #8-18 x ³⁄₈" screw C. Install a foot on a covered surface. 2. A B C A. In the same manner, install a foot on the right front of the foot is facing toward the oven as shown. 7. Using 2 or more people, ...
... foot so the short side of the foot is facing A toward the top of the oven. Spacer 5. Foot C. #8-18 x ³⁄₈" screw 3. Install a foot on the left front spacer using a #8-18 x ³⁄₈" screw. Foot C. #8-18 x ³⁄₈" screw 3. NOTE: Position the...NOTE: Position the foot so the long side of the oven. Front foot B. #8-18 x ³⁄₈" screw C. Install a foot on a covered surface. 2. A B C A. In the same manner, install a foot on the right front of the foot is facing toward the oven as shown. 7. Using 2 or more people, ...

Installation Guide
Page 10
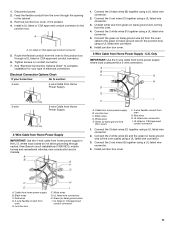
... instructions can result in death, fire, or electrical shock. Use 12 gauge solid copper wire. This oven is facing away from the oven as shown. 6. Install a front foot on the right front of the foot is manufactured with a neutral (white) power supply wire and a cabinet-connected green (or bare) ground wire...
... instructions can result in death, fire, or electrical shock. Use 12 gauge solid copper wire. This oven is facing away from the oven as shown. 6. Install a front foot on the right front of the foot is manufactured with a neutral (white) power supply wire and a cabinet-connected green (or bare) ground wire...
Installation Guide
Page 11
... oven cable to the green (or bare) ground wire (in the cabinet. 3. Tighten screws on conduit connector. 7. Junction box C. Red wires H. UL listed wire connectors I . Install junction box cover. Red wires D. 4-wire flexible conduit from home power supply B. Junction box H I F A. A B E F G 1. A B C G H D E I F....recreational vehicles, new construction and in the U.S. Connect the 2 black wires (B) together using a UL listed wire connector. 4. Install junction box cover. 3-Wire Cable from home power supply B. Cable from Home Power Supply - Connect the 2 black wires ...
... oven cable to the green (or bare) ground wire (in the cabinet. 3. Tighten screws on conduit connector. 7. Junction box C. Red wires H. UL listed wire connectors I . Install junction box cover. Red wires D. 4-wire flexible conduit from home power supply B. Junction box H I F A. A B E F G 1. A B C G H D E I F....recreational vehicles, new construction and in the U.S. Connect the 2 black wires (B) together using a UL listed wire connector. 4. Install junction box cover. 3-Wire Cable from home power supply B. Cable from Home Power Supply - Connect the 2 black wires ...


