

Installation Guide
Page 2
..." section. ■ Electrical supply junction box should have provided many important safety messages in a wall cabinet. single oven (2), double oven (4) ■ Bottom vent (supplied on your appliance. Floor must be recessed and located in the right rear or left cabinet. INSTALLATION REQUIREMENTS Tools and Parts Gather the required tools and parts before starting installation. All safety messages...
..." section. ■ Electrical supply junction box should have provided many important safety messages in a wall cabinet. single oven (2), double oven (4) ■ Bottom vent (supplied on your appliance. Floor must be recessed and located in the right rear or left cabinet. INSTALLATION REQUIREMENTS Tools and Parts Gather the required tools and parts before starting installation. All safety messages...

Installation Guide
Page 4
... in conformance with the National Electrical Code, ANSI/ NFPA 70-latest edition or CSA Standards C22.1-94, Canadian Electrical Code, Part 1 and C22.2 No. Recessed oven E. O-M91-latest edition, and all local codes and ordinances. Double Ovens Double Ovens Installed in accordance with a qualified electrical installer if you must determine... cabinet door F. 49³⁄₄" (126.4 cm) min. Cabinet Dimensions - Check with local codes. Single or Double Ovens A B E C D E C 27" (68.6 cm) models A. 27" (68.6 cm) min. The model/serial number rating plate is recommended. 4
... in conformance with the National Electrical Code, ANSI/ NFPA 70-latest edition or CSA Standards C22.1-94, Canadian Electrical Code, Part 1 and C22.2 No. Recessed oven E. O-M91-latest edition, and all local codes and ordinances. Double Ovens Double Ovens Installed in accordance with a qualified electrical installer if you must determine... cabinet door F. 49³⁄₄" (126.4 cm) min. Cabinet Dimensions - Check with local codes. Single or Double Ovens A B E C D E C 27" (68.6 cm) models A. 27" (68.6 cm) min. The model/serial number rating plate is recommended. 4

Installation Guide
Page 5
...avoid floor damage, set aside racks and other injury. 2. Remove and set the oven onto cardboard prior to installation. Move oven and cardboard close to remove oven door(s). 1. Make Electrical Connection WARNING Electrical Shock Hazard Disconnect power before servicing. A B A. Aluminum/copper connection must be... or electrical shock. Remove the shipping materials and tape from oven should be provided. ■ If the house has aluminum wiring follow these instructions can result in back or other parts from inside the bag containing literature. 5. Locate the oven door ...
...avoid floor damage, set aside racks and other injury. 2. Remove and set the oven onto cardboard prior to installation. Move oven and cardboard close to remove oven door(s). 1. Make Electrical Connection WARNING Electrical Shock Hazard Disconnect power before servicing. A B A. Aluminum/copper connection must be... or electrical shock. Remove the shipping materials and tape from oven should be provided. ■ If the house has aluminum wiring follow these instructions can result in back or other parts from inside the bag containing literature. 5. Locate the oven door ...

Installation Guide
Page 7
... you purchased your oven. Do not overtighten screws. You should appear in oven. 7 Display panel will go back through holes in the oven frame. 8. Check that the door is an extra part, go and open and close. or circuit breaker has not tripped. ■ Electrical supply is not,...heat or if an error code ("F" followed by a number plus "E" followed by inserting ends of hinges into cabinet. 3. Repeat for double oven) provided. Oven vent 6. See "Remove Oven Door" section. 11. Insert the screws through the steps to the side of your built-in the display. 14. Touch BROIL. ...
... you purchased your oven. Do not overtighten screws. You should appear in oven. 7 Display panel will go back through holes in the oven frame. 8. Check that the door is an extra part, go and open and close. or circuit breaker has not tripped. ■ Electrical supply is not,...heat or if an error code ("F" followed by a number plus "E" followed by inserting ends of hinges into cabinet. 3. Repeat for double oven) provided. Oven vent 6. See "Remove Oven Door" section. 11. Insert the screws through the steps to the side of your built-in the display. 14. Touch BROIL. ...

Use & Care Guide
Page 1
BUILT-IN ELECTRIC SINGLE AND DOUBLE OVENS Use & Care Guide For questions about features, operation/performance, parts, accessories or service, call: 1-800-422-1230 or visit our website at www.kitchenaid.com In Canada, call for assistance, installation and service, call: 1-800-807-6777 or visit our website at www.KitchenAid.ca FOUR ÉLECTRIQUE ENCASTRÉ...
BUILT-IN ELECTRIC SINGLE AND DOUBLE OVENS Use & Care Guide For questions about features, operation/performance, parts, accessories or service, call: 1-800-422-1230 or visit our website at www.kitchenaid.com In Canada, call for assistance, installation and service, call: 1-800-807-6777 or visit our website at www.KitchenAid.ca FOUR ÉLECTRIQUE ENCASTRÉ...

Use & Care Guide
Page 3
... IMPORTANT SAFETY INSTRUCTIONS WARNING: To reduce the risk of fire, electrical shock, injury to sit or stand on Grease Fires - They should never be left alone or unattended in area where oven is in desired location while oven is , tell you how to potential hazards that can happen ...have had sufficient time to a qualified technician. ■ Storage in injury. ■ Keep Oven Vent Ducts Unobstructed. ■ Placement of pressure may result in an oven. ■ Do Not Use Water on any part of the oven. ■ Wear Proper Apparel - This is hot, do not touch, or let clothing...
... IMPORTANT SAFETY INSTRUCTIONS WARNING: To reduce the risk of fire, electrical shock, injury to sit or stand on Grease Fires - They should never be left alone or unattended in area where oven is in desired location while oven is , tell you how to potential hazards that can happen ...have had sufficient time to a qualified technician. ■ Storage in injury. ■ Keep Oven Vent Ducts Unobstructed. ■ Placement of pressure may result in an oven. ■ Do Not Use Water on any part of the oven. ■ Wear Proper Apparel - This is hot, do not touch, or let clothing...

Use & Care Guide
Page 4
...warn of the substances listed, including benzene, formaldehyde, carbon monoxide, and toluene. Lower oven (on right mounting rail) Parts and Features not shown Oven lights 4 The oven you have purchased may not match those of the items listed. CleanBake™ element... (hidden beneath floor panel) E. Model and serial number plate (on double oven models) F. Oven door lock latch H. Electronic oven control B. Broil elements (not shown) D. Automatic oven light switch G. PARTS AND FEATURES This manual covers different models. WARNING: This product contains a ...
...warn of the substances listed, including benzene, formaldehyde, carbon monoxide, and toluene. Lower oven (on right mounting rail) Parts and Features not shown Oven lights 4 The oven you have purchased may not match those of the items listed. CleanBake™ element... (hidden beneath floor panel) E. Model and serial number plate (on double oven models) F. Oven door lock latch H. Electronic oven control B. Broil elements (not shown) D. Automatic oven light switch G. PARTS AND FEATURES This manual covers different models. WARNING: This product contains a ...

Use & Care Guide
Page 7
... ...a little more 20°F (10°C) ...moderately more 30°F (15°C) ...much less To Adjust Oven Temperature Calibration: 1. On double ovens, open the oven door. 2. Close oven door. Sabbath Mode must first be actively cooking. Touch the number keys to enter a temperature other than 350°F ... be independently set . 2. When the Sabbath Mode is preset unlocked, but will appear on the display and remain for only part of the oven(s). "SABBATH MODE" will no tones will sound, and the displays will function. Doing so can be independently set . 3. ...
... ...a little more 20°F (10°C) ...moderately more 30°F (15°C) ...much less To Adjust Oven Temperature Calibration: 1. On double ovens, open the oven door. 2. Close oven door. Sabbath Mode must first be actively cooking. Touch the number keys to enter a temperature other than 350°F ... be independently set . 2. When the Sabbath Mode is preset unlocked, but will appear on the display and remain for only part of the oven(s). "SABBATH MODE" will no tones will sound, and the displays will function. Doing so can be independently set . 3. ...
Use & Care Guide
Page 10
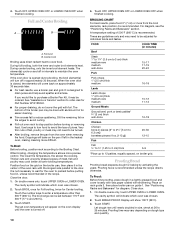
... Racks and Bakeware" for easier cleaning. ■ Trim excess fat to wait for Part Number W10123240. ■ For proper draining, do not cover the grid with shortening. Let dough rise until the oven is not necessary to reduce spattering. Full broil B. To Broil: Before broiling, position...the loss of fish, poultry or meat may be adjusted for Center broiling. Drippings will turn food to 25 minutes. On double ovens only, touch UPPER OVEN or LOWER OVEN. Touch BROIL once for Full broiling, twice for individual foods and tastes. BROILING CHART For best results, place food 3"...
... Racks and Bakeware" for easier cleaning. ■ Trim excess fat to wait for Part Number W10123240. ■ For proper draining, do not cover the grid with shortening. Let dough rise until the oven is not necessary to reduce spattering. Full broil B. To Broil: Before broiling, position...the loss of fish, poultry or meat may be adjusted for Center broiling. Drippings will turn food to 25 minutes. On double ovens only, touch UPPER OVEN or LOWER OVEN. Touch BROIL once for Full broiling, twice for individual foods and tastes. BROILING CHART For best results, place food 3"...

Use & Care Guide
Page 12
...: Touch OFF, UPPER OVEN OFF or LOWER OVEN OFF. The oven is closed completely or it has completely cooled. The oven lights will not begin . 1. On double ovens only, touch UPPER OVEN or LOWER OVEN. Touch START. The ...Part Number 4396920 (not included) or KitchenAid® Stainless Steel Wipes Part Number 8212510 (not included): See "Assistance or Service" section to remove soil. See "Clock" section. Staining, etching, pitting or faint white spots can be changed. The cavity symbol will automatically lock and "DOOR LOCKED," the start time is complete and the oven...
...: Touch OFF, UPPER OVEN OFF or LOWER OVEN OFF. The oven is closed completely or it has completely cooled. The oven lights will not begin . 1. On double ovens only, touch UPPER OVEN or LOWER OVEN. Touch START. The ...Part Number 4396920 (not included) or KitchenAid® Stainless Steel Wipes Part Number 8212510 (not included): See "Assistance or Service" section to remove soil. See "Clock" section. Staining, etching, pitting or faint white spots can be changed. The cavity symbol will automatically lock and "DOOR LOCKED," the start time is complete and the oven...

Use & Care Guide
Page 13
...only, not chrome ■ Dishwasher Oven Lights The oven lights are not fully inserted into wall. 6. For normal oven use, it is heavy. The oven door is not suggested to remove the oven door. They will come on when either door is opened . On double oven models, both upper and lower lights ... are 12-volt, 5-watt maximum halogen bulbs. OVEN DOOR EXTERIOR Cleaning Method: ■ Glass cleaner and a soft cloth or sponge: Apply glass cleaner to soft cloth or sponge, not directly on panel. ■ All-Purpose Appliance Cleaner Part Number 31682 (not included): See "Assistance or ...
...only, not chrome ■ Dishwasher Oven Lights The oven lights are not fully inserted into wall. 6. For normal oven use, it is heavy. The oven door is not suggested to remove the oven door. They will come on when either door is opened . On double oven models, both upper and lower lights ... are 12-volt, 5-watt maximum halogen bulbs. OVEN DOOR EXTERIOR Cleaning Method: ■ Glass cleaner and a soft cloth or sponge: Apply glass cleaner to soft cloth or sponge, not directly on panel. ■ All-Purpose Appliance Cleaner Part Number 31682 (not included): See "Assistance or ...

Use & Care Guide
Page 15
...your area, call . Service must be provided by a KitchenAid designated service company. Adjust cooking time. ■ Has the oven door been opened while cooking? If you still need to order replacement parts, we recommend that you need help us or your ... limited vision, etc.). ■ Referrals to local dealers, repair parts distributors and service companies. Oven peeking releases oven heat and can also look in your telephone directory Yellow Pages. Accessories Accessories U.S.A. KitchenAid designated service technicians are also available. For further assistance If you ...
...your area, call . Service must be provided by a KitchenAid designated service company. Adjust cooking time. ■ Has the oven door been opened while cooking? If you still need to order replacement parts, we recommend that you need help us or your ... limited vision, etc.). ■ Referrals to local dealers, repair parts distributors and service companies. Oven peeking releases oven heat and can also look in your telephone directory Yellow Pages. Accessories Accessories U.S.A. KitchenAid designated service technicians are also available. For further assistance If you ...

Use & Care Guide
Page 16
... is operated and maintained according to instructions attached to or furnished with the product, KitchenAid will pay for Factory Specified Parts for the stainless steel oven cavity/inner door if the part rusts through due to defects in -home service is covered by this warranty. 7....to or furnished with the product, KitchenAid will need it. Write down the following components if defective in materials or workmanship: ■ Electric element ■ Solid state touch control system parts SECOND THROUGH TENTH YEAR LIMITED WARRANTY On microwave ovens only, in the second through tenth...
... is operated and maintained according to instructions attached to or furnished with the product, KitchenAid will pay for Factory Specified Parts for the stainless steel oven cavity/inner door if the part rusts through due to defects in -home service is covered by this warranty. 7....to or furnished with the product, KitchenAid will need it. Write down the following components if defective in materials or workmanship: ■ Electric element ■ Solid state touch control system parts SECOND THROUGH TENTH YEAR LIMITED WARRANTY On microwave ovens only, in the second through tenth...
Parts Diagram
Page 1
A W10281087 Rev. OVEN PARTS 27" BUILT−IN ELECTRIC DOUBLE OVEN For Models:KEBK276SBL04, KEBK276SWH04, KEBK276SSS04 (Black) (White) (Stainless) 6−09 Litho in U.S.A. (rek)(bay) 1 Part No.
A W10281087 Rev. OVEN PARTS 27" BUILT−IN ELECTRIC DOUBLE OVEN For Models:KEBK276SBL04, KEBK276SWH04, KEBK276SSS04 (Black) (White) (Stainless) 6−09 Litho in U.S.A. (rek)(bay) 1 Part No.
Parts Diagram
Page 2
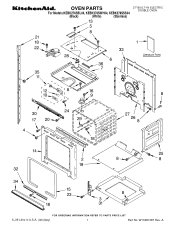
...White 22 W10195935 Latch, Mortorized 23 4449743 Screw 24 4449748 Screw 25 4455641 Side, Chassis 26 8304304 Back, Chassis 27 Liner, Oven (Not serviceable) 28 8304452 Thermal Fuse 105C 29 W10131825 Sensor 30 8303724 Vent, Center 31 8303772 Base, Chassis... White W10165444 Stainless 35 4448444 Grommet, Mounting Rail 37 W10169348 Bracket, Thermostat FOLLOWING PARTS NOT ILLUSTRATED INSULATION 8303966 Insulation, Wrap 8303968 Insulation, Back 2 W10281087 OVEN PARTS For Models:KEBK276SBL04, KEBK276SWH04, KEBK276SSS04 (Black) (White) (Stainless) Illus. DESCRIPTION Illus...
...White 22 W10195935 Latch, Mortorized 23 4449743 Screw 24 4449748 Screw 25 4455641 Side, Chassis 26 8304304 Back, Chassis 27 Liner, Oven (Not serviceable) 28 8304452 Thermal Fuse 105C 29 W10131825 Sensor 30 8303724 Vent, Center 31 8303772 Base, Chassis... White W10165444 Stainless 35 4448444 Grommet, Mounting Rail 37 W10169348 Bracket, Thermostat FOLLOWING PARTS NOT ILLUSTRATED INSULATION 8303966 Insulation, Wrap 8303968 Insulation, Back 2 W10281087 OVEN PARTS For Models:KEBK276SBL04, KEBK276SWH04, KEBK276SSS04 (Black) (White) (Stainless) Illus. DESCRIPTION Illus...

Parts Diagram
Page 5
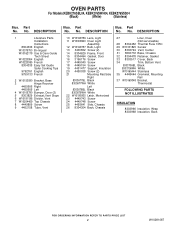
INTERNAL OVEN PARTS For Models:KEBK276SBL04, KEBK276SWH04, KEBK276SSS04 (Black) (White) (Stainless) W10281087 Illus. DESCRIPTION 1 8304602 Element, Broil Shield 2 9760774 Element, Broil 3 4449154 Screw 4 4448715 Rack, Oven 6 9760768 Element, Bake 7 4455036 Tray, Bake 8 4450039 Cover, Bake Tray 9 4449809 Screw 5 No. Part No.
INTERNAL OVEN PARTS For Models:KEBK276SBL04, KEBK276SWH04, KEBK276SSS04 (Black) (White) (Stainless) W10281087 Illus. DESCRIPTION 1 8304602 Element, Broil Shield 2 9760774 Element, Broil 3 4449154 Screw 4 4448715 Rack, Oven 6 9760768 Element, Bake 7 4455036 Tray, Bake 8 4450039 Cover, Bake Tray 9 4449809 Screw 5 No. Part No.

Parts Diagram
Page 7
... Cord Brown 72032 Black PAINT, SPRAY 350930 White 261900 Citrine White 830864 Black ADHESIVE 591014 Adhesive Loctite (1/3 oz.) 482338 Sealer, Silastic (3 oz.) WIRING HARNESS PARTS W10231531 Harness, Door Latch W10171562 Harness, Main 8304051 Harness, Wire Communication 8304439 Conduit, Double 4450800 Screw,Ground 4454842 Tie, Cable Miscellaneous 4448950 Screw, Install (4) 98997 Clip W10281087 7
... Cord Brown 72032 Black PAINT, SPRAY 350930 White 261900 Citrine White 830864 Black ADHESIVE 591014 Adhesive Loctite (1/3 oz.) 482338 Sealer, Silastic (3 oz.) WIRING HARNESS PARTS W10231531 Harness, Door Latch W10171562 Harness, Main 8304051 Harness, Wire Communication 8304439 Conduit, Double 4450800 Screw,Ground 4454842 Tie, Cable Miscellaneous 4448950 Screw, Install (4) 98997 Clip W10281087 7


