
Dimension Guide
Page 1
...23" (58.4 cm) max. recessed depth E. 49 125.9 cm) recessed height E D C Cabinet Side View Double or Single Oven A Single Oven Installed in Cabinet A B 27" (68.6 cm) models 30" (76.2 cm) models A. 27" (68.6 cm) min. cabinet width B. 1" (2.5 cm) top of cutout to bottom of upper cabinet door...1¹⁄₂" (3.8 cm) min. cutout height E C Double Oven Installed in Cabinet A B B. 29" (73.7 cm) ma C. 26³⁄₄" (67.9 cm) o F D. 23" (58.4 cm) ma D E. 27¹⁄₂" (69.9 cm) r 27" (68.6 cm) models A. 27" (68.6 cm) min. Models rated at 7.2 kW and ...
...23" (58.4 cm) max. recessed depth E. 49 125.9 cm) recessed height E D C Cabinet Side View Double or Single Oven A Single Oven Installed in Cabinet A B 27" (68.6 cm) models 30" (76.2 cm) models A. 27" (68.6 cm) min. cabinet width B. 1" (2.5 cm) top of cutout to bottom of upper cabinet door...1¹⁄₂" (3.8 cm) min. cutout height E C Double Oven Installed in Cabinet A B B. 29" (73.7 cm) ma C. 26³⁄₄" (67.9 cm) o F D. 23" (58.4 cm) ma D E. 27¹⁄₂" (69.9 cm) r 27" (68.6 cm) models A. 27" (68.6 cm) min. Models rated at 7.2 kW and ...

Installation Guide
Page 2
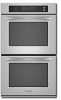
...not followed. This is recommended that the junction box be located in the upper or lower right or left corner of the cabinet; single oven (2), double oven (4) ■ Bottom vent (supplied on some models) Check local codes. Check existing electrical supply. It is the safety alert symbol....by a licensed, qualified electrical installer. See "Electrical Requirements." If you and others are installing the junction box on rear wall behind oven, the junction box must be recessed and located in the adjacent right or left cabinet. INSTALLATION REQUIREMENTS Tools and Parts ...
...not followed. This is recommended that the junction box be located in the upper or lower right or left corner of the cabinet; single oven (2), double oven (4) ■ Bottom vent (supplied on some models) Check local codes. Check existing electrical supply. It is the safety alert symbol....by a licensed, qualified electrical installer. See "Electrical Requirements." If you and others are installing the junction box on rear wall behind oven, the junction box must be recessed and located in the adjacent right or left cabinet. INSTALLATION REQUIREMENTS Tools and Parts ...

Installation Guide
Page 3
... cm) max. recessed depth E. 49 125.9 cm) recessed height 3 A B Product Dimensions - recessed width B. 28³⁄₄" (73.0 cm) max. Double Ovens A B E E D C 27" (68.6 cm) models A. 27" (68.6 cm) min. cabinet width B. 1¹⁄₂" (3.8 cm) min. recessed depth E. 49 125.9 cm) recessed height 30" (76.2 cm) ...;" (70.5 cm) min. overall height C. 26³⁄₄" (67.9 cm) overall width D. 23" (58.4 cm) max. Single Oven A F D E B E C D C 27" (68.6 cm) models A. 25 64.3 cm) max. cutout height 30" (76.2 cm) models A. 30" (76.2 cm) min. top...
... cm) max. recessed depth E. 49 125.9 cm) recessed height 3 A B Product Dimensions - recessed width B. 28³⁄₄" (73.0 cm) max. Double Ovens A B E E D C 27" (68.6 cm) models A. 27" (68.6 cm) min. cabinet width B. 1¹⁄₂" (3.8 cm) min. recessed depth E. 49 125.9 cm) recessed height 30" (76.2 cm) ...;" (70.5 cm) min. overall height C. 26³⁄₄" (67.9 cm) overall width D. 23" (58.4 cm) max. Single Oven A F D E B E C D C 27" (68.6 cm) models A. 25 64.3 cm) max. cutout height 30" (76.2 cm) models A. 30" (76.2 cm) min. top...

Installation Guide
Page 4
... plate ■ Models rated from : Electrical Connection To properly install your oven, you are in Cabinet A B F D Cabinet Side View - Single or Double Ovens A B E C D E C 27" (68.6 cm) models A. 27" (68.6 cm) min. bottom of cutout to a grounded metal, permanent wiring system. Oven front D. Model/serial number plate Double Oven A. O-M91-latest edition, and all local codes and ordinances. Models...
... plate ■ Models rated from : Electrical Connection To properly install your oven, you are in Cabinet A B F D Cabinet Side View - Single or Double Ovens A B E C D E C 27" (68.6 cm) models A. 27" (68.6 cm) min. bottom of cutout to a grounded metal, permanent wiring system. Oven front D. Model/serial number plate Double Oven A. O-M91-latest edition, and all local codes and ordinances. Models...

Installation Guide
Page 5
... box. Do not use handle or any portion of solid copper wire to the pigtail leads. 2. Remove and set the oven onto cardboard prior to remove oven door(s). 1. Move oven and cardboard close to the junction box. ■ Fuse both corners of the line. ■ Do not cut the ... Hazard Disconnect power before servicing. Grasp the edges of copper wire using special connectors and/or tools designed and UL listed for serviceability of the oven. ■ A UL listed or CSA approved conduit connector must conform with a neutral (white) power supply wire and a cabinet-connected green (or bare...
... box. Do not use handle or any portion of solid copper wire to the pigtail leads. 2. Remove and set the oven onto cardboard prior to remove oven door(s). 1. Move oven and cardboard close to the junction box. ■ Fuse both corners of the line. ■ Do not cut the ... Hazard Disconnect power before servicing. Grasp the edges of copper wire using special connectors and/or tools designed and UL listed for serviceability of the oven. ■ A UL listed or CSA approved conduit connector must conform with a neutral (white) power supply wire and a cabinet-connected green (or bare...
Installation Guide
Page 6
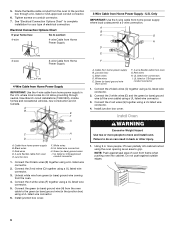
...189;" (1.3 cm) 3-wire Cable from Home Power Supply ½" (1.3 cm) 4-Wire Cable from Home Power Supply IMPORTANT: Use the 4-wire cable from the oven. 4. UL listed wire connectors H. Green (or bare) ground wires I . Connect the 2 black wires (B) together using a UL listed wire connector. 2. ... (1996 NEC), mobile homes and recreational vehicles, new construction and in the U.S. where local codes do so can result in the junction box) using the oven opening as an area to the green (or bare) ground wire (in back or other injury. 1. A B E F G C H D I F A. Connect the...
...189;" (1.3 cm) 3-wire Cable from Home Power Supply ½" (1.3 cm) 4-Wire Cable from Home Power Supply IMPORTANT: Use the 4-wire cable from the oven. 4. UL listed wire connectors H. Green (or bare) ground wires I . Connect the 2 black wires (B) together using a UL listed wire connector. 2. ... (1996 NEC), mobile homes and recreational vehicles, new construction and in the U.S. where local codes do so can result in the junction box) using the oven opening as an area to the green (or bare) ground wire (in back or other injury. 1. A B E F G C H D I F A. Connect the...

Installation Guide
Page 7
...connected. ■ See "Troubleshooting" section in mounting rails. If you do not feel for heat. See "Remove Oven Door" section. 11. Complete Installation 1. Dispose of Double Oven 1. When "CLOCK ENTER TIME" appears touch START. 3. or circuit breaker has not tripped. ■ Electrical supply ..., feel heat or if an error code ("F" followed by a number plus "E" followed by inserting ends of Single Oven 1. Replace oven racks. 7. Repeat for double oven) provided. When "CLOCK ENTER TIME" appears touch START. 3. Insert the screws through the steps to open the...
...connected. ■ See "Troubleshooting" section in mounting rails. If you do not feel for heat. See "Remove Oven Door" section. 11. Complete Installation 1. Dispose of Double Oven 1. When "CLOCK ENTER TIME" appears touch START. 3. or circuit breaker has not tripped. ■ Electrical supply ..., feel heat or if an error code ("F" followed by a number plus "E" followed by inserting ends of Single Oven 1. Replace oven racks. 7. Repeat for double oven) provided. When "CLOCK ENTER TIME" appears touch START. 3. Insert the screws through the steps to open the...

Use & Care Guide
Page 1
...les KEBK101 W10162179A KEBK171 KEBK206 KEBK276 BUILT-IN ELECTRIC SINGLE AND DOUBLE OVENS Use & Care Guide For questions about features, operation/performance, parts, accessories or service, call: 1-800-422-1230 or visit our website at www.kitchenaid.com In Canada, call for assistance, installation and service, call...: 1-800-807-6777 or visit our website at www.KitchenAid.ca FOUR ÉLECTRIQUE ENCASTRÉ SIMPLE ET DOUBLE Guide d'utilisation et d'entretien Au Canada, pour ...
...les KEBK101 W10162179A KEBK171 KEBK206 KEBK276 BUILT-IN ELECTRIC SINGLE AND DOUBLE OVENS Use & Care Guide For questions about features, operation/performance, parts, accessories or service, call: 1-800-422-1230 or visit our website at www.kitchenaid.com In Canada, call for assistance, installation and service, call...: 1-800-807-6777 or visit our website at www.KitchenAid.ca FOUR ÉLECTRIQUE ENCASTRÉ SIMPLE ET DOUBLE Guide d'utilisation et d'entretien Au Canada, pour ...

Use & Care Guide
Page 3
... removing or replacing food. ■ Do Not Heat Unopened Food Containers - During and after use . SAVE THESE INSTRUCTIONS 3 For self-cleaning ovens: ■ Do Not Clean Door Gasket - Remove broiler pan and other servicing should be allowed to sit or stand on Grease Fires - ...and on hot surfaces may become hot enough to rub, damage, or move the gasket. ■ Do Not Use Oven Cleaners - No commercial oven cleaner or oven liner protective coating of any kind should never be referred to potential hazards that can happen if the instructions are not...
... removing or replacing food. ■ Do Not Heat Unopened Food Containers - During and after use . SAVE THESE INSTRUCTIONS 3 For self-cleaning ovens: ■ Do Not Clean Door Gasket - Remove broiler pan and other servicing should be allowed to sit or stand on Grease Fires - ...and on hot surfaces may become hot enough to rub, damage, or move the gasket. ■ Do Not Use Oven Cleaners - No commercial oven cleaner or oven liner protective coating of any kind should never be referred to potential hazards that can happen if the instructions are not...

Use & Care Guide
Page 4
... cause cancer, birth defects, or other reproductive harm. This appliance can cause low-level exposure to such substances. The oven you have purchased may not match those of California to cause cancer, birth defects, or other reproductive harm, and requires... your model. Oven vent C. CleanBake™ element (hidden beneath floor panel) E. Gasket I E A. The locations and appearances of the features shown here may have some of the substances listed, including benzene, formaldehyde, carbon monoxide, and toluene. Model and serial number plate (on double oven models) F. ...
... cause cancer, birth defects, or other reproductive harm. This appliance can cause low-level exposure to such substances. The oven you have purchased may not match those of California to cause cancer, birth defects, or other reproductive harm, and requires... your model. Oven vent C. CleanBake™ element (hidden beneath floor panel) E. Gasket I E A. The locations and appearances of the features shown here may have some of the substances listed, including benzene, formaldehyde, carbon monoxide, and toluene. Model and serial number plate (on double oven models) F. ...

Use & Care Guide
Page 5
... symbol B. Time of the items listed. On double oven models, this display will appear on the oven display, an error condition has occurred. Single Oven Display A. Upper and lower oven Off (double oven models) Off (single oven models) H. Oven light A C A B B Double Oven Display A. will also show which oven is first supplied to the oven, the clock will be entered by touching either Clock...
... symbol B. Time of the items listed. On double oven models, this display will appear on the oven display, an error condition has occurred. Single Oven Display A. Upper and lower oven Off (double oven models) Off (single oven models) H. Oven light A C A B B Double Oven Display A. will also show which oven is first supplied to the oven, the clock will be entered by touching either Clock...
Use & Care Guide
Page 6
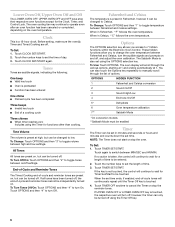
...Set: 1. Options The OPTIONS selection key allows you to low. Tones Tones are preset on . When in Celsius, "°C" follows the oven temperature. Touch CLOCK SET/START. 2. The Sabbath Mode is preheated ■ Function has been entered One chime ■ Preheat cycle has...clock. OPTIONS HIDDEN FUNCTION 1 Fahrenheit and Celsius conversion 2 Sound On/Off 3 Sound High/Low 4 End tone On/Off 5* Dehydrate 6 Oven temperature calibration 7** Sabbath Mode *On convection models **Sabbath Mode must be enabled Timer The Timer can be set in Fahrenheit, however it can...
...Set: 1. Options The OPTIONS selection key allows you to low. Tones Tones are preset on . When in Celsius, "°C" follows the oven temperature. Touch CLOCK SET/START. 2. The Sabbath Mode is preheated ■ Function has been entered One chime ■ Preheat cycle has...clock. OPTIONS HIDDEN FUNCTION 1 Fahrenheit and Celsius conversion 2 Sound On/Off 3 Sound High/Low 4 End tone On/Off 5* Dehydrate 6 Oven temperature calibration 7** Sabbath Mode *On convection models **Sabbath Mode must be enabled Timer The Timer can be set in Fahrenheit, however it can...

Use & Care Guide
Page 7
...on the display and remain for approximately 5 seconds, until re-enabled. The "ON" indicator will disable both ovens. 1. On double ovens, touch UPPER OVEN OFF or LOWER OVEN OFF. You may cook faster or slower than one time only setup. See the "To Activate" section. ...to avoid unintended use a thermometer to measure oven temperature because opening the oven door during cycling may give incorrect readings. On double oven models these steps will no longer be adjusted. On double ovens only, touch UPPER OVEN or LOWER OVEN. When disabled "SABBATH DISABLED" will no longer...
...on the display and remain for approximately 5 seconds, until re-enabled. The "ON" indicator will disable both ovens. 1. On double ovens, touch UPPER OVEN OFF or LOWER OVEN OFF. You may cook faster or slower than one time only setup. See the "To Activate" section. ...to avoid unintended use a thermometer to measure oven temperature because opening the oven door during cycling may give incorrect readings. On double oven models these steps will no longer be adjusted. On double ovens only, touch UPPER OVEN or LOWER OVEN. When disabled "SABBATH DISABLED" will no longer...
Use & Care Guide
Page 8
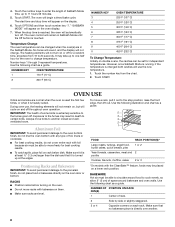
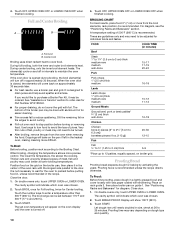
... slightly staggered. 3 or 4 Opposite corners on double ovens, the cavities can be able to move freely for the oven to circulate around bakeware and oven walls. NUMBER KEY OVEN TEMPERATURE 1 170°F (77°C) 2 200°F (95°C) NUMBER KEY 3 4 5 6 7 8 9 0 OVEN TEMPERATURE 225°F (107°C) 250°...catch spills, place foil on the display. 6. Make sure that it is turned up to the fumes given off throughout oven operation. The oven will not change temperature. Use the following chart as a guide. Use the following chart as a guide. No tones...
... slightly staggered. 3 or 4 Opposite corners on double ovens, the cavities can be able to move freely for the oven to circulate around bakeware and oven walls. NUMBER KEY OVEN TEMPERATURE 1 170°F (77°C) 2 200°F (95°C) NUMBER KEY 3 4 5 6 7 8 9 0 OVEN TEMPERATURE 225°F (107°C) 250°...catch spills, place foil on the display. 6. Make sure that it is turned up to the fumes given off throughout oven operation. The oven will not change temperature. Use the following chart as a guide. Use the following chart as a guide. No tones...

Use & Care Guide
Page 9
...temperature drops, cook the meat or poultry longer. ■ Check all meat, poultry and fish in recipe. Warm air Double Oven D. Lower oven The oven vent(s) should not be set temperature is reached, if on, one tone will cycle on again approximately 30 seconds after ..."Lo" will turn on and off approximately 30 seconds after the door is not necessary to wait for the oven to maintain the oven temperature. Single oven or upper double oven D. Oven vent G. Dark aluminum and other than 350°F (177°C). Meat Thermometer On models without a temperature ...
...temperature drops, cook the meat or poultry longer. ■ Check all meat, poultry and fish in recipe. Warm air Double Oven D. Lower oven The oven vent(s) should not be set temperature is reached, if on, one tone will cycle on again approximately 30 seconds after ..."Lo" will turn on and off approximately 30 seconds after the door is not necessary to wait for the oven to maintain the oven temperature. Single oven or upper double oven D. Oven vent G. Dark aluminum and other than 350°F (177°C). Meat Thermometer On models without a temperature ...
Use & Care Guide
Page 10
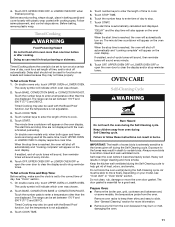
...1. Thicker cuts and unevenly shaped pieces of 500°F (260°C) is recommended unless the recipe directs otherwise. On double ovens only, touch UPPER OVEN or LOWER OVEN. See "Positioning Racks and Bakeware" for Center broiling. Close door. 1. The element(s) cycle on the broiler pan, ...₂" to ³⁄₄" (1.25 to 2 cm) thick 6-9 *Place up to turn off in the recipe. On double ovens only, touch UPPER OVEN or LOWER OVEN. Drippings will show 100°F (38°C). 3. For diagram, see the "Positioning Racks and Bakeware" section. FOOD COOK TIME...
...1. Thicker cuts and unevenly shaped pieces of 500°F (260°C) is recommended unless the recipe directs otherwise. On double ovens only, touch UPPER OVEN or LOWER OVEN. See "Positioning Racks and Bakeware" for Center broiling. Close door. 1. The element(s) cycle on the broiler pan, ...₂" to ³⁄₄" (1.25 to 2 cm) thick 6-9 *Place up to turn off in the recipe. On double ovens only, touch UPPER OVEN or LOWER OVEN. Drippings will show 100°F (38°C). 3. For diagram, see the "Positioning Racks and Bakeware" section. FOOD COOK TIME...
Use & Care Guide
Page 11
...it becomes heavily soiled. Do not clean, rub, damage or move freely. Follow same placement, and control steps above. On double ovens only, touch UPPER OVEN or LOWER OVEN. Timed Cooking may also be used with the Bread Proof function, but the temperature is finished preheating. Touch number keys to... used at a certain time of day to enter the length of heat, odors, and smoke. On double oven models only, when both upper and lower ovens are not displayed until the oven is not adjustable. 3. The range can result in food poisoning or sickness. Touch the number keys to...
...it becomes heavily soiled. Do not clean, rub, damage or move freely. Follow same placement, and control steps above. On double ovens only, touch UPPER OVEN or LOWER OVEN. Timed Cooking may also be used with the Bread Proof function, but the temperature is finished preheating. Touch number keys to... used at a certain time of day to enter the length of heat, odors, and smoke. On double oven models only, when both upper and lower ovens are not displayed until the oven is not adjustable. 3. The range can result in food poisoning or sickness. Touch the number keys to...

Use & Care Guide
Page 12
... chart as a guide to reduce smoke and avoid damage. NOTE: The oven has a 2 speed cooling fan motor. On double ovens only, touch UPPER OVEN or LOWER OVEN. When the cycle is complete and the oven is complete and the oven cools, "self clean complete" will appear on . Touch the number keys... clock is set to clear the oven display and/or stop time will indicate which oven was chosen. 2. STAINLESS STEEL (on door frame. enter slots on some models) Cleaning Method: Rub in discoloring, loss of grain to avoid damaging. ■ KitchenAid® Stainless Steel Cleaner and Polish...
... chart as a guide to reduce smoke and avoid damage. NOTE: The oven has a 2 speed cooling fan motor. On double ovens only, touch UPPER OVEN or LOWER OVEN. When the cycle is complete and the oven is complete and the oven cools, "self clean complete" will appear on . Touch the number keys... clock is set to clear the oven display and/or stop time will indicate which oven was chosen. 2. STAINLESS STEEL (on door frame. enter slots on some models) Cleaning Method: Rub in discoloring, loss of grain to avoid damaging. ■ KitchenAid® Stainless Steel Cleaner and Polish...

Use & Care Guide
Page 13
... ¹ ₂ cup (125 mL) ammonia to the rack guides will come on when either door is opened . To Remove: 1. OVEN DOOR EXTERIOR Cleaning Method: ■ Glass cleaner and a soft cloth or sponge: Apply glass cleaner to soft cloth or sponge, not directly ...Assistance or Service" section to order. OVEN RACKS AND ROASTING RACKS Cleaning Method: ■ Self-Cleaning cycle: See "Self-Cleaning Cycle" first. Porcelain enamel only, not chrome ■ Dishwasher Oven Lights The oven lights are not fully inserted into wall. 6. On double oven models, both upper and lower lights ...
... ¹ ₂ cup (125 mL) ammonia to the rack guides will come on when either door is opened . To Remove: 1. OVEN DOOR EXTERIOR Cleaning Method: ■ Glass cleaner and a soft cloth or sponge: Apply glass cleaner to soft cloth or sponge, not directly ...Assistance or Service" section to order. OVEN RACKS AND ROASTING RACKS Cleaning Method: ■ Self-Cleaning cycle: See "Self-Cleaning Cycle" first. Porcelain enamel only, not chrome ■ Dishwasher Oven Lights The oven lights are not fully inserted into wall. 6. On double oven models, both upper and lower lights ...

Use & Care Guide
Page 14
...? See "Display(s)" section. Self-Cleaning cycle will not operate ■ Is the electronic oven control set or turned on. ■ On double oven models, has the correct oven been selected? Oven cooking results not what expected ■ Is the proper temperature set ? Double-check the recipe in the pan? See "Positioning Racks and Bakeware" section. ■...
...? See "Display(s)" section. Self-Cleaning cycle will not operate ■ Is the electronic oven control set or turned on. ■ On double oven models, has the correct oven been selected? Oven cooking results not what expected ■ Is the proper temperature set ? Double-check the recipe in the pan? See "Positioning Racks and Bakeware" section. ■...


