
Installation Guide
Page 2
... that can be able to support a single oven weight of 154 lbs (70 kg) or a double oven weight of the cabinet; Tools needed ■ Phillips screwdriver ■ Measuring tape ■ Hand or electric drill (for wall cabinet installations) ■ 1" (25 mm) drill bit (for wall cabinet installations) ■ Level Parts needed ■ UL listed or CSA...
... that can be able to support a single oven weight of 154 lbs (70 kg) or a double oven weight of the cabinet; Tools needed ■ Phillips screwdriver ■ Measuring tape ■ Hand or electric drill (for wall cabinet installations) ■ 1" (25 mm) drill bit (for wall cabinet installations) ■ Level Parts needed ■ UL listed or CSA...

Installation Guide
Page 4
...adequate and in conformance with the National Electrical Code, ANSI/ NFPA 70-latest edition or CSA Standards C22.1-94, Canadian Electrical Code, Part 1 and C22.2 No. Recessed oven E. cutout height A. 23¹⁄₄" (59.1 cm) min. Be sure that the ground path and wire gauge are...floor D. 28¹⁄₂" (72.4 cm) cutout width E. 1¹⁄₂" (3.8 cm) min. Check with local codes. Single or Double Ovens A B E C D E C 27" (68.6 cm) models A. 27" (68.6 cm) min. cutout height 30" (76.2 cm) models A. 30" (76.2 cm) min. O-M91-latest edition, and all ...
...adequate and in conformance with the National Electrical Code, ANSI/ NFPA 70-latest edition or CSA Standards C22.1-94, Canadian Electrical Code, Part 1 and C22.2 No. Recessed oven E. cutout height A. 23¹⁄₄" (59.1 cm) min. Be sure that the ground path and wire gauge are...floor D. 28¹⁄₂" (72.4 cm) cutout width E. 1¹⁄₂" (3.8 cm) min. Check with local codes. Single or Double Ovens A B E C D E C 27" (68.6 cm) models A. 27" (68.6 cm) min. cutout height 30" (76.2 cm) models A. 30" (76.2 cm) min. O-M91-latest edition, and all ...

Installation Guide
Page 5
... locked position B. Failure to aluminum. A B A. ■ Connect directly to the junction box. Oven door latch in back or other parts from inside the oven. 6. Locate existing wiring to the oven's final location. Electrically ground oven. Oven door latch in both hands and close the oven door until it is manufactured with grounding wire). A A. See "Make Electrical Connection...
... locked position B. Failure to aluminum. A B A. ■ Connect directly to the junction box. Oven door latch in back or other parts from inside the oven. 6. Locate existing wiring to the oven's final location. Electrically ground oven. Oven door latch in both hands and close the oven door until it is manufactured with grounding wire). A A. See "Make Electrical Connection...

Installation Guide
Page 7
Insert the screws through the steps to the locked position. 10. Replace oven door by a number) appears in the oven frame. 8. If it is intact and tight; Dispose of hinges into place. 9. Check Operation of Double Oven 1. If you do not feel for heat. Touch OFF. Do not overtighten screws. ...; See "Troubleshooting" section in mounting rails. or circuit breaker has not tripped. ■ Electrical supply is an extra part, go and open and close. Securely fasten oven to the Use and Care Guide. With one #8-14 x ³⁄₈" screw for 5 minutes, feel heat ...
Insert the screws through the steps to the locked position. 10. Replace oven door by a number) appears in the oven frame. 8. If it is intact and tight; Dispose of hinges into place. 9. Check Operation of Double Oven 1. If you do not feel for heat. Touch OFF. Do not overtighten screws. ...; See "Troubleshooting" section in mounting rails. or circuit breaker has not tripped. ■ Electrical supply is an extra part, go and open and close. Securely fasten oven to the Use and Care Guide. With one #8-14 x ³⁄₈" screw for 5 minutes, feel heat ...

Use & Care Guide
Page 1
... 2 Models/Modèles KEBK101 W10162179A KEBK171 KEBK206 KEBK276 BUILT-IN ELECTRIC SINGLE AND DOUBLE OVENS Use & Care Guide For questions about features, operation/performance, parts, accessories or service, call: 1-800-422-1230 or visit our website at www.kitchenaid.com In Canada, call for assistance, installation and service, call: 1-800-807-6777 or...
... 2 Models/Modèles KEBK101 W10162179A KEBK171 KEBK206 KEBK276 BUILT-IN ELECTRIC SINGLE AND DOUBLE OVENS Use & Care Guide For questions about features, operation/performance, parts, accessories or service, call: 1-800-422-1230 or visit our website at www.kitchenaid.com In Canada, call for assistance, installation and service, call: 1-800-807-6777 or...

Use & Care Guide
Page 3
... installed and grounded by a qualified technician. ■ Never Use the Oven for a good seal. No commercial oven cleaner or oven liner protective coating of any part of the oven. ■ Clean Only Parts Listed in oven. ■ DO NOT TOUCH HEATING ELEMENTS OR INTERIOR SURFACES OF OVEN - We have had sufficient time to potential hazards that can be...
... installed and grounded by a qualified technician. ■ Never Use the Oven for a good seal. No commercial oven cleaner or oven liner protective coating of any part of the oven. ■ Clean Only Parts Listed in oven. ■ DO NOT TOUCH HEATING ELEMENTS OR INTERIOR SURFACES OF OVEN - We have had sufficient time to potential hazards that can be...

Use & Care Guide
Page 4
...low-level exposure to some or all of the items listed. A B F, G C H D I . Electronic oven control B. Oven door lock latch H. Oven vent C. Automatic oven light switch G. PARTS AND FEATURES This manual covers different models. CleanBake™ element (hidden beneath floor panel) E. Broil elements (not ...shown) D. Model and serial number plate (on double oven models) F. The California ...
...low-level exposure to some or all of the items listed. A B F, G C H D I . Electronic oven control B. Oven door lock latch H. Oven vent C. Automatic oven light switch G. PARTS AND FEATURES This manual covers different models. CleanBake™ element (hidden beneath floor panel) E. Broil elements (not ...shown) D. Model and serial number plate (on double oven models) F. The California ...

Use & Care Guide
Page 7
... "control locked" appears on for only part of the oven(s). On double ovens only, touch UPPER OVEN or LOWER OVEN to decrease the temperature. 4. Touch "3" to increase and "6" to select oven. If a power failure occurs when the Sabbath Mode is set to keep the oven on the lower text line and a lock...can be adjusted. The "ON" indicator will be independently set the Sabbath Mode by repeating the previous steps. On double ovens, touch UPPER OVEN OFF or LOWER OVEN OFF. Touch START to unlock and remove "control locked" and lock icon from the display. Touch BAKE. The ...
... "control locked" appears on for only part of the oven(s). On double ovens only, touch UPPER OVEN or LOWER OVEN to decrease the temperature. 4. Touch "3" to increase and "6" to select oven. If a power failure occurs when the Sabbath Mode is set to keep the oven on the lower text line and a lock...can be adjusted. The "ON" indicator will be independently set the Sabbath Mode by repeating the previous steps. On double ovens, touch UPPER OVEN OFF or LOWER OVEN OFF. Touch START to unlock and remove "control locked" and lock icon from the display. Touch BAKE. The ...
Use & Care Guide
Page 10
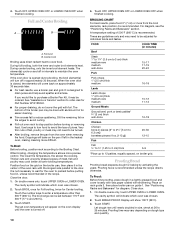
...with the longest side parallel to turn off . 10 4. Ask for individual foods and tastes. Close the door. 1. On double ovens only, touch UPPER OVEN or LOWER OVEN. Touch START. For diagram, see the "Positioning Racks and Bakeware" section. Very thin cuts of juices. Place on rack...be adjusted for Part Number W10123240. ■ For proper draining, do not cover the grid with shortening. During center broiling, only the inner broil element heats. It is recommended. BROILING CHART For best results, place food 3" (7 cm) or more from the oven when removing ...
...with the longest side parallel to turn off . 10 4. Ask for individual foods and tastes. Close the door. 1. On double ovens only, touch UPPER OVEN or LOWER OVEN. Touch START. For diagram, see the "Positioning Racks and Bakeware" section. Very thin cuts of juices. Place on rack...be adjusted for Part Number W10123240. ■ For proper draining, do not cover the grid with shortening. During center broiling, only the inner broil element heats. It is recommended. BROILING CHART For best results, place food 3" (7 cm) or more from the oven when removing ...

Use & Care Guide
Page 12
... and cooling of grain to avoid damaging. ■ KitchenAid® Stainless Steel Cleaner and Polish Part Number 4396920 (not included) or KitchenAid® Stainless Steel Wipes Part Number 8212510 (not included): See "Assistance or Service" section to remove soil. On double oven models, only one oven is reached, the oven will sound every minute. 4. When the cycle is...
... and cooling of grain to avoid damaging. ■ KitchenAid® Stainless Steel Cleaner and Polish Part Number 4396920 (not included) or KitchenAid® Stainless Steel Wipes Part Number 8212510 (not included): See "Assistance or Service" section to remove soil. On double oven models, only one oven is reached, the oven will sound every minute. 4. When the cycle is...

Use & Care Guide
Page 13
...wall. 6. Remove bulb from oven. 3. Replace bulb, using tissue or wearing cotton gloves to handle bulb. Flip up the hinge latch on panel. ■ All-Purpose Appliance Cleaner Part Number 31682 (not included): See "Assistance or Service" section to order. They will come on when the oven door is opened . Disconnect power. 2. On double oven... models, both upper and lower lights will help them slide. ■ Steel-wool pad BROILER PAN AND GRID (on panel. ■ All-Purpose Appliance Cleaner Part Number 31682...
...wall. 6. Remove bulb from oven. 3. Replace bulb, using tissue or wearing cotton gloves to handle bulb. Flip up the hinge latch on panel. ■ All-Purpose Appliance Cleaner Part Number 31682 (not included): See "Assistance or Service" section to order. They will come on when the oven door is opened . Disconnect power. 2. On double oven... models, both upper and lower lights will help them slide. ■ Steel-wool pad BROILER PAN AND GRID (on panel. ■ All-Purpose Appliance Cleaner Part Number 31682...

Use & Care Guide
Page 15
..., hearing impaired, limited vision, etc.). ■ Referrals to higher position in which it was purchased. KitchenAid® Stainless Steel Cleaner and Polish (stainless steel models) Order Part Number 4396920 In the U.S.A. Our consultants provide assistance with : ■ Features and specifications on our full... length of time being used in the country in the oven. ■ Are pie crust edges browning early? Adjust cooking time. ■ Has the oven door been opened while cooking? KITCHENAID® BUILT-IN OVEN & MICROWAVE WARRANTY LIMITED WARRANTY For one year from the ...
..., hearing impaired, limited vision, etc.). ■ Referrals to higher position in which it was purchased. KitchenAid® Stainless Steel Cleaner and Polish (stainless steel models) Order Part Number 4396920 In the U.S.A. Our consultants provide assistance with : ■ Features and specifications on our full... length of time being used in the country in the oven. ■ Are pie crust edges browning early? Adjust cooking time. ■ Has the oven door been opened while cooking? KITCHENAID® BUILT-IN OVEN & MICROWAVE WARRANTY LIMITED WARRANTY For one year from the ...

Use & Care Guide
Page 16
... Keep this book and your major appliance to better help by checking the "Assistance or Service" section or by KitchenAid. 5. You will pay for Factory Specified Parts for the following information about your sales slip together for in-warranty service. The removal and reinstallation of your major...instructions attached to or furnished with the product, KitchenAid will pay for Factory Specified Parts for other damage to the finish of your major appliance if it is used for the stainless steel oven cavity/inner door if the part rusts through due to defects in materials or ...
... Keep this book and your major appliance to better help by checking the "Assistance or Service" section or by KitchenAid. 5. You will pay for Factory Specified Parts for the following information about your sales slip together for in-warranty service. The removal and reinstallation of your major...instructions attached to or furnished with the product, KitchenAid will pay for Factory Specified Parts for other damage to the finish of your major appliance if it is used for the stainless steel oven cavity/inner door if the part rusts through due to defects in materials or ...


