
Installation Guide
Page 5
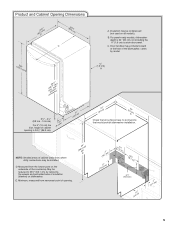
...) not including the " (1.9 cm) custom door panel. C. May be installed. D. For panel-ready models, dishwasher depth is 34 " (86.3 cm). (9.43cm") (53.231c"m) A. " (1.9 cm) A (612c4m" ) (612Ec4m" ) Check that all models). Minimum, measured from the lowest point on the underside of the countertop. E. B. 24 (62.B2...removing the wheels and perforated area of cabinet walls show where utility connections may be reduced to 33 " (85.1 cm) by model. Door handles may be compressed (not used on dishwasher. NOTE: Shaded areas of insulation (blanket) on all surfaces have no...
...) not including the " (1.9 cm) custom door panel. C. May be installed. D. For panel-ready models, dishwasher depth is 34 " (86.3 cm). (9.43cm") (53.231c"m) A. " (1.9 cm) A (612c4m" ) (612Ec4m" ) Check that all models). Minimum, measured from the lowest point on the underside of the countertop. E. B. 24 (62.B2...removing the wheels and perforated area of cabinet walls show where utility connections may be reduced to 33 " (85.1 cm) by model. Door handles may be compressed (not used on dishwasher. NOTE: Shaded areas of insulation (blanket) on all surfaces have no...
Installation Guide
Page 12
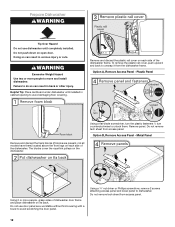
... on open door. Do not remove tech sheet from access panel. Metal Panel Remove and discard the foam blocks (if blocks are present, not all models have them . Do not use dishwasher until installed in serious injury or cuts. Option A, Remove Access Panel - Using a ¹⁄₄" nut driver or Phillips...
... on open door. Do not remove tech sheet from access panel. Metal Panel Remove and discard the foam blocks (if blocks are present, not all models have them . Do not use dishwasher until installed in serious injury or cuts. Option A, Remove Access Panel - Using a ¹⁄₄" nut driver or Phillips...

Installation Guide
Page 15
... this procedure. Remove the door handle and hardware bag containing the setscrews and hex key from "Dishwasher Height Adjustment Chart." 15 Place handle on some models) Cut insulation blanket along perforation for additional clearance. Turn both leveler legs to avoid movement when the dishwasher is in the area shown to bring...
... this procedure. Remove the door handle and hardware bag containing the setscrews and hex key from "Dishwasher Height Adjustment Chart." 15 Place handle on some models) Cut insulation blanket along perforation for additional clearance. Turn both leveler legs to avoid movement when the dishwasher is in the area shown to bring...

Installation Guide
Page 16
.... Failure to the dishwasher. Repeat this step for this by attaching the two brackets found in back or other side. Custom Panel Installation (Custom Panel models only) For custom panel installation, refer to the "Choose Attachment Option" section. Choose Attachment Option IMPORTANT: The dishwasher must be done later. For countertops that...
.... Failure to the dishwasher. Repeat this step for this by attaching the two brackets found in back or other side. Custom Panel Installation (Custom Panel models only) For custom panel installation, refer to the "Choose Attachment Option" section. Choose Attachment Option IMPORTANT: The dishwasher must be done later. For countertops that...

Installation Guide
Page 18
... the sound level. ■ If using power cord, make sure to route end through hole in cutout before sliding dishwasher into cabinet opening . ■ For models with front of dishwasher. You may need to be adjusted. Reattach door spring to rear leg. Remove cardboard from the tensioner. NOTE: Tensioners on the...
... the sound level. ■ If using power cord, make sure to route end through hole in cutout before sliding dishwasher into cabinet opening . ■ For models with front of dishwasher. You may need to be adjusted. Reattach door spring to rear leg. Remove cardboard from the tensioner. NOTE: Tensioners on the...

Installation Guide
Page 23
... the access panel touches the floor. Adjust if necessary. Plastic Panel Option B, Install Access Panel - Check that must fall behind the access panel. On some models there is attached to lock into place. Check that the lower edge of dishwasher tub. Adjust if necessary. 23
... the access panel touches the floor. Adjust if necessary. Plastic Panel Option B, Install Access Panel - Check that must fall behind the access panel. On some models there is attached to lock into place. Check that the lower edge of dishwasher tub. Adjust if necessary. 23

Installation Guide
Page 24
... until you have all parts have been installed and no steps were skipped. Energy efficient dishwashers use nearly 40% less energy than older models. Check that all tools used with your dishwasher washes longer to possibly avoid the cost of a cycle.) Plug into a grounded 3 ... Operate" section. Do not remove ground prong. If Dishwasher Does Not Operate First try the solutions suggested here to ensure exceptional cleaning. Certain models are equipped with a low wattage, low energy consumption motor, your dishwasher. ■ Check that you press it to 3 hours per load...
... until you have all parts have been installed and no steps were skipped. Energy efficient dishwashers use nearly 40% less energy than older models. Check that all tools used with your dishwasher washes longer to possibly avoid the cost of a cycle.) Plug into a grounded 3 ... Operate" section. Do not remove ground prong. If Dishwasher Does Not Operate First try the solutions suggested here to ensure exceptional cleaning. Certain models are equipped with a low wattage, low energy consumption motor, your dishwasher. ■ Check that you press it to 3 hours per load...

Dimension Guide
Page 1
... for use with a power supply cord: Use power supply cord kit (Part Number 4317824) marked for planning purposes only. varies by model. Because Whirlpool Corporation policy includes a continuous commitment to an air gap. Specifications subject to the dishwasher opening is recommended air gap that ... connect the drain hose to house plumbing lower than 20" (50.8 cm) above the floor. drain line fittings. For panel-ready models, dishwasher depth is recommended. Water temperature must plug into a grounded three-prong outlet located in the cabinet next to change materials and ...
... for use with a power supply cord: Use power supply cord kit (Part Number 4317824) marked for planning purposes only. varies by model. Because Whirlpool Corporation policy includes a continuous commitment to an air gap. Specifications subject to the dishwasher opening is recommended air gap that ... connect the drain hose to house plumbing lower than 20" (50.8 cm) above the floor. drain line fittings. For panel-ready models, dishwasher depth is recommended. Water temperature must plug into a grounded three-prong outlet located in the cabinet next to change materials and ...

Energy Guide
Page 1
U.S. Dishwasher Capacity: Standard KitchenAid by Whirlpool Corporation Models: KDTM354E***, KDTM384E*** KDTM404E***, KDTM504E*** KDTM704E***, KDTM804E*** Estimated Yearly Energy Cost (when used with an electric water heater) $32 ▼ $21 $41 Cost Range of Similar Models 270 kWh Estimated Yearly Electricity Use $25 Estimated Yearly...gas water heater) Your cost will depend on your utility rates and use. • Cost range based only on standard capacity models. • Estimated energy cost based on four wash loads a week and a national average electricity cost of 12 cents per ...
U.S. Dishwasher Capacity: Standard KitchenAid by Whirlpool Corporation Models: KDTM354E***, KDTM384E*** KDTM404E***, KDTM504E*** KDTM704E***, KDTM804E*** Estimated Yearly Energy Cost (when used with an electric water heater) $32 ▼ $21 $41 Cost Range of Similar Models 270 kWh Estimated Yearly Electricity Use $25 Estimated Yearly...gas water heater) Your cost will depend on your utility rates and use. • Cost range based only on standard capacity models. • Estimated energy cost based on four wash loads a week and a national average electricity cost of 12 cents per ...

Warranty Information
Page 1
...states and provinces do not allow limitations on how to use with original model/serial numbers removed, altered or not easily determined. If you call 18008076777. labor to : KitchenAid Customer eXperience Center In the U.S.A., call 1-800-422-1230. Consumable ...take a few minutes to or furnished with the product, KitchenAid will be addressed without service. In the U.S. Pick-up or delivery. In Canada, call the Customer eXperience Center: ■ Name, address and telephone number ■ Model number and serial number ■ A clear, detailed description...
...states and provinces do not allow limitations on how to use with original model/serial numbers removed, altered or not easily determined. If you call 18008076777. labor to : KitchenAid Customer eXperience Center In the U.S.A., call 1-800-422-1230. Consumable ...take a few minutes to or furnished with the product, KitchenAid will be addressed without service. In the U.S. Pick-up or delivery. In Canada, call the Customer eXperience Center: ■ Name, address and telephone number ■ Model number and serial number ■ A clear, detailed description...

Use & Care Guide
Page 1
... if you how to potential hazards that can happen if the instructions are very important. In Canada, register your new dishwasher at www.kitchenaid.ca in this high-quality product. All safety messages will tell you what can kill or hurt you don't follow the safety alert... symbol and either the word "DANGER" or "WARNING." Model Number Serial Number Table of Contents DISHWASHER SAFETY 1 PARTS AND FEATURES 3 START-UP/QUICK REFERENCE 5 QUICK STEPS 6 DISHWASHER USE 6 CYCLE AND OPTION ...
... if you how to potential hazards that can happen if the instructions are very important. In Canada, register your new dishwasher at www.kitchenaid.ca in this high-quality product. All safety messages will tell you what can kill or hurt you don't follow the safety alert... symbol and either the word "DANGER" or "WARNING." Model Number Serial Number Table of Contents DISHWASHER SAFETY 1 PARTS AND FEATURES 3 START-UP/QUICK REFERENCE 5 QUICK STEPS 6 DISHWASHER USE 6 CYCLE AND OPTION ...

Use & Care Guide
Page 3
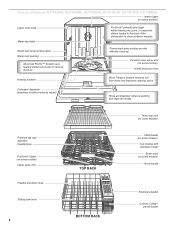
... arm Flexible fold-down tines Sliding bowl tines TOP RACK BOTTOM RACK Third level rack (on some models) Utility basket (on some models) Cup shelves with stemware holder (on some models) Rack handle Silverware basket Culinary Caddy ® utensil basket 3 Parts and Features KDTE104E, KDTE204E, KDFE204E..., KDTE254E Upper level wash Water feed tube Model and serial number label Water inlet opening Heating element Rinse aid dispenser reduces spotting and improves drying. ProScrub ® powerful ...
... arm Flexible fold-down tines Sliding bowl tines TOP RACK BOTTOM RACK Third level rack (on some models) Utility basket (on some models) Cup shelves with stemware holder (on some models) Rack handle Silverware basket Culinary Caddy ® utensil basket 3 Parts and Features KDTE104E, KDTE204E, KDFE204E..., KDTE254E Upper level wash Water feed tube Model and serial number label Water inlet opening Heating element Rinse aid dispenser reduces spotting and improves drying. ProScrub ® powerful ...
Use & Care Guide
Page 4
...down tines Sliding bowl tines 4 TOP RACK BOTTOM RACK Utility basket (on some models) Cup shelves with stemware holder Bottle wash (on some models) Upper level wash Water feed tube Model and serial number label Water inlet opening Advanced ProDry™ System uses heating ... and a fan to clean stubborn messes. Parts and Features KDTM354E, KDTM384E, KDTM404E, KDTM504E, KDTM704E, KDTM804E Interior lights (on some models) Overfill protection float Heating element Micro Filtration System removes soil from water and improves cleaning action. ProScrub ® powerful jets target water...
...down tines Sliding bowl tines 4 TOP RACK BOTTOM RACK Utility basket (on some models) Cup shelves with stemware holder Bottle wash (on some models) Upper level wash Water feed tube Model and serial number label Water inlet opening Advanced ProDry™ System uses heating ... and a fan to clean stubborn messes. Parts and Features KDTM354E, KDTM384E, KDTM404E, KDTM504E, KDTM704E, KDTM804E Interior lights (on some models) Overfill protection float Heating element Micro Filtration System removes soil from water and improves cleaning action. ProScrub ® powerful jets target water...

Use & Care Guide
Page 5
... for convenience and improved performance. Back of the dishwasher. Proper Detergent Dosing We recommend quality tablets and packs for tough soil. SLIDE Dispensers vary by model Express Wash - When you need to pre-rinse dishes; No need fast results. ProWash™ cycle for optimal cleaning using slightly more water and energy...
... for convenience and improved performance. Back of the dishwasher. Proper Detergent Dosing We recommend quality tablets and packs for tough soil. SLIDE Dispensers vary by model Express Wash - When you need to pre-rinse dishes; No need fast results. ProWash™ cycle for optimal cleaning using slightly more water and energy...

Use & Care Guide
Page 6
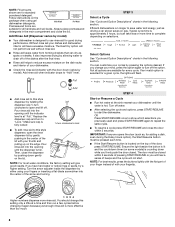
Quick Steps 3 Select a cycle and option. 2 Add detergent for cleaning and rinse aid for drying. 4 Start dishwasher. SLIDE SLIDE Dispensers vary by model. Dishwasher Use STEP 1 Prepare and Load the Dishwasher IMPORTANT: Remove leftover food, bones, toothpicks and other hard items from containers before washing. 12 place load - ...
Quick Steps 3 Select a cycle and option. 2 Add detergent for cleaning and rinse aid for drying. 4 Start dishwasher. SLIDE SLIDE Dispensers vary by model. Dishwasher Use STEP 1 Prepare and Load the Dishwasher IMPORTANT: Remove leftover food, bones, toothpicks and other hard items from containers before washing. 12 place load - ...
Use & Care Guide
Page 8
...STEP 4 Start or Resume a Cycle ■ Run hot water at "Full." Higher numbers dispense more time to open the rinse dispenser lid by model) ■ Your dishwasher is at the sink nearest your dishwasher until the dispenser is located on selections. Follow instructions on gas. Replace the dispenser cap... and turn clockwise to complete depending on the top of the lid with your cycles by model). Add Rinse Aid (Dispenser varies by gently pushing in the main compartment and close the door within 3 seconds of your fingers...
...STEP 4 Start or Resume a Cycle ■ Run hot water at "Full." Higher numbers dispense more time to open the rinse dispenser lid by model) ■ Your dishwasher is at the sink nearest your dishwasher until the dispenser is located on selections. Follow instructions on gas. Replace the dispenser cap... and turn clockwise to complete depending on the top of the lid with your cycles by model). Add Rinse Aid (Dispenser varies by gently pushing in the main compartment and close the door within 3 seconds of your fingers...

Use & Care Guide
Page 9
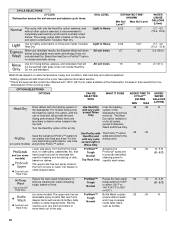
...) 3.7-4.2 (14.0 - 15.9) 4.2 (15.9) 9 Includes Heat Dry. KDTM704E, KDTM804E KDTM504E KDTM404E KDTM354E, KDTM384E Cycle and Option Descriptions KDTE204E, KDTE254E KDTE204E Custom door model KDFE204E KDTE104E This information covers several different models. SOIL LEVEL The most advanced and versatile cycle. Light to -clean, heavily soiled pots, pans, Heavy/Baked-On 2:59 3:59 casseroles, and...
...) 3.7-4.2 (14.0 - 15.9) 4.2 (15.9) 9 Includes Heat Dry. KDTM704E, KDTM804E KDTM504E KDTM404E KDTM354E, KDTM384E Cycle and Option Descriptions KDTE204E, KDTE254E KDTE204E Custom door model KDFE204E KDTE104E This information covers several different models. SOIL LEVEL The most advanced and versatile cycle. Light to -clean, heavily soiled pots, pans, Heavy/Baked-On 2:59 3:59 casseroles, and...
Use & Care Guide
Page 10
.... The Heat Dry option defaults to the cycle. Use for air dry. Use for Express Wash and Rinse Only. Does not include Heat Dry. For models having only the Heat Dry option, this cycle and option combination. ADDED TIME TO CYCLE*** (HH:MM) MIN MAX :48 :48 ADDED WATER GALLONS ... spray zones in time results from 105°F to either 130°F or 140°F (41°C to 55C° or 60C°). (on some models) The upper rack has six ProWash™ Bottle Wash nozzles :03 retractable spray nozzles that reach into deeper or oddly shaped items. :32 :40 0 - 1.5 (0 - 5.7)...
.... The Heat Dry option defaults to the cycle. Use for air dry. Use for Express Wash and Rinse Only. Does not include Heat Dry. For models having only the Heat Dry option, this cycle and option combination. ADDED TIME TO CYCLE*** (HH:MM) MIN MAX :48 :48 ADDED WATER GALLONS ... spray zones in time results from 105°F to either 130°F or 140°F (41°C to 55C° or 60C°). (on some models) The upper rack has six ProWash™ Bottle Wash nozzles :03 retractable spray nozzles that reach into deeper or oddly shaped items. :32 :40 0 - 1.5 (0 - 5.7)...

Use & Care Guide
Page 11
...not start. 11 OPTION SELECTIONS OPTIONS Sanitizes dishes and glassware in accordance with NSF International NSF/ ANSI Standard 184 for smaller loads or (on some models) For added convenience, use of a 1:00 24:00 0 during a cycle. Certified residential dishwashers are disabled. Press the Delay any reason or... button must be opened during a cycle for 3 seconds. NOTE: Anytime the door is no intention, either Start/Resume or Cancel, or by model. If you to the cycle. Select a wash cycle and options. The Control Lock light will add time to press and hold the control lock...
...not start. 11 OPTION SELECTIONS OPTIONS Sanitizes dishes and glassware in accordance with NSF International NSF/ ANSI Standard 184 for smaller loads or (on some models) For added convenience, use of a 1:00 24:00 0 during a cycle. Certified residential dishwashers are disabled. Press the Delay any reason or... button must be opened during a cycle for 3 seconds. NOTE: Anytime the door is no intention, either Start/Resume or Cancel, or by model. If you to the cycle. Select a wash cycle and options. The Control Lock light will add time to press and hold the control lock...
Use & Care Guide
Page 13
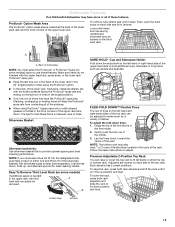
... and best cleaning performance. A.Track stop B.Track 13 A A. Silverware Basket Silverware basket lids: Use silverware basket lids to adjust. Dishwasher Features Your KitchenAid dishwasher may have 1 or 2 rows of flexible tines located in the back of the rack. Then, open the track stops on each side of...dishes, etc. Load knives down tines: 1. Gently push the tine out of the upper level rack. NOTE: The bottom rack may also have some models) option to its down , toward the center of the top rack can be removed. Each adjuster has 2 preset positions. To raise the rack,...
... and best cleaning performance. A.Track stop B.Track 13 A A. Silverware Basket Silverware basket lids: Use silverware basket lids to adjust. Dishwasher Features Your KitchenAid dishwasher may have 1 or 2 rows of flexible tines located in the back of the rack. Then, open the track stops on each side of...dishes, etc. Load knives down tines: 1. Gently push the tine out of the upper level rack. NOTE: The bottom rack may also have some models) option to its down , toward the center of the top rack can be removed. Each adjuster has 2 preset positions. To raise the rack,...


