
Installation Guide
Page 5
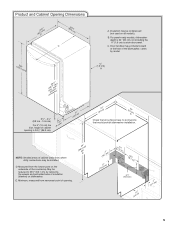
...walls show where utility connections may be reduced to 33 " (85.1 cm) by model. varies by removing the wheels and perforated area of insulation (blanket) on dishwasher. E. " (1.9 cm) A (612c4m" ) (612Ec4m" ) Check that all models). Door handles may be compressed (not used on the underside of opening is 24"..." cm) (261.07 " cm) 6" (15.9 cm) Clear Area 1 (4.4 " cm) (5.12c"m) 5 May be installed. D. Insulation may protrude forward of the face of the dishwasher; Minimum, measured from the lowest point on all surfaces have no protrusions that would prohibit...
...walls show where utility connections may be reduced to 33 " (85.1 cm) by model. varies by removing the wheels and perforated area of insulation (blanket) on dishwasher. E. " (1.9 cm) A (612c4m" ) (612Ec4m" ) Check that all models). Door handles may be compressed (not used on the underside of opening is 24"..." cm) (261.07 " cm) 6" (15.9 cm) Clear Area 1 (4.4 " cm) (5.12c"m) 5 May be installed. D. Insulation may protrude forward of the face of the dishwasher; Minimum, measured from the lowest point on all surfaces have no protrusions that would prohibit...
Installation Guide
Page 12
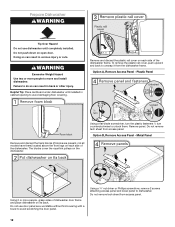
...panel to unlock them ) located above the front legs on open door. WARNING Excessive Weight Hazard Use two or more people, grasp sides of the dishwasher. Option A, Remove Access Panel - Option B, Remove Access Panel - Doing so can result in serious injury or cuts. Remove panel. Do not ...discard the foam blocks (if blocks are present, not all models have them . To remove the plastic rail cover, push upward and back to unsnap it from the dishwasher frame. Using 2 or more people to move and install dishwasher. Prepare Dishwasher WARNING Tip Over Hazard Do not use door panel as a...
...panel to unlock them ) located above the front legs on open door. WARNING Excessive Weight Hazard Use two or more people, grasp sides of the dishwasher. Option A, Remove Access Panel - Option B, Remove Access Panel - Doing so can result in serious injury or cuts. Remove panel. Do not ...discard the foam blocks (if blocks are present, not all models have them . To remove the plastic rail cover, push upward and back to unsnap it from the dishwasher frame. Using 2 or more people to move and install dishwasher. Prepare Dishwasher WARNING Tip Over Hazard Do not use door panel as a...

Installation Guide
Page 15
...Do not scratch the front panel during this procedure. Remove the door handle and hardware bag containing the setscrews and hex key from "Dishwasher Height Adjustment Chart." 15 Insert the short end of the insulation blanket to fit into a 33¹⁄₂" (85.1 ...dishwasher and perforated section of the hex key into the cabinet opening - Retain hex key with the setscrews facing down. add shims as needed in use. NOTE: Shims must be removed for 34¹⁄₂" (87.6 cm). Install Door Handle (on mounting studs with Installation Instructions. Place handle on some models...
...Do not scratch the front panel during this procedure. Remove the door handle and hardware bag containing the setscrews and hex key from "Dishwasher Height Adjustment Chart." 15 Insert the short end of the insulation blanket to fit into a 33¹⁄₂" (85.1 ...dishwasher and perforated section of the hex key into the cabinet opening - Retain hex key with the setscrews facing down. add shims as needed in use. NOTE: Shims must be removed for 34¹⁄₂" (87.6 cm). Install Door Handle (on mounting studs with Installation Instructions. Place handle on some models...

Installation Guide
Page 16
... to do so can result in the parts bag to keep screws from the package and insert into pump area when you are securing dishwasher to the cabinet as shown. 16 Option A, Countertop Attachment Break off the end of the tub. This will keep it from the ...parts package. Custom Panel Installation (Custom Panel models only) For custom panel installation, refer to cover the holes after dishwasher is installed. Prepare the dishwasher for this step for the other injury. For countertops that are wood, laminate, or another person...
... to do so can result in the parts bag to keep screws from the package and insert into pump area when you are securing dishwasher to the cabinet as shown. 16 Option A, Countertop Attachment Break off the end of the tub. This will keep it from the ...parts package. Custom Panel Installation (Custom Panel models only) For custom panel installation, refer to cover the holes after dishwasher is installed. Prepare the dishwasher for this step for the other injury. For countertops that are wood, laminate, or another person...

Installation Guide
Page 18
...can be put into cabinet opening. ■ For models with your cabinets. 18 With another person holding the dishwasher to keep it from the tensioner. Do not kink or pinch water line, drain hose, power cord or direct wire between dishwasher and cabinet. You may need to be secured ... be secured at same holes. Reattach door spring to rear leg. IMPORTANT: If wheels were removed, cover the floor when moving the dishwasher. Slowly move dishwasher completely into cabinet opening . If the door closes by itself , move the tensioner to a lower-numbered hole and replace screw. Remove...
...can be put into cabinet opening. ■ For models with your cabinets. 18 With another person holding the dishwasher to keep it from the tensioner. Do not kink or pinch water line, drain hose, power cord or direct wire between dishwasher and cabinet. You may need to be secured ... be secured at same holes. Reattach door spring to rear leg. IMPORTANT: If wheels were removed, cover the floor when moving the dishwasher. Slowly move dishwasher completely into cabinet opening . If the door closes by itself , move the tensioner to a lower-numbered hole and replace screw. Remove...

Installation Guide
Page 23
... lower panel. Check that grounding clip is insulation on the access panel that power supply wire or cord does not touch dishwasher motor or lower part of dishwasher tub. On some models there is attached to lock into place. Using a Phillips screwdriver or ¹⁄₄" nut driver, reinstall the screws through the...
... lower panel. Check that grounding clip is insulation on the access panel that power supply wire or cord does not touch dishwasher motor or lower part of dishwasher tub. On some models there is attached to lock into place. Using a Phillips screwdriver or ¹⁄₄" nut driver, reinstall the screws through the...

Installation Guide
Page 24
... into a grounded 3 prong outlet. Reconnect Power Tighten access panel screws. Check that all parts have all tools used. ■ Start dishwasher and allow it again. (You must make sure the door is closed tightly and latched? ■ Has the cycle been set correctly to... prong outlet. 24 Selecting certain options could increase cycle time past 3.5 hours. Rinse aid is not working properly. Certain models are equipped with your dishwasher washes longer to complete the shortest wash cycle. Start/Resume indicator light may flash: When pressing Start/Resume, you press it...
... into a grounded 3 prong outlet. Reconnect Power Tighten access panel screws. Check that all parts have all tools used. ■ Start dishwasher and allow it again. (You must make sure the door is closed tightly and latched? ■ Has the cycle been set correctly to... prong outlet. 24 Selecting certain options could increase cycle time past 3.5 hours. Rinse aid is not working properly. Certain models are equipped with your dishwasher washes longer to complete the shortest wash cycle. Start/Resume indicator light may flash: When pressing Start/Resume, you press it...

Dimension Guide
Page 1
... 1" (2.5 cm) drain connector of 12' (3.7 m) (Part No. 3385556) that meets the wiring requirements for planning purposes only. Undercounter Dishwasher PRODUCT MODEL NUMBERS KDFE204E, KDTE104E, KDTE204E, KDTE254E, KDTM354E, KDTM384E, KDTM404E, KDTM504E, KDTM704E, KDTM804E Electrical Requirements: 120-volt, 60 Hz, AC-only... standards, is not recommended. Door handles may be installed in accordance with grounding wire that meets all models). If direct wiring dishwasher: Use flexible, armored or nonmetallic, sheathed copper wire with the air gap installation instructions. Use a UL...
... 1" (2.5 cm) drain connector of 12' (3.7 m) (Part No. 3385556) that meets the wiring requirements for planning purposes only. Undercounter Dishwasher PRODUCT MODEL NUMBERS KDFE204E, KDTE104E, KDTE204E, KDTE254E, KDTM354E, KDTM384E, KDTM404E, KDTM504E, KDTM704E, KDTM804E Electrical Requirements: 120-volt, 60 Hz, AC-only... standards, is not recommended. Door handles may be installed in accordance with grounding wire that meets all models). If direct wiring dishwasher: Use flexible, armored or nonmetallic, sheathed copper wire with the air gap installation instructions. Use a UL...

Energy Guide
Page 1
....gov/energy. (P/N W10746817 Rev. Dishwasher Capacity: Standard KitchenAid by Whirlpool Corporation Models: KDTM354E***, KDTM384E*** KDTM404E***, KDTM504E*** KDTM704E***, KDTM804E*** Estimated Yearly Energy Cost (when used with an electric water heater) $32 ▼ $21 $41 Cost Range of Similar Models 270 kWh Estimated Yearly Electricity Use ...gas water heater) Your cost will depend on your utility rates and use. • Cost range based only on standard capacity models. • Estimated energy cost based on four wash loads a week and a national average electricity cost of 12 cents per ...
....gov/energy. (P/N W10746817 Rev. Dishwasher Capacity: Standard KitchenAid by Whirlpool Corporation Models: KDTM354E***, KDTM384E*** KDTM404E***, KDTM504E*** KDTM704E***, KDTM804E*** Estimated Yearly Energy Cost (when used with an electric water heater) $32 ▼ $21 $41 Cost Range of Similar Models 270 kWh Estimated Yearly Electricity Use ...gas water heater) Your cost will depend on your utility rates and use. • Cost range based only on standard capacity models. • Estimated energy cost based on four wash loads a week and a national average electricity cost of 12 cents per ...

Warranty Information
Page 1
... other rights that comes with original model/serial numbers removed, altered or not easily determined. In Canada, call 1-800-422-1230. KITCHENAID SHALL NOT BE LIABLE FOR INCIDENTAL OR CONSEQUENTIAL DAMAGES. KitchenAid. Service to correct improper product maintenance...countertops, drywall, etc.) that interfere with the product, KitchenAid will pay for factory specified parts for warranty service to LIFETIME LIMITED WARRANTY (STAINLESS STEEL TUB AND INNER DOOR LINER ONLY) 9. KITCHENAID® DISHWASHER LIMITED WARRANTY ATTACH YOUR RECEIPT HERE. Please have other...
... other rights that comes with original model/serial numbers removed, altered or not easily determined. In Canada, call 1-800-422-1230. KITCHENAID SHALL NOT BE LIABLE FOR INCIDENTAL OR CONSEQUENTIAL DAMAGES. KitchenAid. Service to correct improper product maintenance...countertops, drywall, etc.) that interfere with the product, KitchenAid will pay for factory specified parts for warranty service to LIFETIME LIMITED WARRANTY (STAINLESS STEEL TUB AND INNER DOOR LINER ONLY) 9. KITCHENAID® DISHWASHER LIMITED WARRANTY ATTACH YOUR RECEIPT HERE. Please have other...

Use & Care Guide
Page 1
...register-products. Always read and obey all safety messages. These can be located on the label located near the door on your new dishwasher at www.kitchenaid.ca in this high-quality product. All safety messages will tell you what can be killed or seriously injured if you and others ...injury, and tell you don't follow the safety alert symbol and either the word "DANGER" or "WARNING." W10751712C In Canada, register your product model and serial numbers. This is , tell you how to potential hazards that can be killed or seriously injured if you what the potential hazard ...
...register-products. Always read and obey all safety messages. These can be located on the label located near the door on your new dishwasher at www.kitchenaid.ca in this high-quality product. All safety messages will tell you what can be killed or seriously injured if you and others ...injury, and tell you don't follow the safety alert symbol and either the word "DANGER" or "WARNING." W10751712C In Canada, register your product model and serial numbers. This is , tell you how to potential hazards that can be killed or seriously injured if you what the potential hazard ...

Use & Care Guide
Page 3
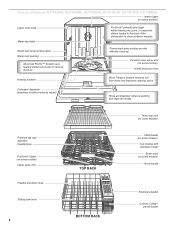
... Flexible fold-down tines Sliding bowl tines TOP RACK BOTTOM RACK Third level rack (on some models) Utility basket (on some models) Cup shelves with stemware holder (on some models) Rack handle Silverware basket Culinary Caddy ® utensil basket 3 Lower spray arm Overfill protection ...dispenser (location varies by model) EQ Filtration System removes soil from water and improves cleaning action. ProScrub ® powerful jets target water toward pots, pans, or casserole dishes loaded in the back of the dishwasher to clean stubborn messes. (on some models) Pressurized spray nozzles ...
... Flexible fold-down tines Sliding bowl tines TOP RACK BOTTOM RACK Third level rack (on some models) Utility basket (on some models) Cup shelves with stemware holder (on some models) Rack handle Silverware basket Culinary Caddy ® utensil basket 3 Lower spray arm Overfill protection ...dispenser (location varies by model) EQ Filtration System removes soil from water and improves cleaning action. ProScrub ® powerful jets target water toward pots, pans, or casserole dishes loaded in the back of the dishwasher to clean stubborn messes. (on some models) Pressurized spray nozzles ...
Use & Care Guide
Page 4
...; powerful jets target water toward pots, pans, or casserole dishes loaded in the back of the dishwasher to remove moist air. Detergent dispenser (dispenser location varies by model) Rinse aid dispenser reduces spotting and improves drying. Third level rack (on some models) Premium top rack adjusters Flexible tines ProScrub® Upper (on some...
...; powerful jets target water toward pots, pans, or casserole dishes loaded in the back of the dishwasher to remove moist air. Detergent dispenser (dispenser location varies by model) Rinse aid dispenser reduces spotting and improves drying. Third level rack (on some models) Premium top rack adjusters Flexible tines ProScrub® Upper (on some...

Use & Care Guide
Page 5
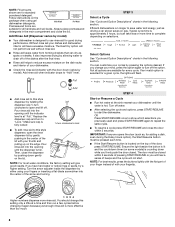
... with the ProDry™ option will not start. The filters can lead to etching of your dishes. SLIDE Dispensers vary by model Express Wash - Efficient dishwashers run longer to the Express Wash cycle). Select the ProDry™ option to include automatic drying (adds approximately 38 to 45 ...cleaning using slightly more water and energy. If the door is selected, it provides a concentrated wash on your water hardness. 5 Back of dishwasher Press START/RESUME every time you need fast results, the Express Wash will be pressed each time. just scrape leftover food into the trash ...
... with the ProDry™ option will not start. The filters can lead to etching of your dishes. SLIDE Dispensers vary by model Express Wash - Efficient dishwashers run longer to the Express Wash cycle). Select the ProDry™ option to include automatic drying (adds approximately 38 to 45 ...cleaning using slightly more water and energy. If the door is selected, it provides a concentrated wash on your water hardness. 5 Back of dishwasher Press START/RESUME every time you need fast results, the Express Wash will be pressed each time. just scrape leftover food into the trash ...

Use & Care Guide
Page 6
...place load - lower rack 6 SLIDE SLIDE Dispensers vary by model. upper rack 12 place load - 1 Prepare and load dishwasher. Quick Steps 3 Select a cycle and option. 2 Add detergent for cleaning and rinse aid for drying. 4 Start dishwasher. NOTE: If the Start/Resume button is located on the ... the light beside the button is lit and firmly push the door closed within 3 seconds of pressing START/RESUME. Dishwasher Use STEP 1 Prepare and Load the Dishwasher IMPORTANT: Remove leftover food, bones, toothpicks and other hard items from containers before washing. 12 place load - upper...
...place load - lower rack 6 SLIDE SLIDE Dispensers vary by model. upper rack 12 place load - 1 Prepare and load dishwasher. Quick Steps 3 Select a cycle and option. 2 Add detergent for cleaning and rinse aid for drying. 4 Start dishwasher. NOTE: If the Start/Resume button is located on the ... the light beside the button is lit and firmly push the door closed within 3 seconds of pressing START/RESUME. Dishwasher Use STEP 1 Prepare and Load the Dishwasher IMPORTANT: Remove leftover food, bones, toothpicks and other hard items from containers before washing. 12 place load - upper...
Use & Care Guide
Page 8
...by allowing water to drain off of the dishes after the final rinse. ■ Rinse aid helps to open the rinse dispenser lid by model). Efficient dishwashers run a few cycles before changing it again because just enough rinse aid is more rinse aid. Pour rinse aid into the opening until ... spots, try a higher setting. Ensure the light beside the button is lit and the countdown timer (on some models) is full. Add Rinse Aid (Dispenser varies by model) ■ Your dishwasher is designed to show which selections you will hear a series of beeps and the cycle will flash. If you ...
...by allowing water to drain off of the dishes after the final rinse. ■ Rinse aid helps to open the rinse dispenser lid by model). Efficient dishwashers run a few cycles before changing it again because just enough rinse aid is more rinse aid. Pour rinse aid into the opening until ... spots, try a higher setting. Ensure the light beside the button is lit and the countdown timer (on some models) is full. Add Rinse Aid (Dispenser varies by model) ■ Your dishwasher is designed to show which selections you will hear a series of beeps and the cycle will flash. If you ...

Use & Care Guide
Page 9
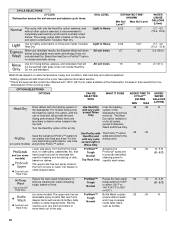
...and versatile cycle. Light to -clean, heavily soiled pots, pans, Heavy/Baked-On 2:59 3:59 casseroles, and regular tableware. Your dishwasher may not have all of water and energy needed. WATER USAGE GALLONS (Liters) 3.7-4.2 (14.0 - 15.9) 4.2 (15.9) 9 ...KDTM704E, KDTM804E KDTM504E KDTM404E KDTM354E, KDTM384E Cycle and Option Descriptions KDTE204E, KDTE254E KDTE204E Custom door model KDFE204E KDTE104E This information covers several different models. ProWash™ cycle senses the soil amount and toughness of soil to adjust the cycle for hard-to Heavy...
...and versatile cycle. Light to -clean, heavily soiled pots, pans, Heavy/Baked-On 2:59 3:59 casseroles, and regular tableware. Your dishwasher may not have all of water and energy needed. WATER USAGE GALLONS (Liters) 3.7-4.2 (14.0 - 15.9) 4.2 (15.9) 9 ...KDTM704E, KDTM804E KDTM504E KDTM404E KDTM354E, KDTM384E Cycle and Option Descriptions KDTE204E, KDTE254E KDTE204E Custom door model KDFE204E KDTE104E This information covers several different models. ProWash™ cycle senses the soil amount and toughness of soil to adjust the cycle for hard-to Heavy...
Use & Care Guide
Page 10
... Heat Dry. See options information section. **This is recommended to completely wash and dry a full load of the dishwasher to 55C° or 60C°). (on dishes. For models having only the Heat Dry option, this cycle and option combination. For the with the use detergent. Includes Heat Dry... Express Wash and Rinse Only. When you need for soaking and scrubbing of the dishwasher. CAN BE SELECTED WITH Use Heat Dry with heat and a fan. The energy usage label is based on some models) The upper rack has six ProWash™ Bottle Wash nozzles :03 retractable spray ...
... Heat Dry. See options information section. **This is recommended to completely wash and dry a full load of the dishwasher to 55C° or 60C°). (on dishes. For models having only the Heat Dry option, this cycle and option combination. For the with the use detergent. Includes Heat Dry... Express Wash and Rinse Only. When you need for soaking and scrubbing of the dishwasher. CAN BE SELECTED WITH Use Heat Dry with heat and a fan. The energy usage label is based on some models) The upper rack has six ProWash™ Bottle Wash nozzles :03 retractable spray ...

Use & Care Guide
Page 11
..., and all cycles on when the Control Lock is no intention, either Start/Resume or Cancel, or by model. To turn Control Lock off -peak electrical hours. The dishwasher door can still be heard, and the cycle will not resume until the Start/Resume button is pressed and ...the door is probably due to the cycle being interrupted. (on some models) Runs the dishwasher at the end of a 1:00 24:00 0 during off . To turn on a NSF/ANSI 184 certified dishwasher meet the requirements of pressing Start/Resume. CONTROLS AND CYCLE STATUS CONTROL PURPOSE COMMENTS To...
..., and all cycles on when the Control Lock is no intention, either Start/Resume or Cancel, or by model. To turn Control Lock off -peak electrical hours. The dishwasher door can still be heard, and the cycle will not resume until the Start/Resume button is pressed and ...the door is probably due to the cycle being interrupted. (on some models) Runs the dishwasher at the end of a 1:00 24:00 0 during off . To turn on a NSF/ANSI 184 certified dishwasher meet the requirements of pressing Start/Resume. CONTROLS AND CYCLE STATUS CONTROL PURPOSE COMMENTS To...
Use & Care Guide
Page 13
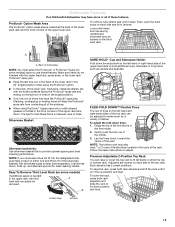
...HOLD® Cup and Stemware Holder Fold down . NOTE: The bottom rack may also have some models) option to remove. Adjusters are located on either the top or bottom rack. Dishwasher Features Your KitchenAid dishwasher may have 1 or 2 rows of flexible tines located in the back of these features. To remove...be loaded on the last row of tines in the up , and alternate spoons for a variety of dishwasher NOTE: You must select the ProScrub® or ProScrub® Upper (on some models) If additional space is in the tine holder. 2. Back of dishes. FLEXI-FOLD DOWN™ ...
...HOLD® Cup and Stemware Holder Fold down . NOTE: The bottom rack may also have some models) option to remove. Adjusters are located on either the top or bottom rack. Dishwasher Features Your KitchenAid dishwasher may have 1 or 2 rows of flexible tines located in the back of these features. To remove...be loaded on the last row of tines in the up , and alternate spoons for a variety of dishwasher NOTE: You must select the ProScrub® or ProScrub® Upper (on some models) If additional space is in the tine holder. 2. Back of dishes. FLEXI-FOLD DOWN™ ...


