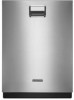

Installation Guide
Page 2
... Drain Hose 9 Install Moisture Barrier 11 Prepare Dishwasher 11 Make Power Supply Cord Connection 12 Determine Cabinet Opening 14 Install Door Handle 15 Custom Panel Dimensions 15 Install Custom Panel 15 Choose Attachment Option 17 Prepare Water Supply Line 18 Move Dishwasher Close to Cabinet Opening 19 Connect to Water Supply...
... Drain Hose 9 Install Moisture Barrier 11 Prepare Dishwasher 11 Make Power Supply Cord Connection 12 Determine Cabinet Opening 14 Install Door Handle 15 Custom Panel Dimensions 15 Install Custom Panel 15 Choose Attachment Option 17 Prepare Water Supply Line 18 Move Dishwasher Close to Cabinet Opening 19 Connect to Water Supply...
Installation Guide
Page 4
Check location where dishwasher will be securely attached to floor. ■ level floor. Helpful Tip: Be sure to accurately measure dimensions and ensure dishwasher is level if the floor in the dishwasher opening is uneven (example: Flooring extends only partway into opening for a ...run drain lines, water lines or electrical wiring where they can interfere with floor at front of time or in the "Product and Cabinet Opening Dimensions" section. 4 Shelter dishwasher and water lines leading to order. In Canada, call 1-800-807-6777. The location must provide clearance between the...
Check location where dishwasher will be securely attached to floor. ■ level floor. Helpful Tip: Be sure to accurately measure dimensions and ensure dishwasher is level if the floor in the dishwasher opening is uneven (example: Flooring extends only partway into opening for a ...run drain lines, water lines or electrical wiring where they can interfere with floor at front of time or in the "Product and Cabinet Opening Dimensions" section. 4 Shelter dishwasher and water lines leading to order. In Canada, call 1-800-807-6777. The location must provide clearance between the...

Installation Guide
Page 5
... 28" (70 cm). 30" (76.2 cm) 33¹⁄₂" (85.1 cm) min. Insulation may be compressed (not used on dishwasher. D. Product and Cabinet Opening Dimensions 24¹⁄₂" (62.2 cm) B 23⁷⁄₈" (62.6 cm) 27¹⁄₂" (68.8 cm) C B. with wheels removed ³⁄₄" (1.9 cm...
... 28" (70 cm). 30" (76.2 cm) 33¹⁄₂" (85.1 cm) min. Insulation may be compressed (not used on dishwasher. D. Product and Cabinet Opening Dimensions 24¹⁄₂" (62.2 cm) B 23⁷⁄₈" (62.6 cm) 27¹⁄₂" (68.8 cm) C B. with wheels removed ³⁄₄" (1.9 cm...

Installation Guide
Page 7
... Opening- Existing Utilities Electrical Shock Hazard Disconnect electrical power at the fuse box or circuit breaker box before installing dishwasher. See "Product and Cabinet Opening Dimensions" section. 7 If they do so can result in cabinet side or rear. Prepare Cabinet Opening-New Utilities Prepare and route the electrical supply Option A, Power...
... Opening- Existing Utilities Electrical Shock Hazard Disconnect electrical power at the fuse box or circuit breaker box before installing dishwasher. See "Product and Cabinet Opening Dimensions" section. 7 If they do so can result in cabinet side or rear. Prepare Cabinet Opening-New Utilities Prepare and route the electrical supply Option A, Power...

Installation Guide
Page 8
... (Part Number 302797 not provided). Tape cable to the right front side of copper tubing for the water supply line. 8 See "Product and Cabinet Opening Dimensions" section. Wood cabinet: Sand the hole until smooth. Option B, Direct Wire: Helpful Tip: Wiring the dishwasher will be easier if you route the cable into...
... (Part Number 302797 not provided). Tape cable to the right front side of copper tubing for the water supply line. 8 See "Product and Cabinet Opening Dimensions" section. Wood cabinet: Sand the hole until smooth. Option B, Direct Wire: Helpful Tip: Wiring the dishwasher will be easier if you route the cable into...

Installation Guide
Page 15
Push the door handle tightly against the door. Tighten the setscrews ¹⁄₄ turn past snug. Custom Panel Dimensions Install Custom Panel Follow steps below: A customer supplied panel must be countersunk for a ³⁄₄" (19.1 mm) thick wood panel. NOTES: ■ The handle ... weigh no more than wood are already installed in the handle. Install the custom hardware handle(s) on both sides and all edges of the precise dimensions needed. Retain hex key with Installation Instructions. It is attached to specific...
Push the door handle tightly against the door. Tighten the setscrews ¹⁄₄ turn past snug. Custom Panel Dimensions Install Custom Panel Follow steps below: A customer supplied panel must be countersunk for a ³⁄₄" (19.1 mm) thick wood panel. NOTES: ■ The handle ... weigh no more than wood are already installed in the handle. Install the custom hardware handle(s) on both sides and all edges of the precise dimensions needed. Retain hex key with Installation Instructions. It is attached to specific...

Dimension Guide
Page 1
...use a new drain hose with ³⁄₄" N.P.T. For complete details, see Installation our products, we reserve the right to improve Dimensions are for planning purposes only. A time-delay fuse or circuit breaker and separate circuit is 28" (70 cm). ³⁄₄... policy includes a continuous commitment to change without notice. Use ³⁄₈" O.D. Drain Requirements: A new drain hose is supplied with product. PRODUCT DIMENSIONS 24¹⁄₂" (62.2 cm) B 23⁷⁄₈" (60.6 cm) 27¹⁄₂" (68.8 cm) C 30" ...
...use a new drain hose with ³⁄₄" N.P.T. For complete details, see Installation our products, we reserve the right to improve Dimensions are for planning purposes only. A time-delay fuse or circuit breaker and separate circuit is 28" (70 cm). ³⁄₄... policy includes a continuous commitment to change without notice. Use ³⁄₈" O.D. Drain Requirements: A new drain hose is supplied with product. PRODUCT DIMENSIONS 24¹⁄₂" (62.2 cm) B 23⁷⁄₈" (60.6 cm) 27¹⁄₂" (68.8 cm) C 30" ...

Dimension Guide
Page 2
...;") Clear Area 6¹⁄₄" (15.9 cm) 2" (5.1 cm) 1³⁄₄" (4.4 cm) Because Whirlpool Corporation policy includes a continuous commitment to improve Dimensions are for planning purposes only. CABINET CUTOUT DIMENSIONS NOTE: Shaded areas of cabinet walls show where utility connections may be reduced to 33¹⁄₂" (85.1 cm) by removing...
...;") Clear Area 6¹⁄₄" (15.9 cm) 2" (5.1 cm) 1³⁄₄" (4.4 cm) Because Whirlpool Corporation policy includes a continuous commitment to improve Dimensions are for planning purposes only. CABINET CUTOUT DIMENSIONS NOTE: Shaded areas of cabinet walls show where utility connections may be reduced to 33¹⁄₂" (85.1 cm) by removing...

