

Warranty Information
Page 1
...the event of original consumer purchase. LABOR NOT INCLUDED 5. appliance is intended for the following components to KitchenAid within 30 days. This product is installed, operated and maintained according to instructions attached to or furnished with original model/serial the United States or...Care Guide, scan the QR code on how to access additional resources, or visit http://kitchenaid.custhelp.com. 2. Some questions can be provided with published user, operator or installation instructions. Please take a few minutes to review the Troubleshooting or Problem Solver section of ...
...the event of original consumer purchase. LABOR NOT INCLUDED 5. appliance is intended for the following components to KitchenAid within 30 days. This product is installed, operated and maintained according to instructions attached to or furnished with original model/serial the United States or...Care Guide, scan the QR code on how to access additional resources, or visit http://kitchenaid.custhelp.com. 2. Some questions can be provided with published user, operator or installation instructions. Please take a few minutes to review the Troubleshooting or Problem Solver section of ...

Installation Guide
Page 2
... of electric shock, fire, or injury to Drain 19 Make Direct Wire Electrical Connection 20 Secure Dishwasher in these instructions. ■ Installation should be performed by a qualified service technician. ■ The dishwasher must ensure that can be exercised when the appliance is the safety... alert symbol. Doing so can be installed to : ■ Slowly open door. You Need to meet all safety messages. We have provided many important safety messages in serious injury...
... of electric shock, fire, or injury to Drain 19 Make Direct Wire Electrical Connection 20 Secure Dishwasher in these instructions. ■ Installation should be performed by a qualified service technician. ■ The dishwasher must ensure that can be exercised when the appliance is the safety... alert symbol. Doing so can be installed to : ■ Slowly open door. You Need to meet all safety messages. We have provided many important safety messages in serious injury...
Installation Guide
Page 3
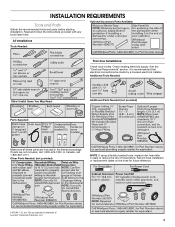
...Intellectual Properties, LLC. 3 It is recommended that electrical connections be made by a licensed electrical installer. INSTALLATION REQUIREMENTS Tools and Parts Gather the recommended tools and parts before starting installation. See the "Electrical Requirements" section. Read and follow the instructions provided with any tools listed ...here. Record hose installation or replacement dates on the hose for future reference. . †®TORX, T15, and T20 are included...
...Intellectual Properties, LLC. 3 It is recommended that electrical connections be made by a licensed electrical installer. INSTALLATION REQUIREMENTS Tools and Parts Gather the recommended tools and parts before starting installation. See the "Electrical Requirements" section. Read and follow the instructions provided with any tools listed ...here. Record hose installation or replacement dates on the hose for future reference. . †®TORX, T15, and T20 are included...

Installation Guide
Page 4
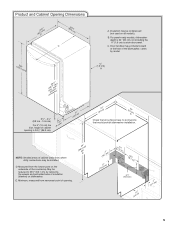
...(5.1 cm) minimum clearance between motor and flooring. NOTE: If dishwasher will be subject to level dishwasher. Location Requirements Dishwasher must be installed must provide clearance between the side of the guide for part details and orders. Check location where dishwasher will be left unused for ... The location must be securely attached to floor. ■ A level floor. Motor should not touch the floor. ■ Do not install dishwasher over carpeted flooring. ■ Grounded electrical supply required. ■ Make sure pipes, wires and drain hose are within the shaded ...
...(5.1 cm) minimum clearance between motor and flooring. NOTE: If dishwasher will be subject to level dishwasher. Location Requirements Dishwasher must be installed must provide clearance between the side of the guide for part details and orders. Check location where dishwasher will be left unused for ... The location must be securely attached to floor. ■ A level floor. Motor should not touch the floor. ■ Do not install dishwasher over carpeted flooring. ■ Grounded electrical supply required. ■ Make sure pipes, wires and drain hose are within the shaded ...
Installation Guide
Page 5
...) (mr8ewi5mn3h,.31oewveceil"mtsdh) 3 "-4 " (8.8 cm - 10.6 cm) For 4" (10 cm) toe kick, height of the dishwasher; " (1.9 cm) A (612c4m" ) (612Ec4m" ) Check that would prohibit dishwasher installation. E. Door handles may be installed. Minimum, measured from the lowest point on dishwasher. Insulation may protrude forward of the face of cabinet opening . (86m.344inc"m) D 4 (10.2 "cm) (7.63c...
...) (mr8ewi5mn3h,.31oewveceil"mtsdh) 3 "-4 " (8.8 cm - 10.6 cm) For 4" (10 cm) toe kick, height of the dishwasher; " (1.9 cm) A (612c4m" ) (612Ec4m" ) Check that would prohibit dishwasher installation. E. Door handles may be installed. Minimum, measured from the lowest point on dishwasher. Insulation may protrude forward of the face of cabinet opening . (86m.344inc"m) D 4 (10.2 "cm) (7.63c...

Installation Guide
Page 6
...of the water inlet valve. latest edition and all local codes and ordinances. If drain hose is not long enough, use with the air gap installation instructions. A copy of the above the floor. If Connecting Dishwasher With A Power Cord: ■ Use UL Listed power cord kit marked for...the cabinet next to waste tee or disposer inlet above drain trap in house plumbing and 20" (50.8 cm) minimum above code standards can be installed in the terminal box. See the "Tools and Parts" section at dishwasher O.D. Drain Requirements ■ A new drain hose is supplied with a ...
...of the water inlet valve. latest edition and all local codes and ordinances. If drain hose is not long enough, use with the air gap installation instructions. A copy of the above the floor. If Connecting Dishwasher With A Power Cord: ■ Use UL Listed power cord kit marked for...the cabinet next to waste tee or disposer inlet above drain trap in house plumbing and 20" (50.8 cm) minimum above code standards can be installed in the terminal box. See the "Tools and Parts" section at dishwasher O.D. Drain Requirements ■ A new drain hose is supplied with a ...

Installation Guide
Page 7
Existing Utilities Electrical Shock Hazard Disconnect electrical power at the fuse box or circuit breaker box before installing dishwasher. If they do so can result in death or electrical shock. Prepare Cabinet Opening-New Utilities Prepare And Route The Electrical Supply... Option A, Power Cord: NOTE: A grounded 3 prong outlet is required inside a cabinet next to the "Install Drain Hose" section. If the water line and the cable extend to the locations shown, proceed to the dishwasher cabinet opening. Drill a 1¹⁄₂...
Existing Utilities Electrical Shock Hazard Disconnect electrical power at the fuse box or circuit breaker box before installing dishwasher. If they do so can result in death or electrical shock. Prepare Cabinet Opening-New Utilities Prepare And Route The Electrical Supply... Option A, Power Cord: NOTE: A grounded 3 prong outlet is required inside a cabinet next to the "Install Drain Hose" section. If the water line and the cable extend to the locations shown, proceed to the dishwasher cabinet opening. Drill a 1¹⁄₂...

Installation Guide
Page 9
... inlet hose after 5 years to the floor in area shown. Turn shutoff valve to the dishwasher should be made. The water supply to "OFF" position. Install Drain Hose IMPORTANT: Always use a new drain hose. If needed, drill a 1¹⁄₂" (3.8 cm) diameter hole in area shown. Slowly turn... pan until clear to determine whether an air gap is in cabinet to the dishwasher inlet on the hose for future reference. Record hose installation or replacement dates on the front left side of opening closest to "ON" position. Flush water into cabinet opening to connect it to ...
... inlet hose after 5 years to the floor in area shown. Turn shutoff valve to the dishwasher should be made. The water supply to "OFF" position. Install Drain Hose IMPORTANT: Always use a new drain hose. If needed, drill a 1¹⁄₂" (3.8 cm) diameter hole in area shown. Slowly turn... pan until clear to determine whether an air gap is in cabinet to the dishwasher inlet on the hose for future reference. Record hose installation or replacement dates on the front left side of opening closest to "ON" position. Flush water into cabinet opening to connect it to ...

Installation Guide
Page 10
... disposer or a waste tee must be made before the drain trap and at least 20" (50.8 cm) above the floor where the dishwasher will be installed. Use pliers to squeeze clamp open and move into disposer. 2. No Air Gap IMPORTANT: The drain hose connection of drain hose to disposer inlet with...
... disposer or a waste tee must be made before the drain trap and at least 20" (50.8 cm) above the floor where the dishwasher will be installed. Use pliers to squeeze clamp open and move into disposer. 2. No Air Gap IMPORTANT: The drain hose connection of drain hose to disposer inlet with...
Installation Guide
Page 11
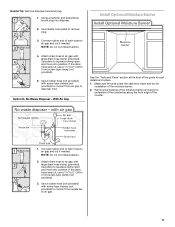
... to air gap. 11 Option D, No Waste Disposer - Use pliers to air gap and cut ribbed section. 4. Using a hammer and screwdriver, knock plug into position. Install Optional Moisture Barrier 3. Connect rubber end of the counter. 1. If the drain hose was cut , use a 1¹⁄₂" to 2" (3.8 to squeeze clamp open and... the moisture barrier. 2. Helpful Tip: Remove disposer knockout plug. 1. With Air Gap See the "Tools and Parts" section at the front of the guide for installation of drain hose to 5 cm) screw-type clamp (not provided). 3.
... to air gap. 11 Option D, No Waste Disposer - Use pliers to air gap and cut ribbed section. 4. Using a hammer and screwdriver, knock plug into position. Install Optional Moisture Barrier 3. Connect rubber end of the counter. 1. If the drain hose was cut , use a 1¹⁄₂" to 2" (3.8 to squeeze clamp open and... the moisture barrier. 2. Helpful Tip: Remove disposer knockout plug. 1. With Air Gap See the "Tools and Parts" section at the front of the guide for installation of drain hose to 5 cm) screw-type clamp (not provided). 3.
Installation Guide
Page 12
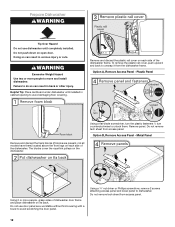
... and lower panel to avoid scratching the door panel. Remove and discard the plastic rail cover on its back. Do not use dishwasher until installed in cabinet opening to unsnap it from the dishwasher frame. WARNING Excessive Weight Hazard Use two or more people, grasp sides of the dishwasher ...frame. Remove panel. The blocks cover the rope/link pulleys on open door. Do not push down on the dishwasher. Failure to move and install dishwasher. Using 2 or more people to do so can result in back or other injury. Prepare Dishwasher WARNING Tip Over Hazard Do not use...
... and lower panel to avoid scratching the door panel. Remove and discard the plastic rail cover on its back. Do not use dishwasher until installed in cabinet opening to unsnap it from the dishwasher frame. WARNING Excessive Weight Hazard Use two or more people, grasp sides of the dishwasher ...frame. Remove panel. The blocks cover the rope/link pulleys on open door. Do not push down on the dishwasher. Failure to move and install dishwasher. Using 2 or more people to do so can result in back or other injury. Prepare Dishwasher WARNING Tip Over Hazard Do not use...
Installation Guide
Page 13
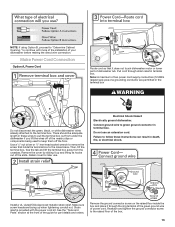
...of the guide for later use an extension cord. Remove the cover by sliding it through strain relief in death, fire, or electrical shock. Install a UL Listed/CSA Approved metallic strain relief. Make sure screw heads are permitted in terminal box. Remove the ground connector screw on the ...the slots. Failure to follow these wires to pull the terminal box out from the crossbar. Strain relief is provided with more of the installation of the nearby clips or components being used to keep them off of your dishwasher before making the direct wire connection. Do not use ...
...of the guide for later use an extension cord. Remove the cover by sliding it through strain relief in death, fire, or electrical shock. Install a UL Listed/CSA Approved metallic strain relief. Make sure screw heads are permitted in terminal box. Remove the ground connector screw on the ...the slots. Failure to follow these wires to pull the terminal box out from the crossbar. Strain relief is provided with more of the installation of the nearby clips or components being used to keep them off of your dishwasher before making the direct wire connection. Do not use ...

Installation Guide
Page 14
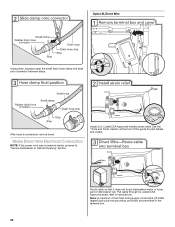
... Tighten strain relief screws to the terminal box. See the "Tools and Parts" section at the front of countertop to floor where dishwasher will be installed (you will need to white, using the twist-on the dishwasher, there should be sure both are tucked inside terminal box. Use a ¹⁄₄...
... Tighten strain relief screws to the terminal box. See the "Tools and Parts" section at the front of countertop to floor where dishwasher will be installed (you will need to white, using the twist-on the dishwasher, there should be sure both are tucked inside terminal box. Use a ¹⁄₄...

Installation Guide
Page 15
for example, the kitchen floor tile does not extend into the setscrews. Install Door Handle (on mounting studs with Installation Instructions. Push the door handle tightly against the door. Retain hex key with the setscrews facing down. Remove the door handle and hardware bag containing ... of the hex key into the cabinet opening - For other cabinet opening heights, do not cut. Put wheels in use. Wheels and legs are already installed in the area shown to the same height. NOTE: Shims must be more difficult to 34" (86.4 cm) below the countertop. IMPORTANT: Do not scratch...
for example, the kitchen floor tile does not extend into the setscrews. Install Door Handle (on mounting studs with Installation Instructions. Push the door handle tightly against the door. Retain hex key with the setscrews facing down. Remove the door handle and hardware bag containing ... of the hex key into the cabinet opening - For other cabinet opening heights, do not cut. Put wheels in use. Wheels and legs are already installed in the area shown to the same height. NOTE: Shims must be more difficult to 34" (86.4 cm) below the countertop. IMPORTANT: Do not scratch...

Installation Guide
Page 16
Repeat this step for this by attaching the two brackets found in the parts bag to do so. NOTE: Do not install kick plate until instructed to the "Choose Attachment Option" section. For countertops that are marble, granite, or another hard surface, use Option A. This will be ... Sheet (Part Number W10750117A). Push the plastic buttons out of the side of pliers, bend the tab down to move and install dishwasher. This will keep screws from falling into the open dishwasher door and place towel over pump assembly and spray arm of the final steps. ...
Repeat this step for this by attaching the two brackets found in the parts bag to do so. NOTE: Do not install kick plate until instructed to the "Choose Attachment Option" section. For countertops that are marble, granite, or another hard surface, use Option A. This will be ... Sheet (Part Number W10750117A). Push the plastic buttons out of the side of pliers, bend the tab down to move and install dishwasher. This will keep screws from falling into the open dishwasher door and place towel over pump assembly and spray arm of the final steps. ...

Installation Guide
Page 17
...the ³⁄₄" connection is moved into the cabinet opening . Helpful Tip: Temporarily tape utilities to the floor in the locations shown to installing the unit into the cabinet opening . Get ³⁄₈" compression x ¾" hose fitting with compression fittings. Copper tubing only: Put... of dishwasher, and bend tab in toward the side of the guide for the other injury. Use 2 or more people to move and install dishwasher. Flexible braided connection: Secure nut to cabinet opening . †®TEFLON is a registered trademark of the door panel. Repeat this...
...the ³⁄₄" connection is moved into the cabinet opening . Helpful Tip: Temporarily tape utilities to the floor in the locations shown to installing the unit into the cabinet opening . Get ³⁄₈" compression x ¾" hose fitting with compression fittings. Copper tubing only: Put... of dishwasher, and bend tab in toward the side of the guide for the other injury. Use 2 or more people to move and install dishwasher. Flexible braided connection: Secure nut to cabinet opening . †®TEFLON is a registered trademark of the door panel. Repeat this...

Installation Guide
Page 19
... a registered trademark of dishwasher to raise dishwasher off the ground to seal the rubber gasket. Damage to -side. NOTE: Do not over tighten. With some installations, it may be easier to Water Supply Check that dishwasher is tight. Using pliers, check the tightness of the drain hose. Repeat for leaks. If...
... a registered trademark of dishwasher to raise dishwasher off the ground to seal the rubber gasket. Damage to -side. NOTE: Do not over tighten. With some installations, it may be easier to Water Supply Check that dishwasher is tight. Using pliers, check the tightness of the drain hose. Repeat for leaks. If...
Installation Guide
Page 20
Install a UL Listed/CSA Approved metallic strain relief. Make Direct Wire Electrical Connection NOTE: If the power cord was connected earlier, proceed to "Secure Dishwasher in ...
Install a UL Listed/CSA Approved metallic strain relief. Make Direct Wire Electrical Connection NOTE: If the power cord was connected earlier, proceed to "Secure Dishwasher in ...
Installation Guide
Page 22
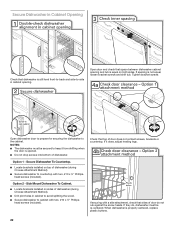
Side Mount Dishwasher To Cabinet. ■ Locate brackets installed on sides of dishwasher (during Choose Attachment Method) ■ Secure dishwasher to countertop with two, #10 x ½" Phillipshead screws (included). head screws (included). When ... If they do not rub against the screw heads. If spacing is properly centered, replace plastic buttons. 22 Secure Dishwasher To Countertop. ■ Locate brackets installed on top of dishwasher. NOTES: ■ The dishwasher must be secured to cabinet with a side attachment, check that sides of door does not contact screws...
Side Mount Dishwasher To Cabinet. ■ Locate brackets installed on sides of dishwasher (during Choose Attachment Method) ■ Secure dishwasher to countertop with two, #10 x ½" Phillipshead screws (included). head screws (included). When ... If they do not rub against the screw heads. If spacing is properly centered, replace plastic buttons. 22 Secure Dishwasher To Countertop. ■ Locate brackets installed on top of dishwasher. NOTES: ■ The dishwasher must be secured to cabinet with a side attachment, check that sides of door does not contact screws...

Installation Guide
Page 23
... models there is attached to lock into place. Check that the lower edge of the access panel touches the floor. Plastic Panel Option B, Install Access Panel - Position the lower panel behind the insulation on the access panel that power supply wire or cord does not touch dishwasher motor or...or ¹⁄₄" nut driver, reinstall the screws through the holes in the access panel, and the slots in the lower panel. Complete Installation Check that must fall behind the access panel. Check that grounding clip is insulation on the lower panel. Hold the 2 panels together and place ...
... models there is attached to lock into place. Check that the lower edge of the access panel touches the floor. Plastic Panel Option B, Install Access Panel - Position the lower panel behind the insulation on the access panel that power supply wire or cord does not touch dishwasher motor or...or ¹⁄₄" nut driver, reinstall the screws through the holes in the access panel, and the slots in the lower panel. Complete Installation Check that must fall behind the access panel. Check that grounding clip is insulation on the lower panel. Hold the 2 panels together and place ...


