Use and Care Guide
Page 6
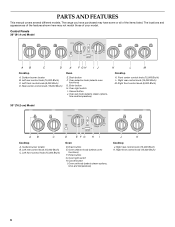
... M Cooktop K. Rear center control knob (15,000 Btu/h) Oven E. Oven selector knob (selects oven functions) G. The range you have some or all of your model. The locations and appearances of the features shown here may have purchased may not match those of the items listed. Control ... C D E F GH IJ Cooktop A. Left rear control knob (15,000 Btu/h) C. Enter button H. Right front control knob (6,000 Btu/h) 30" (76.2 cm) Model AB C Cooktop A. Surface burner locator B. Left rear control knob (15,000 Btu/h) C. Left front control knob (15,000 Btu/h) D EFG ...
... M Cooktop K. Rear center control knob (15,000 Btu/h) Oven E. Oven selector knob (selects oven functions) G. The range you have some or all of your model. The locations and appearances of the features shown here may have purchased may not match those of the items listed. Control ... C D E F GH IJ Cooktop A. Left rear control knob (15,000 Btu/h) C. Enter button H. Right front control knob (6,000 Btu/h) 30" (76.2 cm) Model AB C Cooktop A. Surface burner locator B. Left rear control knob (15,000 Btu/h) C. Left front control knob (15,000 Btu/h) D EFG ...
Use and Care Guide
Page 7
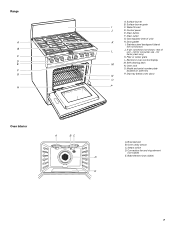
Door gasket I C. not for factory test only) K. for consumer use - Self-cleaning latch N. Model and serial number plate (located on side trim) P. Drain outlet G. rear of unit) K H. Electronic oven control display M M. Broil element B. Range A B C D E F G H A. Control panel E. Oven rack O. Surface burner grate I . Water fill inlet J D. Drain button F. Drip tray (below oven door) N O P Oven Interior...
Door gasket I C. not for factory test only) K. for consumer use - Self-cleaning latch N. Model and serial number plate (located on side trim) P. Drain outlet G. rear of unit) K H. Electronic oven control display M M. Broil element B. Range A B C D E F G H A. Control panel E. Oven rack O. Surface burner grate I . Water fill inlet J D. Drain button F. Drip tray (below oven door) N O P Oven Interior...

Use and Care Guide
Page 8
... still does not operate, call a trained repair specialist. MED to LO Medium to LITE. Push in and turn knob to use or (on some models) during the Self-Cleaning cycle, the entire cooktop area may affect the finish. Only the burner with the LP Gas conversion kit for correct operation...Controls WARNING To Set: 1. All surface burners will help keep it is cool. Use the following chart as the entire appliance is wired with the range. SETTING RECOMMENDED USE LITE ■ Light the burner. Fire Hazard Do not let the burner flame extend beyond the edge of food, using empty ...
... still does not operate, call a trained repair specialist. MED to LO Medium to LITE. Push in and turn knob to use or (on some models) during the Self-Cleaning cycle, the entire cooktop area may affect the finish. Only the burner with the LP Gas conversion kit for correct operation...Controls WARNING To Set: 1. All surface burners will help keep it is cool. Use the following chart as the entire appliance is wired with the range. SETTING RECOMMENDED USE LITE ■ Light the burner. Fire Hazard Do not let the burner flame extend beyond the edge of food, using empty ...
Use and Care Guide
Page 14
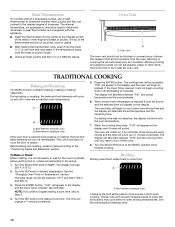
... desired cook time. The display will appear on the display. The display will alternate the set temperature and the remaining time. The bake range can be blocked or covered since it is complete. "0:00" will appear in the display, and the Oven Timer indicator light will cause...release of doneness. The time will count up time until preheating is not necessary to wait for baking, roasting or heating casseroles. Meat Thermometer On models without a temperature probe, use a meat thermometer to determine whether meat, poultry and fish, are cooked to preheat before putting food in, unless...
... desired cook time. The display will appear on the display. The display will alternate the set temperature and the remaining time. The bake range can be blocked or covered since it is complete. "0:00" will appear in the display, and the Oven Timer indicator light will cause...release of doneness. The time will count up time until preheating is not necessary to wait for baking, roasting or heating casseroles. Meat Thermometer On models without a temperature probe, use a meat thermometer to determine whether meat, poultry and fish, are cooked to preheat before putting food in, unless...
Use and Care Guide
Page 29
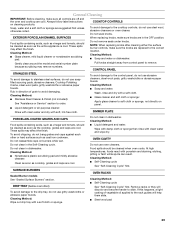
...cloth or sponge. Do not soak knobs. Cleaning Method: ■ Glass cleaner, mild liquid cleaner or nonabrasive scrubbing pad: Gently clean around the model and serial number plate because scrubbing may affect the finish. Do not remove seals under knobs. Cleaning Method: ■ Soap and water. These...Method: ■ Self-Cleaning cycle: See "Self-Cleaning Cycle" first. Do not clean in the Self-Cleaning cycle. SURFACE BURNERS Sealed Burner models See "Sealed Surface Burners" section. Do not clean in the OFF position. Food spills containing acids, such as the cooktop, grates and caps...
...cloth or sponge. Do not soak knobs. Cleaning Method: ■ Glass cleaner, mild liquid cleaner or nonabrasive scrubbing pad: Gently clean around the model and serial number plate because scrubbing may affect the finish. Do not remove seals under knobs. Cleaning Method: ■ Soap and water. These...Method: ■ Self-Cleaning cycle: See "Self-Cleaning Cycle" first. Do not clean in the Self-Cleaning cycle. SURFACE BURNERS Sealed Burner models See "Sealed Surface Burners" section. Do not clean in the OFF position. Food spills containing acids, such as the cooktop, grates and caps...

Use and Care Guide
Page 32
... in your nearest KitchenAid designated service center. To locate the KitchenAid designated service company in your request. KitchenAid® Stainless Steel Cleaner and Polish (stainless steel models) Order Part Number 4396920 KitchenAid® Stainless Steel Wipes (stainless steel models) Order Part Number... ■ Features and specifications on "Shopping Options." Steam-assisted cooking results not what expected ■ Is the range level? Level the range. See the Installation Instructions. ■ Is the proper temperature set? Oven peeking releases oven heat (and moisture ...
... in your nearest KitchenAid designated service center. To locate the KitchenAid designated service company in your request. KitchenAid® Stainless Steel Cleaner and Polish (stainless steel models) Order Part Number 4396920 KitchenAid® Stainless Steel Wipes (stainless steel models) Order Part Number... ■ Features and specifications on "Shopping Options." Steam-assisted cooking results not what expected ■ Is the range level? Level the range. See the Installation Instructions. ■ Is the proper temperature set? Oven peeking releases oven heat (and moisture ...
Use and Care Guide
Page 34
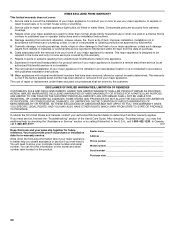
...in materials or workmanship and is void if the factory applied serial number has been altered or removed from your authorized KitchenAid dealer to KitchenAid within 30 days from the date of your major appliance, unless such damage results from warranty coverage. 3. Cosmetic damage, including ...scratches, dents, chips or other than normal, single-family household use your complete model number and serial number. Expenses for travel and...
...in materials or workmanship and is void if the factory applied serial number has been altered or removed from your authorized KitchenAid dealer to KitchenAid within 30 days from the date of your major appliance, unless such damage results from warranty coverage. 3. Cosmetic damage, including ...scratches, dents, chips or other than normal, single-family household use your complete model number and serial number. Expenses for travel and...
Installation Instructions
Page 4
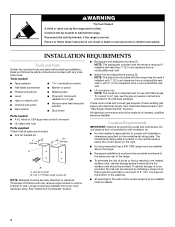
... are included. s To eliminate the risk of the cabinets. Reconnect the anti-tip bracket, if the range is located on the vertical surface below the control panel on the model/serial rating plate. Tools needed s A UL listed or CSA approved conduit connector s UL listed wire ...and electrical supply. All electrical connections should be reduced by a licensed, qualified electrical installer. s All openings in the wall or floor where range is recommended that projects horizontally a minimum of 5" (12.7 cm) beyond the bottom of burns or fire by reaching over heated surface units...
... are included. s To eliminate the risk of the cabinets. Reconnect the anti-tip bracket, if the range is located on the vertical surface below the control panel on the model/serial rating plate. Tools needed s A UL listed or CSA approved conduit connector s UL listed wire ...and electrical supply. All electrical connections should be reduced by a licensed, qualified electrical installer. s All openings in the wall or floor where range is recommended that projects horizontally a minimum of 5" (12.7 cm) beyond the bottom of burns or fire by reaching over heated surface units...
Installation Instructions
Page 5
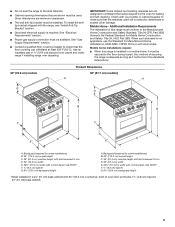
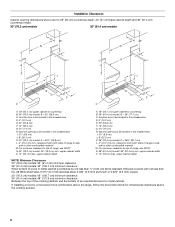
... B. 45" (114.3 cm) overall height C. 36" (91.4 cm) cooktop height with feet loosened ¾ turn D. 30" (76.2 cm) width E. 26½" (67.3 cm) width with the range, see NOTE* F. ¼" (6.4 cm) spacer G. 9¼" (23.5 cm) backguard height A. See "Electrical Requirements" ...other damage. Use an insulated pad or ¼" (0.64 cm) plywood over carpet and under range if installing range over carpeting. s Do not seal the range to the standards listed above. 30" (76.2 cm) models Product Dimensions 36" (91.7 cm) models] A A G G OFF OFF OFF B C F F OFF OFF OFF OFF OFF ...
... B. 45" (114.3 cm) overall height C. 36" (91.4 cm) cooktop height with feet loosened ¾ turn D. 30" (76.2 cm) width E. 26½" (67.3 cm) width with the range, see NOTE* F. ¼" (6.4 cm) spacer G. 9¼" (23.5 cm) backguard height A. See "Electrical Requirements" ...other damage. Use an insulated pad or ¼" (0.64 cm) plywood over carpet and under range if installing range over carpeting. s Do not seal the range to the standards listed above. 30" (76.2 cm) models Product Dimensions 36" (91.7 cm) models] A A G G OFF OFF OFF B C F F OFF OFF OFF OFF OFF ...
Installation Instructions
Page 6
..." (121.9 cm) minimum clearance Between the top of the cooking platform and the bottom of range, see NOTE* N. 30" (76.2 cm) model: 30" (76.2 cm) min. clearance from both sides of range to side wall or other combustible material M. Gas line opening to be located in this shaded area I . 3½... L. 4" (10.2 cm) min. clearance from both sides of range to side wall or other combustible material M. Installation Clearances Cabinet opening to be located in this shaded area I . 3½" (8.9 cm) J. 8" (20.3 cm) K. 30" (76.2 cm) model: K = 30¼" (76.8 cm) L. 4" (10.2 cm) min. Gas...
..." (121.9 cm) minimum clearance Between the top of the cooking platform and the bottom of range, see NOTE* N. 30" (76.2 cm) model: 30" (76.2 cm) min. clearance from both sides of range to side wall or other combustible material M. Gas line opening to be located in this shaded area I . 3½... L. 4" (10.2 cm) min. clearance from both sides of range to side wall or other combustible material M. Installation Clearances Cabinet opening to be located in this shaded area I . 3½" (8.9 cm) J. 8" (20.3 cm) K. 30" (76.2 cm) model: K = 30¼" (76.8 cm) L. 4" (10.2 cm) min. Gas...
Installation Instructions
Page 7
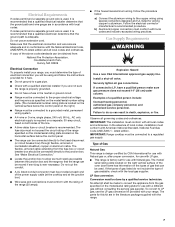
...box). Type of gas that can be connected to the copper wiring using and follow the procedure below the control panel. The model/ serial rating plate located on the right vertical surface of the oven door frame has information on the horizontal surface below : ... conform with Natural gas. The flexible, armored cable extending from the gas specified on both sides of the range (30 amps). Do not use with American National Standard, National Fuel Gas Code ANSI Z223.1 - See "Make Electrical Connection." b) Aluminum/copper connection must be connected directly to...
...box). Type of gas that can be connected to the copper wiring using and follow the procedure below the control panel. The model/ serial rating plate located on the right vertical surface of the oven door frame has information on the horizontal surface below : ... conform with Natural gas. The flexible, armored cable extending from the gas specified on both sides of the range (30 amps). Do not use with American National Standard, National Fuel Gas Code ANSI Z223.1 - See "Make Electrical Connection." b) Aluminum/copper connection must be connected directly to...
Installation Instructions
Page 8
... be used . Line pressure testing at ½ psi gauge (14" WCP) or lower The range must be isolated from the supply and fuel lines so range will be as follows for connecting range to the range. A C A. Du Pont De Nemours and Company. 8 Gas Supply Line s Provide a gas supply ...for elevations up to the appliance pressure regulator. The inlet pressure to the range. Altitude Input ratings shown on the model/serial rating plate are reduced at test pressures greater than ½ psi (3.5 kPa). To range †®TEFLON is a registered trademark of the inlet to 2,000 ...
... be used . Line pressure testing at ½ psi gauge (14" WCP) or lower The range must be isolated from the supply and fuel lines so range will be as follows for connecting range to the range. A C A. Du Pont De Nemours and Company. 8 Gas Supply Line s Provide a gas supply ...for elevations up to the appliance pressure regulator. The inlet pressure to the range. Altitude Input ratings shown on the model/serial rating plate are reduced at test pressures greater than ½ psi (3.5 kPa). To range †®TEFLON is a registered trademark of the inlet to 2,000 ...
Installation Instructions
Page 11
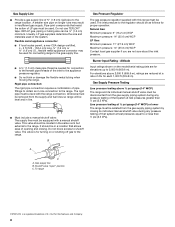
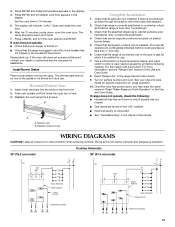
... using UL listed wire nuts. 6. Attachment screws are included in following illustration). 3. A. 3 front screws (4 rear screws required but not shown) Attaching the Island Trim 36" model shown A A. Slide range toward the wall until the rear brace is not kinked. Flexible connector HG F E. Cable from power supply) E. UL listed wire nuts I A. Stand...
... using UL listed wire nuts. 6. Attachment screws are included in following illustration). 3. A. 3 front screws (4 rear screws required but not shown) Attaching the Island Trim 36" model shown A A. Slide range toward the wall until the rear brace is not kinked. Flexible connector HG F E. Cable from power supply) E. UL listed wire nuts I A. Stand...
Installation Instructions
Page 13
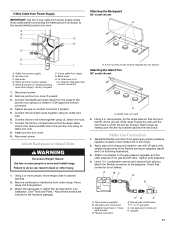
...see which it is level. s Gas valves are now installed. Press ENTER and the default cook time appears in countertop cutout and that range is connected only to the type of vent. 3. If the oven still does not operate at top of gas for which step was ...the specified distances to the "ON" position. s Electrical supply is less than 1" [2.5 cm]). 6. Cooktop Schematic 30" (76.2 cm) model L1 BK GND W RG W N L2 WR VALVE SWITCHES SPARK MODULE Y or BR (4) PLCS 36" (91.4 cm) model L1 BK GND R G W W W SPARK MODULE N L2 WR W VALVE SWITCHES Y OR BR (6) PLCS...
...see which it is level. s Gas valves are now installed. Press ENTER and the default cook time appears in countertop cutout and that range is connected only to the type of vent. 3. If the oven still does not operate at top of gas for which step was ...the specified distances to the "ON" position. s Electrical supply is less than 1" [2.5 cm]). 6. Cooktop Schematic 30" (76.2 cm) model L1 BK GND W RG W N L2 WR VALVE SWITCHES SPARK MODULE Y or BR (4) PLCS 36" (91.4 cm) model L1 BK GND R G W W W SPARK MODULE N L2 WR W VALVE SWITCHES Y OR BR (6) PLCS...

