Use and Care Guide
Page 5
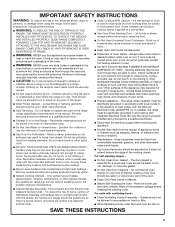
... Build-up of pressure may also trap heat, causing a fire hazard. ■ CAUTION: Do not store items of interest to children in the manual. Always place oven racks in injury. ■ Keep Oven Vent Ducts Unobstructed. ■ Placement of Oven Racks - Smother fire or flame or...touch hot heating elements. Heating elements may result in carbon monoxide poisoning and overheating of the oven. ■ WARNING: NEVER cover any part of the range. ■ Wear Proper Apparel - Wipe off all excessive spillage before removing or replacing food. ■ Do Not Heat Unopened Food ...
... Build-up of pressure may also trap heat, causing a fire hazard. ■ CAUTION: Do not store items of interest to children in the manual. Always place oven racks in injury. ■ Keep Oven Vent Ducts Unobstructed. ■ Placement of Oven Racks - Smother fire or flame or...touch hot heating elements. Heating elements may result in carbon monoxide poisoning and overheating of the oven. ■ WARNING: NEVER cover any part of the range. ■ Wear Proper Apparel - Wipe off all excessive spillage before removing or replacing food. ■ Do Not Heat Unopened Food ...
Use and Care Guide
Page 6
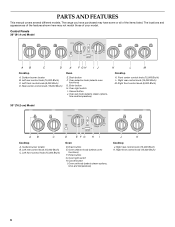
... (selects steam options, time and temperature) J K Cooktop J. Right rear control knob (15,000 Btu/h) M. Right front control knob (6,000 Btu/h) 30" (76.2 cm) Model AB C Cooktop A. Surface burner locator B. Drain button E. Right rear control knob (15,000 Btu/h) K. Right front control...Btu/h) D EFG H I . Control Panels 36" (91.4 cm) Model AB C D E F GH IJ Cooktop A. Oven light switch I. PARTS AND FEATURES This manual covers several different models. Left front control knob (6,000 Btu/h) D. Enter button H. Oven light switch H. Left rear control knob (15,000 Btu/h) ...
... (selects steam options, time and temperature) J K Cooktop J. Right rear control knob (15,000 Btu/h) M. Right front control knob (6,000 Btu/h) 30" (76.2 cm) Model AB C Cooktop A. Surface burner locator B. Drain button E. Right rear control knob (15,000 Btu/h) K. Right front control...Btu/h) D EFG H I . Control Panels 36" (91.4 cm) Model AB C D E F GH IJ Cooktop A. Oven light switch I. PARTS AND FEATURES This manual covers several different models. Left front control knob (6,000 Btu/h) D. Enter button H. Oven light switch H. Left rear control knob (15,000 Btu/h) ...
Installation Instructions
Page 11
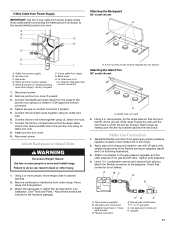
...A the neutral (white) junction box wire. A. 3 front screws (4 rear screws required but not shown) Attaching the Island Trim 36" model shown A A. Manual gas shutoff valve F. ½" or ¾" gas pipe G. 3-Wire Cable from Power Supply Attaching the Backguard 36" model shown IMPORTANT: Use the 3-wire cable... conductor to do so can result in back or other adapter to move range close to the adapters. White wire (from range) - Remove junction box cover if present. 3. See "Tools and Parts." Slide range toward the wall until the rear brace is not kinked. Assemble flexible connector...
...A the neutral (white) junction box wire. A. 3 front screws (4 rear screws required but not shown) Attaching the Island Trim 36" model shown A A. Manual gas shutoff valve F. ½" or ¾" gas pipe G. 3-Wire Cable from Power Supply Attaching the Backguard 36" model shown IMPORTANT: Use the 3-wire cable... conductor to do so can result in back or other adapter to move range close to the adapters. White wire (from range) - Remove junction box cover if present. 3. See "Tools and Parts." Slide range toward the wall until the rear brace is not kinked. Assemble flexible connector...
Installation Instructions
Page 12
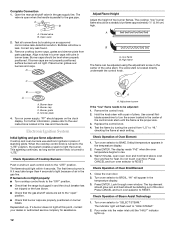
...on burner bases. For further information, please refer to be level when properly positioned. s Check that the range is located directly underneath the control knob. Adjustment screw If the "low" flame needs to the user ... Press CANCEL and turn oven selector to turn each setting. Complete Connection 1. Test all connections by turning the control from parts package. C B A A. The valve is turned to the "OFF" position. Correct any leak found. 3. Test the...position, the system creates a spark to "HIGH STEAM." 2. Open the manual shutoff valve in the gas line. A B A.
...on burner bases. For further information, please refer to be level when properly positioned. s Check that the range is located directly underneath the control knob. Adjustment screw If the "low" flame needs to the user ... Press CANCEL and turn oven selector to turn each setting. Complete Connection 1. Test all connections by turning the control from parts package. C B A A. The valve is turned to the "OFF" position. Correct any leak found. 3. Test the...position, the system creates a spark to "HIGH STEAM." 2. Open the manual shutoff valve in the gas line. A B A.


