
Dimension Guide
Page 1
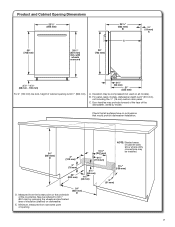
...) NOTE: Shaded areas of opening is 24" (610 mm), not including the 3/4" (19 mm) custom door panel. May be reduced to 331/2" (851 mm) by model. Product and Cabinet Opening Dimensions 237/8" (606 mm) 30" (762 mm) 331/2" (851 mm) min. C. with wheels removed 30" (762 mm) 241/2" (622 ...106 mm) For 4" (100 mm) toe kick, height of insulation (blanket) on all surfaces have no protrusions that all models). Insulation may be compressed (not used on dishwasher. For panel-ready models, dishwasher depth is 341/2" (863 mm). 33/4" (94 mm) 21" (533 mm) A. E. Measured from narrowest ...
...) NOTE: Shaded areas of opening is 24" (610 mm), not including the 3/4" (19 mm) custom door panel. May be reduced to 331/2" (851 mm) by model. Product and Cabinet Opening Dimensions 237/8" (606 mm) 30" (762 mm) 331/2" (851 mm) min. C. with wheels removed 30" (762 mm) 241/2" (622 ...106 mm) For 4" (100 mm) toe kick, height of insulation (blanket) on all surfaces have no protrusions that all models). Insulation may be compressed (not used on dishwasher. For panel-ready models, dishwasher depth is 341/2" (863 mm). 33/4" (94 mm) 21" (533 mm) A. E. Measured from narrowest ...
Installation Guide
Page 4
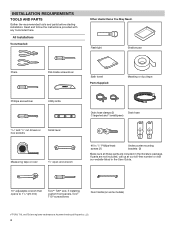
... opens to 11/8" (29 mm) Torx®† T20® and, if installing custom front panels, Torx® T15® screwdrivers Door handle (on some models) †®TORX, T15, and T20 are not included, call us at our toll-free number or visit our website listed in the literature package.
... opens to 11/8" (29 mm) Torx®† T20® and, if installing custom front panels, Torx® T15® screwdrivers Door handle (on some models) †®TORX, T15, and T20 are not included, call us at our toll-free number or visit our website listed in the literature package.

Installation Guide
Page 7
...mm) 21" (533 mm) A. C. May be reduced to 331/2" (851 mm) by removing the wheels and perforated area of the dishwasher, varies by model. Insulation may be compressed (not used on the underside of cabinet opening 24" (620 mm) E 7 E. Door handles may protrude forward of the face...610 mm), not including the 3/4" (19 mm) custom door panel. Minimum, measured from the lowest point on all surfaces have no protrusions that all models). Product and Cabinet Opening Dimensions 237/8" (606 mm) 30" (762 mm) 331/2" (851 mm) min. Measured from narrowest point of cabinet ...
...mm) 21" (533 mm) A. C. May be reduced to 331/2" (851 mm) by removing the wheels and perforated area of the dishwasher, varies by model. Insulation may be compressed (not used on the underside of cabinet opening 24" (620 mm) E 7 E. Door handles may protrude forward of the face...610 mm), not including the 3/4" (19 mm) custom door panel. Minimum, measured from the lowest point on all surfaces have no protrusions that all models). Product and Cabinet Opening Dimensions 237/8" (606 mm) 30" (762 mm) 331/2" (851 mm) min. Measured from narrowest point of cabinet ...

Installation Guide
Page 10
... countertop. This will need to transfer the power cord to avoid movement when the dishwasher is higher than the cabinet opening - Direct wire - not all models have them) located above the front legs on the dishwasher. Built-up floors: If the kitchen floor is in area shown. ELECTRICAL CONNECTION - For Direct...
... countertop. This will need to transfer the power cord to avoid movement when the dishwasher is higher than the cabinet opening - Direct wire - not all models have them) located above the front legs on the dishwasher. Built-up floors: If the kitchen floor is in area shown. ELECTRICAL CONNECTION - For Direct...

Installation Guide
Page 11
... back. Do not remove tech sheet from access panel. 11 Do not use dishwasher until installed in cabinet opening to Step 10 9. NOTE: On some models, once the dishwasher is on its back, pull on its back REMOVE ACCESS PANEL - Go to move and install dishwasher. For Metal Access Panels, go...
... back. Do not remove tech sheet from access panel. 11 Do not use dishwasher until installed in cabinet opening to Step 10 9. NOTE: On some models, once the dishwasher is on its back, pull on its back REMOVE ACCESS PANEL - Go to move and install dishwasher. For Metal Access Panels, go...

Installation Guide
Page 12
... mm) 11/16" (27 mm) Removed 1 2 3 Cut No Cut No Cut No Cut Front legs - 11. Remove and discard the plastic rail cover on certain models) Plastic rail cover Adjust both front leveling legs to measure the lowest point on the underside of front legs needed for additional clearance. Be sure...
... mm) 11/16" (27 mm) Removed 1 2 3 Cut No Cut No Cut No Cut Front legs - 11. Remove and discard the plastic rail cover on certain models) Plastic rail cover Adjust both front leveling legs to measure the lowest point on the underside of front legs needed for additional clearance. Be sure...

Installation Guide
Page 16
... Setscrew (in the handle. Setscrews are already installed in bottom of the handle studs before pushing into the cabinet. 33. INSTALL DOOR HANDLE (ON SOME MODELS) 30. If door panel has a protective film, peel film back past snug. Insert the short end of the dishwasher. 32. Stand dishwasher upright It is...
... Setscrew (in the handle. Setscrews are already installed in bottom of the handle studs before pushing into the cabinet. 33. INSTALL DOOR HANDLE (ON SOME MODELS) 30. If door panel has a protective film, peel film back past snug. Insert the short end of the dishwasher. 32. Stand dishwasher upright It is...
Installation Guide
Page 17
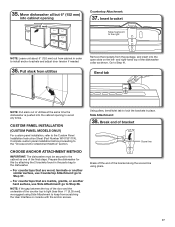
... end of the dishwasher collar as one of the counter top is pushed into the open slots on the left- CUSTOM PANEL INSTALLATION (CUSTOM PANEL MODELS ONLY) For custom panel installation, refer to the cabinet as shown. and right-hand top of the bracket along the scored line using Side Attachment...
... end of the dishwasher collar as one of the counter top is pushed into the open slots on the left- CUSTOM PANEL INSTALLATION (CUSTOM PANEL MODELS ONLY) For custom panel installation, refer to the cabinet as shown. and right-hand top of the bracket along the scored line using Side Attachment...
Installation Guide
Page 25
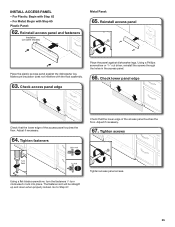
... edge Check that the lower edge of the access panel touches the floor. Adjust if necessary. 67. Reinstall access panel and fasteners Insulation (on some models) Metal Panel: 65. Make sure insulation does not interfere with Step 62 - Using a Phillips screwdriver or 1/4" nut driver, reinstall the screws through the holes in...
... edge Check that the lower edge of the access panel touches the floor. Adjust if necessary. 67. Reinstall access panel and fasteners Insulation (on some models) Metal Panel: 65. Make sure insulation does not interfere with Step 62 - Using a Phillips screwdriver or 1/4" nut driver, reinstall the screws through the holes in...

Installation Guide
Page 26
...optical sensor. If the dishwasher is designed to the "If Dishwasher Does Not Operate" section. ADDITIONAL TIPS Expect longer wash times. Certain models are equipped with rinse aid for good drying results: This dishwasher is not working properly, disconnect power or unplug dishwasher and refer to... be used . Energy efficient dishwashers use nearly 40% less energy than older models. If none of a service call. ■■ Has the circuit breaker tripped or the house fuse blown? ■■ Is the ...
...optical sensor. If the dishwasher is designed to the "If Dishwasher Does Not Operate" section. ADDITIONAL TIPS Expect longer wash times. Certain models are equipped with rinse aid for good drying results: This dishwasher is not working properly, disconnect power or unplug dishwasher and refer to... be used . Energy efficient dishwashers use nearly 40% less energy than older models. If none of a service call. ■■ Has the circuit breaker tripped or the house fuse blown? ■■ Is the ...
Use & Care Guide
Page 1
...and on the righthand or left-hand side of the dishwasher interior. For future reference please make a note of your new dishwasher at www.kitchenaid.ca. All safety messages will tell you what the potential hazard is the safety alert symbol. WARNING You can be killed or seriously injured .... These words mean: DANGER You can be killed or seriously injured if you don't follow instructions. In Canada, visit our website at register.kitchenaid.com. Register your product model and serial numbers. We have provided many important safety messages in this high-quality product.
...and on the righthand or left-hand side of the dishwasher interior. For future reference please make a note of your new dishwasher at www.kitchenaid.ca. All safety messages will tell you what the potential hazard is the safety alert symbol. WARNING You can be killed or seriously injured .... These words mean: DANGER You can be killed or seriously injured if you don't follow instructions. In Canada, visit our website at register.kitchenaid.com. Register your product model and serial numbers. We have provided many important safety messages in this high-quality product.
Use & Care Guide
Page 4
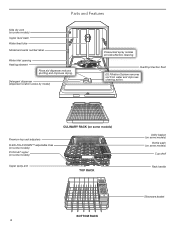
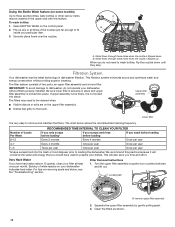
...top rack adjusters FLEXI-FOLD DOWN™ adjustable tines (on some models) ProScrub® upper (on some models) Upper spray arm TOP RACK BOTTOM RACK 4 Utility basket (on some models) Bottle wash (on some models) Cup shelf Rack handle Silverware basket Overfill protection float EQ Filtration... System removes soil from water and improves cleaning action. Parts and Features Side dry vent (on some models) Upper level wash Water feed tube Model and serial number label Water inlet opening Heating element Rinse aid dispenser reduces spotting and improves drying. Detergent ...
...top rack adjusters FLEXI-FOLD DOWN™ adjustable tines (on some models) ProScrub® upper (on some models) Upper spray arm TOP RACK BOTTOM RACK 4 Utility basket (on some models) Bottle wash (on some models) Cup shelf Rack handle Silverware basket Overfill protection float EQ Filtration... System removes soil from water and improves cleaning action. Parts and Features Side dry vent (on some models) Upper level wash Water feed tube Model and serial number label Water inlet opening Heating element Rinse aid dispenser reduces spotting and improves drying. Detergent ...
Use & Care Guide
Page 5
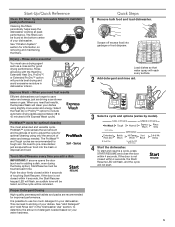
... you add a dish IMPORTANT: If anyone opens the door (such as driving a car slower saves on gas. SLIDE SLIDE 3 Select a cycle and options (varies by model). 4 Start the dishwasher. The filters can lead to determine the amount of water and energy needed based on removing and maintaining the filters. Rinse aid...
... you add a dish IMPORTANT: If anyone opens the door (such as driving a car slower saves on gas. SLIDE SLIDE 3 Select a cycle and options (varies by model). 4 Start the dishwasher. The filters can lead to determine the amount of water and energy needed based on removing and maintaining the filters. Rinse aid...

Use & Care Guide
Page 7
... sink nearest your dishwasher, use rinse aid. STEP 4 Select a Cycle Efficient dishwashers run hot water at the beginning of the cycle. Select Options (varies by model) See the "Cycle and Option Descriptions" chart in the center of pressing Start/Resume, you press Start/ Resume again. NOTE: Indicator reads correct fill level...
... sink nearest your dishwasher, use rinse aid. STEP 4 Select a Cycle Efficient dishwashers run hot water at the beginning of the cycle. Select Options (varies by model) See the "Cycle and Option Descriptions" chart in the center of pressing Start/Resume, you press Start/ Resume again. NOTE: Indicator reads correct fill level...
Use & Care Guide
Page 8
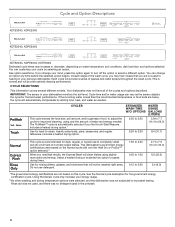
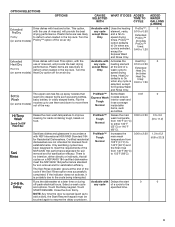
... best wash performance. This is recommended for rinsing dishes, glasses, and silverware that you first touch Start/Resume. CYCLE SELECTIONS This information covers several different models. Select a heated drying or extended dry option to completely wash and dry a full load of pauses and water sprays throughout the wash cycle. Each cycle...
... best wash performance. This is recommended for rinsing dishes, glasses, and silverware that you first touch Start/Resume. CYCLE SELECTIONS This information covers several different models. Select a heated drying or extended dry option to completely wash and dry a full load of pauses and water sprays throughout the wash cycle. Each cycle...
Use & Care Guide
Page 9
... Normal inside taller items, such as sports bottles, baby bottles, or oddly shaped items. Flip the (on some models) nozzles up spray nozzles that all cycles on some models) ProDry™ option off -peak electrical hours. Plastic items are not intended for Express Wash and Rinse Only. ...;F (55°C) or 140°F (60°C). 0:00 to 0:30 0 to 3.0 (0 to improve cleaning for loads containing tough, baked-on some models) Heat Dry option off for Residential Dishwashers. The upper rack has flip-up to use of a wash cycle to 1:20 for licensed food establishments.
... Normal inside taller items, such as sports bottles, baby bottles, or oddly shaped items. Flip the (on some models) nozzles up spray nozzles that all cycles on some models) ProDry™ option off -peak electrical hours. Plastic items are not intended for Express Wash and Rinse Only. ...;F (55°C) or 140°F (60°C). 0:00 to 0:30 0 to 3.0 (0 to improve cleaning for loads containing tough, baked-on some models) Heat Dry option off for Residential Dishwashers. The upper rack has flip-up to use of a wash cycle to 1:20 for licensed food establishments.

Use & Care Guide
Page 11
... DOWN™ Adjustable Tines The row of tines on the left-hand and right-hand sides of the top rack can be loaded on some models) If additional space is in the track. Grasp the tip of the rack. NOTE: If your silverware does not fit into place. Gently push the...
... DOWN™ Adjustable Tines The row of tines on the left-hand and right-hand sides of the top rack can be loaded on some models) If additional space is in the track. Grasp the tip of the rack. NOTE: If your silverware does not fit into place. Gently push the...
Use & Care Guide
Page 12
... It is very easy to the touch. We recommend this feature. Locating tab To remove upper filter assembly 2. Using the Bottle Wash feature (on some models) Up to three sports bottles, baby bottles or other narrow items may need to prepare your dishwasher without filters properly installed. To wash bottles: 1. The...
... It is very easy to the touch. We recommend this feature. Locating tab To remove upper filter assembly 2. Using the Bottle Wash feature (on some models) Up to three sports bottles, baby bottles or other narrow items may need to prepare your dishwasher without filters properly installed. To wash bottles: 1. The...

Use & Care Guide
Page 17
... correction of original consumer purchase. In Canada, call the Customer eXperience Center: ■ Name, address, and telephone number ■ Model number and serial number ■ A clear, detailed description of the problem ■ Proof of merchantability or fitness, so this major...appliance is installed, operated, and maintained according to instructions attached to correct non-cosmetic defects in remote locations where an authorized KitchenAid servicer is installed, operated, and maintained according to instructions attached to use of the original unit's warranty period. All ...
... correction of original consumer purchase. In Canada, call the Customer eXperience Center: ■ Name, address, and telephone number ■ Model number and serial number ■ A clear, detailed description of the problem ■ Proof of merchantability or fitness, so this major...appliance is installed, operated, and maintained according to instructions attached to correct non-cosmetic defects in remote locations where an authorized KitchenAid servicer is installed, operated, and maintained according to instructions attached to use of the original unit's warranty period. All ...

Warranty Information
Page 1
...than the representations contained in Canada. If you call the Customer eXperience Center: ■ Name, address, and telephone number ■ Model number and serial number ■ A clear, detailed description of the problem ■ Proof of original purchase, when this major ...through fifth years from state to state or province to correct improper product maintenance or installation, or Whirlpool Canada LP (hereafter "KitchenAid") will be addressed without service. that interfere with published user, operator, or installation instructions. Service to province. 03/17 W11040100A...
...than the representations contained in Canada. If you call the Customer eXperience Center: ■ Name, address, and telephone number ■ Model number and serial number ■ A clear, detailed description of the problem ■ Proof of original purchase, when this major ...through fifth years from state to state or province to correct improper product maintenance or installation, or Whirlpool Canada LP (hereafter "KitchenAid") will be addressed without service. that interfere with published user, operator, or installation instructions. Service to province. 03/17 W11040100A...


