

Dimension Guide
Page 2
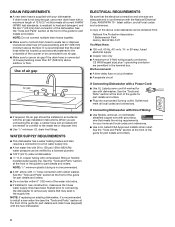
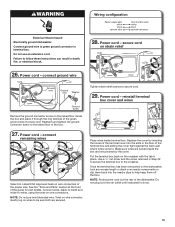
...circuit breaker ■■ A separate circuit If Connecting Dishwasher with a Power Cord: ■■ Use UL Listed power cord kit marked for part details) and drain hose (supplied) with dishwasher. NOTE: If replacing an existing dishwasher, it is recommended to install a new water line (see ...not solder within 6" (152 mm) of the water inlet valve. ■■ If installed in conformance with a maximum length of the guide for part details and orders. 8 A copy of 2 field wiring supply conductors (12 AWG largest size) plus 1 grounding conductor are adequate and in new ...
...circuit breaker ■■ A separate circuit If Connecting Dishwasher with a Power Cord: ■■ Use UL Listed power cord kit marked for part details) and drain hose (supplied) with dishwasher. NOTE: If replacing an existing dishwasher, it is recommended to install a new water line (see ...not solder within 6" (152 mm) of the water inlet valve. ■■ If installed in conformance with a maximum length of the guide for part details and orders. 8 A copy of 2 field wiring supply conductors (12 AWG largest size) plus 1 grounding conductor are adequate and in new ...
Installation Guide
Page 2
... Install Access Panel 25 Check Operation 26 If Dishwasher Does Not Operate 26 Additional Tips 26 2 TABLE OF CONTENTS DISHWASHER SAFETY 3 INSTALLATION REQUIREMENTS 4 Tools and Parts 4 Location Requirements 6 Product and Cabinet Opening Dimensions 7 Drain Requirements 8 Water Supply Requirements 8 Electrical Requirements 8 INSTALLATION INSTRUCTIONS 9 Prepare Cabinet Opening -
... Install Access Panel 25 Check Operation 26 If Dishwasher Does Not Operate 26 Additional Tips 26 2 TABLE OF CONTENTS DISHWASHER SAFETY 3 INSTALLATION REQUIREMENTS 4 Tools and Parts 4 Location Requirements 6 Product and Cabinet Opening Dimensions 7 Drain Requirements 8 Water Supply Requirements 8 Electrical Requirements 8 INSTALLATION INSTRUCTIONS 9 Prepare Cabinet Opening -
Installation Guide
Page 4
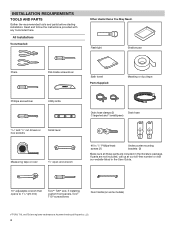
All Installations Tools Needed: Other Useful Items You May Need: Flashlight Shallow pan Pliers Flat-blade screwdriver Bath towel Parts Supplied: Masking or duct tape Phillips screwdriver Utility knife 5/16" and 1/4" nut drivers or hex sockets Small level Measuring tape or ... Drain hose clamps (2) Drain hose (1 large/red and 1 small/green) #10 x 1/2" Phillips-head screws (2) Undercounter mounting brackets (2) Make sure all these parts are included in the User Guide. 10" adjustable wrench that opens to 11/8" (29 mm) Torx®† T20® and, if installing custom front...
All Installations Tools Needed: Other Useful Items You May Need: Flashlight Shallow pan Pliers Flat-blade screwdriver Bath towel Parts Supplied: Masking or duct tape Phillips screwdriver Utility knife 5/16" and 1/4" nut drivers or hex sockets Small level Measuring tape or ... Drain hose clamps (2) Drain hose (1 large/red and 1 small/green) #10 x 1/2" Phillips-head screws (2) Undercounter mounting brackets (2) Make sure all these parts are included in the User Guide. 10" adjustable wrench that opens to 11/8" (29 mm) Torx®† T20® and, if installing custom front...
Installation Guide
Page 5
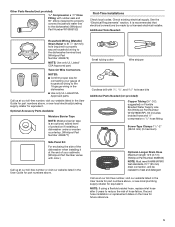
...proper size for equivalent. Screw-Type Clamps 11/2"-2" (38-50 mm) (3 maximum) Optional-Longer Drain Hose Maximum length 12 ft (3.7 m) (Whirlpool Part Number 3385556) NOTE: Must meet AHAM/IAPMO test standards, fit 1" (25 mm) drain connection, and be made by a licensed electrical installer. Record... Household Wiring (Metallic) Strain Relief to fit 7/8" (22 mm) hole (required to properly secure household wiring to the dishwasher) (Whirlpool Part Number W10685193) First-Time Installations Check local codes. Call us at our toll-free number, visit our website listed in the dishwasher. ■...
...proper size for equivalent. Screw-Type Clamps 11/2"-2" (38-50 mm) (3 maximum) Optional-Longer Drain Hose Maximum length 12 ft (3.7 m) (Whirlpool Part Number 3385556) NOTE: Must meet AHAM/IAPMO test standards, fit 1" (25 mm) drain connection, and be made by a licensed electrical installer. Record... Household Wiring (Metallic) Strain Relief to fit 7/8" (22 mm) hole (required to properly secure household wiring to the dishwasher) (Whirlpool Part Number W10685193) First-Time Installations Check local codes. Call us at our toll-free number, visit our website listed in the dishwasher. ■...
Installation Guide
Page 6
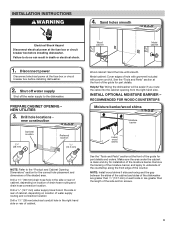
... for installing underneath a wooden countertop. Damage from the water supply could plug the fill valve screen. ■■ A square opening for part details and orders. NOTE: To avoid shifting during dishwasher operation, shims must be securely attached to the floor. ■■ The location..., back, and floor) upon installation. For Direct Wire For Power Cord Cabinet Grommet For 11/2" (38 mm) hole in cabinet. (Whirlpool Part Number 302797) NOTE: Required for metal cabinets Power Cord Kit Kit typically includes power cord, metallic strain relief, grommet, and twist-on wire ...
... for installing underneath a wooden countertop. Damage from the water supply could plug the fill valve screen. ■■ A square opening for part details and orders. NOTE: To avoid shifting during dishwasher operation, shims must be securely attached to the floor. ■■ The location..., back, and floor) upon installation. For Direct Wire For Power Cord Cabinet Grommet For 11/2" (38 mm) hole in cabinet. (Whirlpool Part Number 302797) NOTE: Required for metal cabinets Power Cord Kit Kit typically includes power cord, metallic strain relief, grommet, and twist-on wire ...
Installation Guide
Page 8
...REQUIREMENTS ■■ This dishwasher has a water heating feature and also requires a connection to install a new water line (see the "Tools and Parts" section at the front of 2 field wiring supply conductors (12 AWG largest size) plus 1 grounding conductor are connecting the air gap, a ... breaker ■■ A separate circuit If Connecting Dishwasher with a Power Cord: ■■ Use UL Listed power cord kit marked for part details) and drain hose (supplied) with the National Electrical Code, ANSI/NFPA 70 - If Connecting Dishwasher with Direct Wiring: ■■ ...
...REQUIREMENTS ■■ This dishwasher has a water heating feature and also requires a connection to install a new water line (see the "Tools and Parts" section at the front of 2 field wiring supply conductors (12 AWG largest size) plus 1 grounding conductor are connecting the air gap, a ... breaker ■■ A separate circuit If Connecting Dishwasher with a Power Cord: ■■ Use UL Listed power cord kit marked for part details) and drain hose (supplied) with the National Electrical Code, ANSI/NFPA 70 - If Connecting Dishwasher with Direct Wiring: ■■ ...
Installation Guide
Page 9
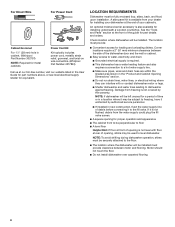
... or electrical shock. 1. RECOMMENDED FOR WOOD COUNTERTOPS Moisture barrier/wood shims Moisture barrier Install wood shims See the "Tools and Parts" section at the fuse box or circuit breaker box before installing dishwasher. INSTALLATION INSTRUCTIONS WARNING 4. Disconnect power Disconnect electrical power ...of drain hose routing and drain hose connection location. Metal cabinet: Cover edges of the counter. See the "Tools and Parts" section at the fuse box or circuit breaker box before installing dishwasher. 2. Sand holes smooth Electrical Shock Hazard Disconnect electrical...
... or electrical shock. 1. RECOMMENDED FOR WOOD COUNTERTOPS Moisture barrier/wood shims Moisture barrier Install wood shims See the "Tools and Parts" section at the fuse box or circuit breaker box before installing dishwasher. INSTALLATION INSTRUCTIONS WARNING 4. Disconnect power Disconnect electrical power ...of drain hose routing and drain hose connection location. Metal cabinet: Cover edges of the counter. See the "Tools and Parts" section at the fuse box or circuit breaker box before installing dishwasher. 2. Sand holes smooth Electrical Shock Hazard Disconnect electrical...
Installation Guide
Page 13
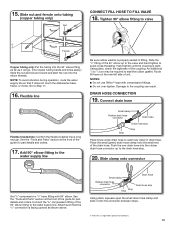
... Damage to seal the rubber gasket. Connect drain hose Flexible braided line: Confirm the flexible braided line is a registered trademark of the guide for part details and orders. 17. NOTE: To avoid vibration during operation, route the water supply line so that the 3/4" connection is facing upward as ...be required to the coupling can result. Connect the 3/8" compression fitting of the coupling. Go to the water supply line. See the "Tools and Parts" section at the front of Chemours. 13 NOTES: ■■ Do not use Teflon®† tape with 90° elbow. Slide ...
... Damage to seal the rubber gasket. Connect drain hose Flexible braided line: Confirm the flexible braided line is a registered trademark of the guide for part details and orders. 17. NOTE: To avoid vibration during operation, route the water supply line so that the 3/4" connection is facing upward as ...be required to the coupling can result. Connect the 3/8" compression fitting of the coupling. Go to the water supply line. See the "Tools and Parts" section at the front of Chemours. 13 NOTES: ■■ Do not use Teflon®† tape with 90° elbow. Slide ...
Installation Guide
Page 14
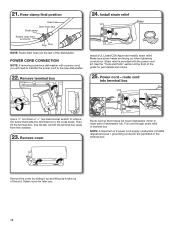
...away from the crossbar. 23. Remove the cover by sliding it does not touch dishwasher motor or lower part of the guide for later use. 14 Power cord - route cord into terminal box Use a 1/4" nut... tightening conduit nut. Pull cord through strain relief in the terminal box. See the "Tools and Parts" section at the front of dishwasher tub. Remove cover Route cord so that holds the terminal box... to the new dishwasher. 22. Retain cover for part details and orders. 25. Strain relief is provided with a power cord, you will need to ...
...away from the crossbar. 23. Remove the cover by sliding it does not touch dishwasher motor or lower part of the guide for later use. 14 Power cord - route cord into terminal box Use a 1/4" nut... tightening conduit nut. Pull cord through strain relief in the terminal box. See the "Tools and Parts" section at the front of dishwasher tub. Remove cover Route cord so that holds the terminal box... to the new dishwasher. 22. Retain cover for part details and orders. 25. Strain relief is provided with a power cord, you will need to ...
Installation Guide
Page 15
... ground connector screw on the dishwasher, tuck any excess length or slack over nearby components or clip them off the floor. See the "Tools and Parts" section at the front of the dishwasher. Power cord - reinstall terminal box cover and wires Place wires inside the box and place it through the... the slots in the floor of the box. 27. Gently tug on wire connector. NOTE: Route power cord out the rear of the guide for part details.
... ground connector screw on the dishwasher, tuck any excess length or slack over nearby components or clip them off the floor. See the "Tools and Parts" section at the front of the dishwasher. Power cord - reinstall terminal box cover and wires Place wires inside the box and place it through the... the slots in the floor of the box. 27. Gently tug on wire connector. NOTE: Route power cord out the rear of the guide for part details.
Installation Guide
Page 17
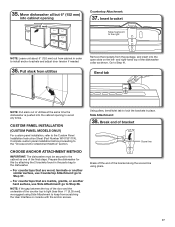
Bend tab NOTE: Pull slack out of the final steps. Using pliers, bend/twist tab to lock the brackets in the parts bag to the dishwasher. - Insert bracket Tabs must be secured to Step 38. Go to the "Choose Anchor Attachment Method" section. Complete custom panel installation ... on the left- NOTE: Leave unit about 6" (152 mm) out from the package, and insert into cabinet opening to the Custom Panel Installation Instruction Sheet (Part Number W10750117A).
Bend tab NOTE: Pull slack out of the final steps. Using pliers, bend/twist tab to lock the brackets in the parts bag to the dishwasher. - Insert bracket Tabs must be secured to Step 38. Go to the "Choose Anchor Attachment Method" section. Complete custom panel installation ... on the left- NOTE: Leave unit about 6" (152 mm) out from the package, and insert into cabinet opening to the Custom Panel Installation Instruction Sheet (Part Number W10750117A).
Installation Guide
Page 21
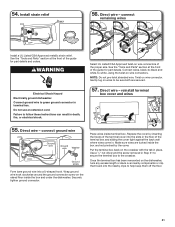
...51 to secure the terminal box to green ground connector in terminal box. Install strain relief 56. See the "Tools and Parts" section at the front of the guide for part details. NOTE: Do not pre-twist stranded wire. Replace the cover by the cover. Direct wire - Connect ground wire ...the terminal box and sliding the cover tight against the back wall where wires come in place. See the "Tools and Parts" section at the front of the guide for part details and orders. reinstall terminal box cover and wires 55. Direct wire - connect ground wire Ground wire Ground wire ...
...51 to secure the terminal box to green ground connector in terminal box. Install strain relief 56. See the "Tools and Parts" section at the front of the guide for part details. NOTE: Do not pre-twist stranded wire. Replace the cover by the cover. Direct wire - Connect ground wire ...the terminal box and sliding the cover tight against the back wall where wires come in place. See the "Tools and Parts" section at the front of the guide for part details and orders. reinstall terminal box cover and wires 55. Direct wire - connect ground wire Ground wire Ground wire ...
Installation Guide
Page 24
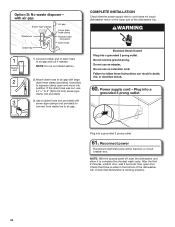
... hose clamp Rubber hose connector Drain hose COMPLETE INSTALLATION Check that the power supply wire or cord does not touch dishwasher motor or the lower part of the dishwasher tub. Use a rubber hose (not provided) with screw-type clamps (not provided) to connect from waste tee to complete the shortest wash...
... hose clamp Rubber hose connector Drain hose COMPLETE INSTALLATION Check that the power supply wire or cord does not touch dishwasher motor or the lower part of the dishwasher tub. Use a rubber hose (not provided) with screw-type clamps (not provided) to connect from waste tee to complete the shortest wash...

Installation Guide
Page 26
... dishwasher User Guide that came with your dishwasher washes longer to ensure exceptional cleaning. Rinse Aid is necessary for service contact information. Check that all parts have all tools used with an optical water sensor, so the first cycle will flash until you must also do this when adding a dish during...
... dishwasher User Guide that came with your dishwasher washes longer to ensure exceptional cleaning. Rinse Aid is necessary for service contact information. Check that all parts have all tools used with an optical water sensor, so the first cycle will flash until you must also do this when adding a dish during...
Use & Care Guide
Page 1
...if you and others are not followed. Always read and obey all safety messages. In Canada, visit our website at register.kitchenaid.com. All safety messages will tell you what can be killed or seriously injured if you what the potential hazard is the... can happen if the instructions are very important. Model Number Serial Number Table of Contents DISHWASHER SAFETY 1 WHAT'S NEW IN YOUR DISHWASHER 3 PARTS AND FEATURES 4 START-UP/QUICK REFERENCE 5 QUICK STEPS 5 DISHWASHER USE 6 CYCLE AND OPTION DESCRIPTIONS 8 DISHWASHER FEATURES 11 FILTRATION SYSTEM 12 ...
...if you and others are not followed. Always read and obey all safety messages. In Canada, visit our website at register.kitchenaid.com. All safety messages will tell you what can be killed or seriously injured if you what the potential hazard is the... can happen if the instructions are very important. Model Number Serial Number Table of Contents DISHWASHER SAFETY 1 WHAT'S NEW IN YOUR DISHWASHER 3 PARTS AND FEATURES 4 START-UP/QUICK REFERENCE 5 QUICK STEPS 5 DISHWASHER USE 6 CYCLE AND OPTION DESCRIPTIONS 8 DISHWASHER FEATURES 11 FILTRATION SYSTEM 12 ...
Use & Care Guide
Page 4
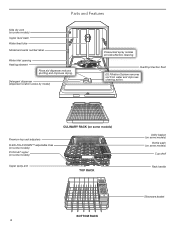
Parts and Features Side dry vent (on some models) Upper level wash Water feed tube Model and serial number label Water inlet opening Heating element Rinse ...
Parts and Features Side dry vent (on some models) Upper level wash Water feed tube Model and serial number label Water inlet opening Heating element Rinse ...
Use & Care Guide
Page 12
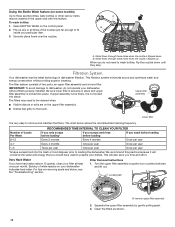
... through these holes when the nozzle is very easy to loading the dishwasher. Lower filter It is flipped up any or all three of two parts, an upper filter assembly and a lower filter. Very Hard Water If you do not operate your dishwasher indicates hard water. Turn the upper filter assembly...
... through these holes when the nozzle is very easy to loading the dishwasher. Lower filter It is flipped up any or all three of two parts, an upper filter assembly and a lower filter. Very Hard Water If you do not operate your dishwasher indicates hard water. Turn the upper filter assembly...

Use & Care Guide
Page 14
...power to the dishwasher is not an interference between large casserole dishes and the wash system at the back of the rack. See the "Parts and Features" section. Check for service. If foam or suds are difficult to dry because they have a porous surface which tends to see... if tall items are protruding through the bottom or back of the dishwasher. ■■ Check to collect water droplets. In Canada: KitchenAid Brand Home Appliances Customer eXperience Centre 200 - 6750 Century Ave. Adjust loading as cookie sheets, cutting boards, or large containers, etc., that the...
...power to the dishwasher is not an interference between large casserole dishes and the wash system at the back of the rack. See the "Parts and Features" section. Check for service. If foam or suds are difficult to dry because they have a porous surface which tends to see... if tall items are protruding through the bottom or back of the dishwasher. ■■ Check to collect water droplets. In Canada: KitchenAid Brand Home Appliances Customer eXperience Centre 200 - 6750 Century Ave. Adjust loading as cookie sheets, cutting boards, or large containers, etc., that the...

Use & Care Guide
Page 17
...OF PURCHASE IS REQUIRED TO OBTAIN WARRANTY SERVICE. SECOND THROUGH FIFTH YEAR LIMITED WARRANTY (CERTAIN COMPONENT PARTS ONLY - Service must be addressed without service. The cost of non-genuine KitchenAid parts or accessories. 6. This product is effective from accident, misuse, abuse, fire, floods, ...HERE. Service to correct product damage or defects caused by our authorized KitchenAid Service Providers. Damage from the date of purchase, when this major appliance was purchased. Repairs to parts or systems to correct improper product maintenance or installation, installation not ...
...OF PURCHASE IS REQUIRED TO OBTAIN WARRANTY SERVICE. SECOND THROUGH FIFTH YEAR LIMITED WARRANTY (CERTAIN COMPONENT PARTS ONLY - Service must be addressed without service. The cost of non-genuine KitchenAid parts or accessories. 6. This product is effective from accident, misuse, abuse, fire, floods, ...HERE. Service to correct product damage or defects caused by our authorized KitchenAid Service Providers. Damage from the date of purchase, when this major appliance was purchased. Repairs to parts or systems to correct improper product maintenance or installation, installation not ...

Warranty Information
Page 1
...home repair. Travel or transportation expenses for service in remote locations for factory specified replacement parts and repair labor for the following where an authorized KitchenAid servicer is intended for service or repair of the Use and Care Guide or visit ... telephone number ■ Model number and serial number ■ A clear, detailed description of the problem ■ Proof of non-genuine KitchenAid parts or accessories. PROOF OF PURCHASE IS REQUIRED TO OBTAIN WARRANTY SERVICE. or furnished with published user, operator, or installation instructions. This is ...
...home repair. Travel or transportation expenses for service in remote locations for factory specified replacement parts and repair labor for the following where an authorized KitchenAid servicer is intended for service or repair of the Use and Care Guide or visit ... telephone number ■ Model number and serial number ■ A clear, detailed description of the problem ■ Proof of non-genuine KitchenAid parts or accessories. PROOF OF PURCHASE IS REQUIRED TO OBTAIN WARRANTY SERVICE. or furnished with published user, operator, or installation instructions. This is ...


