Use & Care Guide
Page 5
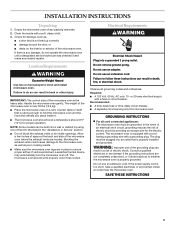
...Consult a qualified electrician or serviceman if the grounding instructions are blocked, a sensitive thermal device may automatically turn the microwave oven off. Empty the microwave oven of the trim kits listed in death, fire, or electrical shock. Do not use an extension cord. or 20-amp electrical supply... with a grounding plug. The microwave oven is strong enough to ensure proper airflow. SAVE THESE INSTRUCTIONS 5 In the event...
...Consult a qualified electrician or serviceman if the grounding instructions are blocked, a sensitive thermal device may automatically turn the microwave oven off. Empty the microwave oven of the trim kits listed in death, fire, or electrical shock. Do not use an extension cord. or 20-amp electrical supply... with a grounding plug. The microwave oven is strong enough to ensure proper airflow. SAVE THESE INSTRUCTIONS 5 In the event...

Use & Care Guide
Page 15
...warranty and provide afterwarranty service, anywhere in your area, you the cost of the following trim kits*. If you need replacement parts If you need to your nearest KitchenAid designated service center. ASSISTANCE OR SERVICE Before calling for the toll-free number. To ...Degreaser Part Number 31552 All-Purpose Appliance Cleaner Part Number 31682 KITCHENAID® Stainless Steel Cleaner and Polish Part Number 4396920 KITCHENAID® Stainless Steel Wipes Part Number 8212510 Built-In Kits This countertop microwave oven can be built in your telephone directory Yellow Pages. For ...
...warranty and provide afterwarranty service, anywhere in your area, you the cost of the following trim kits*. If you need replacement parts If you need to your nearest KitchenAid designated service center. ASSISTANCE OR SERVICE Before calling for the toll-free number. To ...Degreaser Part Number 31552 All-Purpose Appliance Cleaner Part Number 31682 KITCHENAID® Stainless Steel Cleaner and Polish Part Number 4396920 KITCHENAID® Stainless Steel Wipes Part Number 8212510 Built-In Kits This countertop microwave oven can be built in your telephone directory Yellow Pages. For ...
Dimension Guide
Page 1
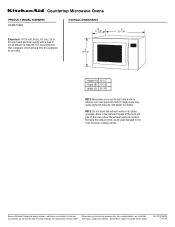
...without notice. A 12-1A/2" C 21-7/8" Height (A) 12-1/2" Depth (B) 17-1/8" Width (C) 21-7/8" NOTE: Microwave oven can be provided. Specifications subject to the oven and poor cooking results. Ref. NOTE: Do not block the exhaust vents or air intake openings. Because Whirlpool ... circuit serving only this appliance be built into a wall or cabinet over over approved electric single ovens only using approved trim kits. W10165700 01-18-08 ® Countertop Microwave Ovens PRODUCT MODEL NUMBERS KCMS1555S OVERALL DIMENSIONS B 17-1/8" Electrical: A 120-volt, 60 Hz, AC-only...
...without notice. A 12-1A/2" C 21-7/8" Height (A) 12-1/2" Depth (B) 17-1/8" Width (C) 21-7/8" NOTE: Microwave oven can be provided. Specifications subject to the oven and poor cooking results. Ref. NOTE: Do not block the exhaust vents or air intake openings. Because Whirlpool ... circuit serving only this appliance be built into a wall or cabinet over over approved electric single ovens only using approved trim kits. W10165700 01-18-08 ® Countertop Microwave Ovens PRODUCT MODEL NUMBERS KCMS1555S OVERALL DIMENSIONS B 17-1/8" Electrical: A 120-volt, 60 Hz, AC-only...
Installation Guide
Page 1
..., GBS307PD, (Y)KEBI101D, (Y)KEBS107D Table of Contents / Table des matières MICROWAVE OVEN SAFETY 1 INSTALLATION INSTRUCTIONS 2 Tools and Parts 2 Minimum Cutout Dimensions 2 Trim Kit Frame Dimensions 2 Electrical Requirements 2 Microwave Oven Preparation 3 Bottom Duct Assembly 3 Side Duct and Upper Duct Assembly 3 Anti-Tip Bracket Installation 4 Microwave Oven Placement 4 Trim Kit Frame Installation 4 SÉCURITÉ DU FOUR À MICRO-ONDES 5 INSTRUCTIONS...
..., GBS307PD, (Y)KEBI101D, (Y)KEBS107D Table of Contents / Table des matières MICROWAVE OVEN SAFETY 1 INSTALLATION INSTRUCTIONS 2 Tools and Parts 2 Minimum Cutout Dimensions 2 Trim Kit Frame Dimensions 2 Electrical Requirements 2 Microwave Oven Preparation 3 Bottom Duct Assembly 3 Side Duct and Upper Duct Assembly 3 Anti-Tip Bracket Installation 4 Microwave Oven Placement 4 Trim Kit Frame Installation 4 SÉCURITÉ DU FOUR À MICRO-ONDES 5 INSTRUCTIONS...
Installation Guide
Page 4
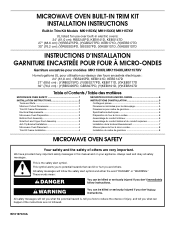
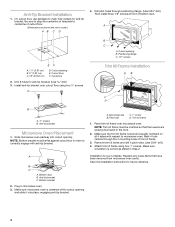
...cutout opening and slide it into cutout opening. Anti-tip bracket Microwave Oven Placement 1. Place trim kit frame over microwave oven. On cutout floor, use template to scale.) AB C D 4. Anti-tip bracket C. Trim kit frame 1. NOTE: Bottom bracket must be flat against cutout floor ... pilot holes through the 4 mounting holes of bottom duct. NOTE: Trim kit frame must be oriented so that have been removed from microwave oven cavity. Make sure the trim kit frame is now complete. Mounting hole B. A Trim Kit Frame Installation A B C D B A. ¹⁄₂" ...
...cutout opening and slide it into cutout opening. Anti-tip bracket Microwave Oven Placement 1. Place trim kit frame over microwave oven. On cutout floor, use template to scale.) AB C D 4. Anti-tip bracket C. Trim kit frame 1. NOTE: Bottom bracket must be flat against cutout floor ... pilot holes through the 4 mounting holes of bottom duct. NOTE: Trim kit frame must be oriented so that have been removed from microwave oven cavity. Make sure the trim kit frame is now complete. Mounting hole B. A Trim Kit Frame Installation A B C D B A. ¹⁄₂" ...


