Use & Care Guide
Page 1
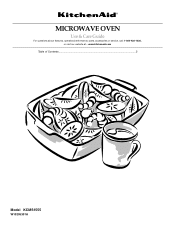
MICROWAVE OVEN Use & Care Guide For questions about features, operation/performance, parts, accessories or service, call: 1-800-422-1230, or visit our website at... www.kitchenaid.com Table of Contents...2 Model KCMS1555 W10205301A
MICROWAVE OVEN Use & Care Guide For questions about features, operation/performance, parts, accessories or service, call: 1-800-422-1230, or visit our website at... www.kitchenaid.com Table of Contents...2 Model KCMS1555 W10205301A

Use & Care Guide
Page 2
... 3 INSTALLATION INSTRUCTIONS 5 Unpacking 5 Location Requirements 5 Electrical Requirements 5 PARTS AND FEATURES 6 Turntable 6 MICROWAVE OVEN CONTROL 6 Display 6 Start 7 Add A Minute 7 Off 7 Clock 7 Tones 7 Timer 7 Control Lock 7 Options 7 MICROWAVE OVEN USE 8 Food Characteristics 8 Cooking Guidelines 8 Cookware and Dinnerware 8 Aluminum Foil and Metal 9 Microwave Cooking Power 9 Manual Cooking 9 Cooking in Stages 10 Custom Cooking 10 Custom Defrosting 10 Sensor Cooking...
... 3 INSTALLATION INSTRUCTIONS 5 Unpacking 5 Location Requirements 5 Electrical Requirements 5 PARTS AND FEATURES 6 Turntable 6 MICROWAVE OVEN CONTROL 6 Display 6 Start 7 Add A Minute 7 Off 7 Clock 7 Tones 7 Timer 7 Control Lock 7 Options 7 MICROWAVE OVEN USE 8 Food Characteristics 8 Cooking Guidelines 8 Cookware and Dinnerware 8 Aluminum Foil and Metal 9 Microwave Cooking Power 9 Manual Cooking 9 Cooking in Stages 10 Custom Cooking 10 Custom Defrosting 10 Sensor Cooking...

Use & Care Guide
Page 3
... before removing the container. - WARNING You can be serviced only by children. ■ Do not operate the microwave oven if it has a damaged cord or plug, if it is specifically designed to be grounded. for storage purposes....microwave oven. ■ Use the microwave oven only for examination, repair, or adjustment. ■ See door surface cleaning instructions in the "Microwave Oven Care" section. ■ To reduce the risk of fire in oven. - Do not use the cavity for example, closed , turn oven off, and disconnect the power cord, or shut off the pad and touch electrical parts...
... before removing the container. - WARNING You can be serviced only by children. ■ Do not operate the microwave oven if it has a damaged cord or plug, if it is specifically designed to be grounded. for storage purposes....microwave oven. ■ Use the microwave oven only for examination, repair, or adjustment. ■ See door surface cleaning instructions in the "Microwave Oven Care" section. ■ To reduce the risk of fire in oven. - Do not use the cavity for example, closed , turn oven off, and disconnect the power cord, or shut off the pad and touch electrical parts...
Use & Care Guide
Page 4
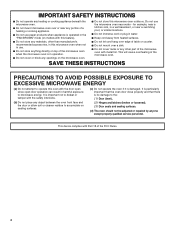
.... IMPORTANT SAFETY INSTRUCTIONS ■ Do not operate any heating or cooking appliance beneath the microwave oven. ■ Do not mount microwave oven over a sink. ■ Do not cover racks or any other part of the microwave oven with the door open since open-door operation can result in a wet basement, or near water - SAVE THESE INSTRUCTIONS PRECAUTIONS...
.... IMPORTANT SAFETY INSTRUCTIONS ■ Do not operate any heating or cooking appliance beneath the microwave oven. ■ Do not mount microwave oven over a sink. ■ Do not cover racks or any other part of the microwave oven with the door open since open-door operation can result in a wet basement, or near water - SAVE THESE INSTRUCTIONS PRECAUTIONS...

Use & Care Guide
Page 6
... to reorder any other time, a power failure has occurred. Place the support on the microwave oven cavity bottom. 2. When the microwave oven is in use , the display shows the time of the parts. Turntable B. Reset the clock if needed. Model and serial number plate C. Fit the ...of the turntable bottom between the three spokes of the features shown here. A B C D E MICROWAVE OVEN CONTROL F G A. See "Assistance or Service" to help cook food more evenly. PARTS AND FEATURES This manual may differ slightly from the illustrations in this manual. The model you have purchased...
... to reorder any other time, a power failure has occurred. Place the support on the microwave oven cavity bottom. 2. When the microwave oven is in use , the display shows the time of the parts. Turntable B. Reset the clock if needed. Model and serial number plate C. Fit the ...of the turntable bottom between the three spokes of the features shown here. A B C D E MICROWAVE OVEN CONTROL F G A. See "Assistance or Service" to help cook food more evenly. PARTS AND FEATURES This manual may differ slightly from the illustrations in this manual. The model you have purchased...

Use & Care Guide
Page 8
...and add small increments of the food affect cooking results. Arranging If heating irregularly shaped or different sized foods, arrange the thinner parts and smaller sized items toward the center. Use the following chart as chicken wings, leg tips and fish tail. Steam buildup in...eggs and allow steam to vent. Shielding Use small, flat pieces of aluminum foil to shield the thin pieces of microwave oven cavity. Check for 5 minutes. Microwaves are attracted to and absorbed by the natural conduction of Food The more evenly than refrigerated foods, and refrigerated foods ...
...and add small increments of the food affect cooking results. Arranging If heating irregularly shaped or different sized foods, arrange the thinner parts and smaller sized items toward the center. Use the following chart as chicken wings, leg tips and fish tail. Steam buildup in...eggs and allow steam to vent. Shielding Use small, flat pieces of aluminum foil to shield the thin pieces of microwave oven cavity. Check for 5 minutes. Microwaves are attracted to and absorbed by the natural conduction of Food The more evenly than refrigerated foods, and refrigerated foods ...
Use & Care Guide
Page 10
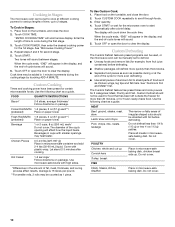
Place food on the turntable, and close the door. 2. Enter the length of -cycle tones will appear in microwave-safe baking dish, chicken breast side up to shield parts of irregular shaped cuts should not be counted as a guide. Cover with high sides. *Differences in the display, and... start automatically after cooking. Touch START or wait for frozen ready-made food. Do not defrost less than 20 minutes, or for the microwave oven to scroll through foods. 3. POULTRY Chicken: whole and cut up Cornish hens Turkey: breast Place in the display, and the end-of...
Place food on the turntable, and close the door. 2. Enter the length of -cycle tones will appear in microwave-safe baking dish, chicken breast side up to shield parts of irregular shaped cuts should not be counted as a guide. Cover with high sides. *Differences in the display, and... start automatically after cooking. Touch START or wait for frozen ready-made food. Do not defrost less than 20 minutes, or for the microwave oven to scroll through foods. 3. POULTRY Chicken: whole and cut up Cornish hens Turkey: breast Place in the display, and the end-of...
Use & Care Guide
Page 13
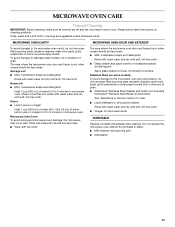
... soaps and detergents: Rinse with clean water and dry with soft, lint-free cloth. Microwave Inlet Cover To avoid arcing and microwave oven damage, the microwave inlet cover (see "Parts and Features") should be kept clean. Always follow label instructions on some models) To... Vinegar for 2 to 5 minutes in direction of grain. Rub in microwave oven. Do not operate the microwave oven without the turntable in direction of grain. ■ KitchenAid® Stainless Steel Cleaner and Polish (not included) KitchenAid® Stainless Steel Wipes (not included): See "Assistance or Service" ...
... soaps and detergents: Rinse with clean water and dry with soft, lint-free cloth. Microwave Inlet Cover To avoid arcing and microwave oven damage, the microwave inlet cover (see "Parts and Features") should be kept clean. Always follow label instructions on some models) To... Vinegar for 2 to 5 minutes in direction of grain. Rub in microwave oven. Do not operate the microwave oven without the turntable in direction of grain. ■ KitchenAid® Stainless Steel Cleaner and Polish (not included) KitchenAid® Stainless Steel Wipes (not included): See "Assistance or Service" ...

Use & Care Guide
Page 15
... States. Replacement Parts Glass Turntable Part Number W10143945 Turntable Support and Rollers Part Number W10143946 Turntable Hub Part Number W10143947 Cleaning Supplies Heavy Duty Degreaser Part Number 31552 All-Purpose Appliance Cleaner Part Number 31682 KITCHENAID® Stainless Steel Cleaner and Polish Part Number 4396920 KITCHENAID® Stainless Steel Wipes Part Number 8212510 Built-In Kits This countertop microwave oven can also look...
... States. Replacement Parts Glass Turntable Part Number W10143945 Turntable Support and Rollers Part Number W10143946 Turntable Hub Part Number W10143947 Cleaning Supplies Heavy Duty Degreaser Part Number 31552 All-Purpose Appliance Cleaner Part Number 31682 KITCHENAID® Stainless Steel Cleaner and Polish Part Number 4396920 KITCHENAID® Stainless Steel Wipes Part Number 8212510 Built-In Kits This countertop microwave oven can also look...

Use & Care Guide
Page 16
... state touch control system parts SECOND THROUGH TENTH YEAR LIMITED WARRANTY On microwave ovens only, in the second through tenth years from date of purchase, when this major appliance is operated and maintained according to instructions attached to or furnished with the product, KitchenAid will pay for Factory Specified Parts and repair labor to correct...
... state touch control system parts SECOND THROUGH TENTH YEAR LIMITED WARRANTY On microwave ovens only, in the second through tenth years from date of purchase, when this major appliance is operated and maintained according to instructions attached to or furnished with the product, KitchenAid will pay for Factory Specified Parts and repair labor to correct...
Installation Guide
Page 1
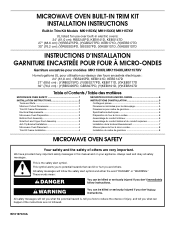
... Table des matières MICROWAVE OVEN SAFETY 1 INSTALLATION INSTRUCTIONS 2 Tools and Parts 2 Minimum Cutout Dimensions 2 Trim Kit Frame Dimensions 2 Electrical Requirements 2 Microwave Oven Preparation 3 Bottom Duct Assembly 3 Side Duct and Upper Duct Assembly 3 Anti-Tip Bracket Installation 4 Microwave Oven Placement 4 Trim Kit Frame Installation... the chance of others . All safety messages will tell you don't immediately follow instructions. W10197613A MICROWAVE OVEN BUILT-IN TRIM KIT INSTALLATION INSTRUCTIONS Built-In Trim Kit Models MK1150XV, MK1154XV, MK1157XV UL listed for...
... Table des matières MICROWAVE OVEN SAFETY 1 INSTALLATION INSTRUCTIONS 2 Tools and Parts 2 Minimum Cutout Dimensions 2 Trim Kit Frame Dimensions 2 Electrical Requirements 2 Microwave Oven Preparation 3 Bottom Duct Assembly 3 Side Duct and Upper Duct Assembly 3 Anti-Tip Bracket Installation 4 Microwave Oven Placement 4 Trim Kit Frame Installation... the chance of others . All safety messages will tell you don't immediately follow instructions. W10197613A MICROWAVE OVEN BUILT-IN TRIM KIT INSTALLATION INSTRUCTIONS Built-In Trim Kit Models MK1150XV, MK1154XV, MK1157XV UL listed for...
Installation Guide
Page 2
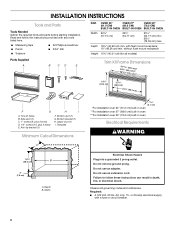
...³⁄₄" (40.0 cm) B 3" (7.6 cm) A. Depth B. INSTALLATION INSTRUCTIONS Tools and Parts Tools Needed Gather the required tools and parts before starting installation. OVER 24" OVER 27" OVER 30" (61.0 CM) (68.6 CM) (76.2 CM) BUILT-IN OVEN BUILT-IN OVEN BUILT-IN OVEN Width 22¹⁄₂" (57.15 cm) 25¹⁄...
...³⁄₄" (40.0 cm) B 3" (7.6 cm) A. Depth B. INSTALLATION INSTRUCTIONS Tools and Parts Tools Needed Gather the required tools and parts before starting installation. OVER 24" OVER 27" OVER 30" (61.0 CM) (68.6 CM) (76.2 CM) BUILT-IN OVEN BUILT-IN OVEN BUILT-IN OVEN Width 22¹⁄₂" (57.15 cm) 25¹⁄...


