
Use & Care Guide
Page 2
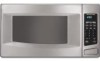
... 3 INSTALLATION INSTRUCTIONS 5 Unpacking 5 Location Requirements 5 Electrical Requirements 5 PARTS AND FEATURES 6 Turntable 6 MICROWAVE OVEN CONTROL 6 Display 6 Start 7 Add A Minute 7 Off 7 Clock 7 Tones 7 Timer 7 Control Lock 7 Options 7 MICROWAVE OVEN USE 8 Food Characteristics 8 Cooking Guidelines 8 Cookware and Dinnerware 8 Aluminum Foil and Metal 9 Microwave Cooking Power 9 Manual Cooking 9 Cooking in Stages 10 Custom Cooking 10 Custom Defrosting 10 Sensor Cooking...
... 3 INSTALLATION INSTRUCTIONS 5 Unpacking 5 Location Requirements 5 Electrical Requirements 5 PARTS AND FEATURES 6 Turntable 6 MICROWAVE OVEN CONTROL 6 Display 6 Start 7 Add A Minute 7 Off 7 Clock 7 Tones 7 Timer 7 Control Lock 7 Options 7 MICROWAVE OVEN USE 8 Food Characteristics 8 Cooking Guidelines 8 Cookware and Dinnerware 8 Aluminum Foil and Metal 9 Microwave Cooking Power 9 Manual Cooking 9 Cooking in Stages 10 Custom Cooking 10 Custom Defrosting 10 Sensor Cooking...

Use & Care Guide
Page 3
... and follow instructions. for examination, repair, or adjustment. ■ See door surface cleaning instructions in the "Microwave Oven Care" section. ■ To reduce the risk of fire in this manual. Do not use as they may create a fire or risk of electric shock. ■ Do not clean...food. Do not overcook food. Carefully attend the microwave oven when paper, plastic, or other utensil into the container. ■ Oversized foods or oversized metal utensils should be heated in this manual and on your appliance. To reduce the risk of oven is not working properly, or if it ....
... and follow instructions. for examination, repair, or adjustment. ■ See door surface cleaning instructions in the "Microwave Oven Care" section. ■ To reduce the risk of fire in this manual. Do not use as they may create a fire or risk of electric shock. ■ Do not clean...food. Do not overcook food. Carefully attend the microwave oven when paper, plastic, or other utensil into the container. ■ Oversized foods or oversized metal utensils should be heated in this manual and on your appliance. To reduce the risk of oven is not working properly, or if it ....

Use & Care Guide
Page 6
.... Model and serial number plate C. Hub C. Place the support on the support. Glass turntable H. A B C D E MICROWAVE OVEN CONTROL F G A. Fit the raised, curved lines in use , the display shows cook time remaining. Door lock system G. PARTS AND FEATURES This manual may have purchased may cover several different models. See "Assistance or Service" to reorder any...
.... Model and serial number plate C. Hub C. Place the support on the support. Glass turntable H. A B C D E MICROWAVE OVEN CONTROL F G A. Fit the raised, curved lines in use , the display shows cook time remaining. Door lock system G. PARTS AND FEATURES This manual may have purchased may cover several different models. See "Assistance or Service" to reorder any...
Use & Care Guide
Page 7
...instructions on or off when the door is active, "LOCKED" will resume the preset cycle. Add A Minute Cook time may be added to a manual cook cycle by repeating the above steps. Touch CLOCK. 2. Touch CLOCK. See "Options" section. Control Lock The Control Lock shuts down the control...weight measure may be changed by touching ADD A MINUTE. OFF is interrupted, touching START will appear in the display. To Set Clock: The microwave oven and Timer must be canceled during the countdown by touching the ADD A MINUTE pad. These tones indicate the following: One tone ■ ...
...instructions on or off when the door is active, "LOCKED" will resume the preset cycle. Add A Minute Cook time may be added to a manual cook cycle by repeating the above steps. Touch CLOCK. 2. Touch CLOCK. See "Options" section. Control Lock The Control Lock shuts down the control...weight measure may be changed by touching ADD A MINUTE. OFF is interrupted, touching START will appear in the display. To Set Clock: The microwave oven and Timer must be canceled during the countdown by touching the ADD A MINUTE pad. These tones indicate the following: One tone ■ ...
Use & Care Guide
Page 9
...meat thermometers may be used with another metal object during the cycle by percent or name. Aluminum Foil and Metal Always use in microwave oven with the microwave oven (on the turntable, and close the door. 2. OK for Use Racks and bakeware supplied with 1 cup (250 mL) ... such as lasagna. 50%, Medium Cooking ham, whole poultry and pot roasts. Manual Cooking To Use: 1. Touch COOK POWER, then set the desired cooking power. Touch OFF or open the door to the microwave oven. Silicone Bakeware Follow manufacturer's recommendations. Use the following guidelines: ■ To ...
...meat thermometers may be used with another metal object during the cycle by percent or name. Aluminum Foil and Metal Always use in microwave oven with the microwave oven (on the turntable, and close the door. 2. OK for Use Racks and bakeware supplied with 1 cup (250 mL) ... such as lasagna. 50%, Medium Cooking ham, whole poultry and pot roasts. Manual Cooking To Use: 1. Touch COOK POWER, then set the desired cooking power. Touch OFF or open the door to the microwave oven. Silicone Bakeware Follow manufacturer's recommendations. Use the following guidelines: ■ To ...
Use & Care Guide
Page 10
.... 2. FOOD QUANTITY/INSTRUCTIONS Bacon* 2-6 slices, average thickness/ Follow directions on package. Use microwave-safe bowls with plastic wrap. See "Aluminum Foil and Metal" first. Cooking in Stages The microwave oven can be manually set to cook at the end of the cycle for more than 20 minutes, or for ...frozen ready-made food. Enter the length of time to 2 stages. See "Microwave Cooking Power." 4. Touch OFF or open the door...
.... 2. FOOD QUANTITY/INSTRUCTIONS Bacon* 2-6 slices, average thickness/ Follow directions on package. Use microwave-safe bowls with plastic wrap. See "Aluminum Foil and Metal" first. Cooking in Stages The microwave oven can be manually set to cook at the end of the cycle for more than 20 minutes, or for ...frozen ready-made food. Enter the length of time to 2 stages. See "Microwave Cooking Power." 4. Touch OFF or open the door...
Use & Care Guide
Page 11
...cooking. 4-16 oz (113-454 g)/ Place in microwave-safe container, place on package for at least 1" (2.5 cm) apart. To Defrost Manually: Follow directions in the microwave oven detects humidity released from the food as a guide. See "Microwave Cooking Power" chart. FOOD QUANTITY/INSTRUCTIONS Frozen Pizza .... 8-32 oz (227-907 g)/ Crumble meat into a microwave-safe container with plastic wrap and vent. The microwave oven will show the setting for the Fish setting. 3. Enter the weight. Sensor Cooking A sensor in "Manual Cooking" section, and use 30% cooking power. Use the...
...cooking. 4-16 oz (113-454 g)/ Place in microwave-safe container, place on package for at least 1" (2.5 cm) apart. To Defrost Manually: Follow directions in the microwave oven detects humidity released from the food as a guide. See "Microwave Cooking Power" chart. FOOD QUANTITY/INSTRUCTIONS Frozen Pizza .... 8-32 oz (227-907 g)/ Crumble meat into a microwave-safe container with plastic wrap and vent. The microwave oven will show the setting for the Fish setting. 3. Enter the weight. Sensor Cooking A sensor in "Manual Cooking" section, and use 30% cooking power. Use the...
Installation Guide
Page 1
...the word "DANGER" or "WARNING." We have provided many important safety messages in electric ovens: 24" (61.0 cm): RBS245PD, KEBI141D, KEBS147D 27" (68.6 cm): (Y)RBS275PD,...MICROWAVE OVEN SAFETY 1 INSTALLATION INSTRUCTIONS 2 Tools and Parts 2 Minimum Cutout Dimensions 2 Trim Kit Frame Dimensions 2 Electrical Requirements 2 Microwave Oven Preparation 3 Bottom Duct Assembly 3 Side Duct and Upper Duct Assembly 3 Anti-Tip Bracket Installation 4 Microwave Oven...micro-ondes 8 Installation du cadre de garniture 8 MICROWAVE OVEN SAFETY Your safety and the safety of injury, and tell ...
...the word "DANGER" or "WARNING." We have provided many important safety messages in electric ovens: 24" (61.0 cm): RBS245PD, KEBI141D, KEBS147D 27" (68.6 cm): (Y)RBS275PD,...MICROWAVE OVEN SAFETY 1 INSTALLATION INSTRUCTIONS 2 Tools and Parts 2 Minimum Cutout Dimensions 2 Trim Kit Frame Dimensions 2 Electrical Requirements 2 Microwave Oven Preparation 3 Bottom Duct Assembly 3 Side Duct and Upper Duct Assembly 3 Anti-Tip Bracket Installation 4 Microwave Oven...micro-ondes 8 Installation du cadre de garniture 8 MICROWAVE OVEN SAFETY Your safety and the safety of injury, and tell ...


