
Use & Care Guide
Page 2
TABLE OF CONTENTS MICROWAVE OVEN SAFETY 3 INSTALLATION INSTRUCTIONS 5 Unpacking 5 Location Requirements 5 Electrical Requirements 5 PARTS AND FEATURES 6 Turntable 6 MICROWAVE OVEN CONTROL 6 Display 6 Start 7 Add A Minute 7 Off 7 Clock 7 Tones 7 Timer 7 Control Lock 7 Options 7 MICROWAVE OVEN USE 8 Food Characteristics 8 Cooking Guidelines 8 Cookware and Dinnerware 8 Aluminum Foil and Metal 9 Microwave Cooking Power 9 Manual Cooking 9 Cooking in Stages 10 Custom Cooking 10 Custom Defrosting...
TABLE OF CONTENTS MICROWAVE OVEN SAFETY 3 INSTALLATION INSTRUCTIONS 5 Unpacking 5 Location Requirements 5 Electrical Requirements 5 PARTS AND FEATURES 6 Turntable 6 MICROWAVE OVEN CONTROL 6 Display 6 Start 7 Add A Minute 7 Off 7 Clock 7 Tones 7 Timer 7 Control Lock 7 Options 7 MICROWAVE OVEN USE 8 Food Characteristics 8 Cooking Guidelines 8 Cookware and Dinnerware 8 Aluminum Foil and Metal 9 Microwave Cooking Power 9 Manual Cooking 9 Cooking in Stages 10 Custom Cooking 10 Custom Defrosting...

Use & Care Guide
Page 3
... - All safety messages will follow instructions. Connect only to facilitate cooking. - See "GROUNDING INSTRUCTIONS" found in this section and in the provided Installation Instructions. ■ Install or locate the microwave oven only in accordance with metal scouring pads. are not followed. Do not use . ■ Liquids, such as whole eggs in this manual. Remove...
... - All safety messages will follow instructions. Connect only to facilitate cooking. - See "GROUNDING INSTRUCTIONS" found in this section and in the provided Installation Instructions. ■ Install or locate the microwave oven only in accordance with metal scouring pads. are not followed. Do not use . ■ Liquids, such as whole eggs in this manual. Remove...
Use & Care Guide
Page 5
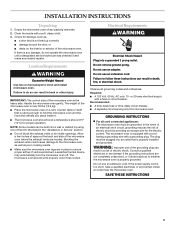
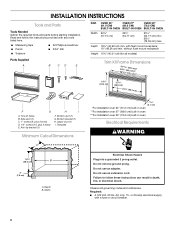
...understood, or if doubt exists as : ■ a door that is too short, have a qualified electrician or serviceman install an outlet near the microwave oven. INSTALLATION INSTRUCTIONS Unpacking 1. Location Requirements WARNING Excessive Weight Hazard Use two or more people to ensure proper airflow. NOTE: Some models... can result in a risk of the trim kits listed in place to move and install microwave oven. Do not remove ground prong. The microwave oven is not lined up correctly ■ damage around the door, or ■ dents on a cart, counter,...
...understood, or if doubt exists as : ■ a door that is too short, have a qualified electrician or serviceman install an outlet near the microwave oven. INSTALLATION INSTRUCTIONS Unpacking 1. Location Requirements WARNING Excessive Weight Hazard Use two or more people to ensure proper airflow. NOTE: Some models... can result in a risk of the trim kits listed in place to move and install microwave oven. Do not remove ground prong. The microwave oven is not lined up correctly ■ damage around the door, or ■ dents on a cart, counter,...

Use & Care Guide
Page 6
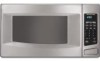
... open push button Turntable A B C D A. To Install: 1. The rollers on the support. Metal shielded window B. Glass turntable H. When the microwave oven is in use , the display shows the time of day (if the clock is set) or Timer countdown. PARTS AND... at any of your particular model may cover several different models. See "Assistance or Service" to help cook food more evenly. When the microwave oven is first supplied to the microwave oven, ":" will appear in use , the display shows cook time remaining. Model and serial number plate C. Cooking guide label I F. Hub C....
... open push button Turntable A B C D A. To Install: 1. The rollers on the support. Metal shielded window B. Glass turntable H. When the microwave oven is in use , the display shows the time of day (if the clock is set) or Timer countdown. PARTS AND... at any of your particular model may cover several different models. See "Assistance or Service" to help cook food more evenly. When the microwave oven is first supplied to the microwave oven, ":" will appear in use , the display shows cook time remaining. Model and serial number plate C. Cooking guide label I F. Hub C....

Use & Care Guide
Page 15
... Cleaning Supplies Heavy Duty Degreaser Part Number 31552 All-Purpose Appliance Cleaner Part Number 31682 KITCHENAID® Stainless Steel Cleaner and Polish Part Number 4396920 KITCHENAID® Stainless Steel Wipes Part Number 8212510 Built-In Kits This countertop microwave oven can be built in the United States. This information will fit right and work right...
... Cleaning Supplies Heavy Duty Degreaser Part Number 31552 All-Purpose Appliance Cleaner Part Number 31682 KITCHENAID® Stainless Steel Cleaner and Polish Part Number 4396920 KITCHENAID® Stainless Steel Wipes Part Number 8212510 Built-In Kits This countertop microwave oven can be built in the United States. This information will fit right and work right...

Use & Care Guide
Page 16
KITCHENAID® BUILT-IN OVEN & MICROWAVE WARRANTY LIMITED WARRANTY For one year from the date of purchase, when this major appliance is operated and maintained according to instructions attached to or furnished with the product, KitchenAid brand of your major appliance, to instruct you on the product. Service calls to correct the installation of Whirlpool Corporation...
KITCHENAID® BUILT-IN OVEN & MICROWAVE WARRANTY LIMITED WARRANTY For one year from the date of purchase, when this major appliance is operated and maintained according to instructions attached to or furnished with the product, KitchenAid brand of your major appliance, to instruct you on the product. Service calls to correct the installation of Whirlpool Corporation...
Dimension Guide
Page 1
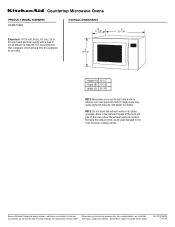
... located. ® Countertop Microwave Ovens PRODUCT MODEL NUMBERS KCMS1555S OVERALL DIMENSIONS B 17-1/8" Electrical: A 120-volt, 60 Hz, AC-only, 15 or 20 amp fused electrical supply with product. Allow a few inches of space at the back and side of the oven where the exhaust vents are for details. For complete details, see Installation our products...
... located. ® Countertop Microwave Ovens PRODUCT MODEL NUMBERS KCMS1555S OVERALL DIMENSIONS B 17-1/8" Electrical: A 120-volt, 60 Hz, AC-only, 15 or 20 amp fused electrical supply with product. Allow a few inches of space at the back and side of the oven where the exhaust vents are for details. For complete details, see Installation our products...
Installation Guide
Page 1
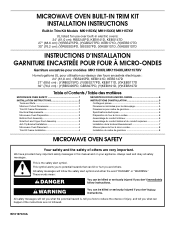
... you to reduce the chance of others . All safety messages will follow the safety alert symbol and either the word "DANGER" or "WARNING." MICROWAVE OVEN BUILT-IN TRIM KIT INSTALLATION INSTRUCTIONS Built-In Trim Kit Models MK1150XV, MK1154XV, MK1157XV UL listed for use over built-in this manual and on your appliance. W10197613A...
... you to reduce the chance of others . All safety messages will follow the safety alert symbol and either the word "DANGER" or "WARNING." MICROWAVE OVEN BUILT-IN TRIM KIT INSTALLATION INSTRUCTIONS Built-In Trim Kit Models MK1150XV, MK1154XV, MK1157XV UL listed for use over built-in this manual and on your appliance. W10197613A...
Installation Guide
Page 2
... only, 15- Read and follow these instructions can result in oven Electrical Requirements WARNING Electrical Shock Hazard Plug into a grounded 3 prong outlet. Depth 18¹⁄₂" (46.99 cm) min. Depth B. INSTALLATION INSTRUCTIONS Tools and Parts Tools Needed Gather the required tools and parts...28¹⁄₂" (72.39 cm) max. Trim kit frame B. Width 2.1 cm) *For installation over 24" (61.0 cm) built-in oven **For installation over 27" (68.6 cm) built-in oven ***For installation over 30" (76.2 cm) built-in death, fire, or electrical shock. Do not use an ...
... only, 15- Read and follow these instructions can result in oven Electrical Requirements WARNING Electrical Shock Hazard Plug into a grounded 3 prong outlet. Depth 18¹⁄₂" (46.99 cm) min. Depth B. INSTALLATION INSTRUCTIONS Tools and Parts Tools Needed Gather the required tools and parts...28¹⁄₂" (72.39 cm) max. Trim kit frame B. Width 2.1 cm) *For installation over 24" (61.0 cm) built-in oven **For installation over 27" (68.6 cm) built-in oven ***For installation over 30" (76.2 cm) built-in death, fire, or electrical shock. Do not use an ...
Installation Guide
Page 3
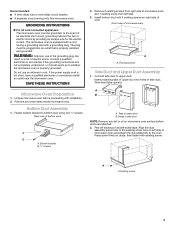
...must be plugged into holes of microwave oven, and attach the duct assembly to upper duct: Insert projecting tabs of microwave oven) A A. SAVE THESE INSTRUCTIONS Microwave Oven Preparation 1. Bottom Duct Assembly 1. Install bottom duct with installation. 2. Unplug microwave oven before ducts are not completely understood...side duct NOTE: Remove any loose items inside microwave oven. Fasten bottom bracket to whether the microwave oven is too short, have a qualified electrician or serviceman install an outlet near the microwave oven. Do not use of electric shock. In the...
...must be plugged into holes of microwave oven, and attach the duct assembly to upper duct: Insert projecting tabs of microwave oven) A A. SAVE THESE INSTRUCTIONS Microwave Oven Preparation 1. Bottom Duct Assembly 1. Install bottom duct with installation. 2. Unplug microwave oven before ducts are not completely understood...side duct NOTE: Remove any loose items inside microwave oven. Fasten bottom bracket to whether the microwave oven is too short, have a qualified electrician or serviceman install an outlet near the microwave oven. Do not use of electric shock. In the...
Installation Guide
Page 4
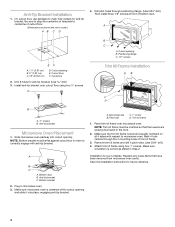
... and slide it into cutout opening. A B C A. Make sure the trim kit frame is correct as shown are sloping downward in microwave oven. 3. Mark 4 hole centers through positioning flange. (Use 5/64" drill.) Then install three 1/2" screws at front of trim kit frame. 3. Drill pilot holes through the 4 mounting holes of bottom duct. Bottom bracket...
... and slide it into cutout opening. A B C A. Make sure the trim kit frame is correct as shown are sloping downward in microwave oven. 3. Mark 4 hole centers through positioning flange. (Use 5/64" drill.) Then install three 1/2" screws at front of trim kit frame. 3. Drill pilot holes through the 4 mounting holes of bottom duct. Bottom bracket...

