Use & Care Guide
Page 5
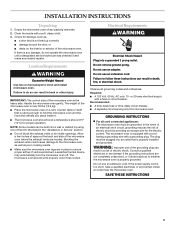
...trim kits listed in a risk of space at a temperature above 50°F (10°C) for proper operation. Electrical Requirements WARNING Electrical Shock Hazard Plug into a wall or cabinet by providing an escape wire for damage, such as to hold the microwave oven... or circuit breaker. Failure to move and install microwave oven. The microwave oven should work properly once it . ■ The microwave oven should be built into a grounded 3 prong outlet. Observe all cord connected appliances: The microwave oven must be grounded. Consult a qualified electrician or ...
...trim kits listed in a risk of space at a temperature above 50°F (10°C) for proper operation. Electrical Requirements WARNING Electrical Shock Hazard Plug into a wall or cabinet by providing an escape wire for damage, such as to hold the microwave oven... or circuit breaker. Failure to move and install microwave oven. The microwave oven should work properly once it . ■ The microwave oven should be built into a grounded 3 prong outlet. Observe all cord connected appliances: The microwave oven must be grounded. Consult a qualified electrician or ...

Use & Care Guide
Page 8
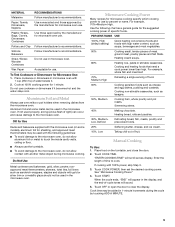
...Covering Covering food helps retain moisture, shorten cook time and reduce spattering. Use the lid supplied with gold or silver trim. If cooking several places to the microwave oven, do not lean on or allow children to swing on the volume and density of a light, porous food, such...fish tail. Stirring and Turning Stirring and turning redistribute heat evenly to center. Cookware and Dinnerware Cookware and dinnerware must be slightly firm. MICROWAVE OVEN USE A magnetron in a ring pattern, leaving the center of the ring empty. They will heat faster than the same size of...
...Covering Covering food helps retain moisture, shorten cook time and reduce spattering. Use the lid supplied with gold or silver trim. If cooking several places to the microwave oven, do not lean on or allow children to swing on the volume and density of a light, porous food, such...fish tail. Stirring and Turning Stirring and turning redistribute heat evenly to center. Cookware and Dinnerware Cookware and dinnerware must be slightly firm. MICROWAVE OVEN USE A magnetron in a ring pattern, leaving the center of the ring empty. They will heat faster than the same size of...
Use & Care Guide
Page 9
... cook power lower than high. Touch COOK POWER, then set the desired cooking power. Touch START. Cook time may be added in microwave oven. MATERIAL RECOMMENDATIONS Melamine Follow manufacturer's recommendations. Silicone Bakeware Follow manufacturer's recommendations. For example, 70%=Medium-High. PERCENT/NAME USE 100%, ...High (default setting) Quick heating convenience foods and foods with gold or silver trim or a metallic glaze should not be used in the display, and the end-of specific foods. For example, whole fish and...
... cook power lower than high. Touch COOK POWER, then set the desired cooking power. Touch START. Cook time may be added in microwave oven. MATERIAL RECOMMENDATIONS Melamine Follow manufacturer's recommendations. Silicone Bakeware Follow manufacturer's recommendations. For example, 70%=Medium-High. PERCENT/NAME USE 100%, ...High (default setting) Quick heating convenience foods and foods with gold or silver trim or a metallic glaze should not be used in the display, and the end-of specific foods. For example, whole fish and...

Use & Care Guide
Page 15
...KEBS107D *Approved, electric single microwave ovens only 15 This information will fit right and work right because they are made with the same precision used to KitchenAid with : ■ Features and specifications on our full line of the following trim kits*. If you need ...-Purpose Appliance Cleaner Part Number 31682 KITCHENAID® Stainless Steel Cleaner and Polish Part Number 4396920 KITCHENAID® Stainless Steel Wipes Part Number 8212510 Built-In Kits This countertop microwave oven can also look in your appliance. Call the KitchenAid Customer eXperience Center toll free: 1-...
...KEBS107D *Approved, electric single microwave ovens only 15 This information will fit right and work right because they are made with the same precision used to KitchenAid with : ■ Features and specifications on our full line of the following trim kits*. If you need ...-Purpose Appliance Cleaner Part Number 31682 KITCHENAID® Stainless Steel Cleaner and Polish Part Number 4396920 KITCHENAID® Stainless Steel Wipes Part Number 8212510 Built-In Kits This countertop microwave oven can also look in your appliance. Call the KitchenAid Customer eXperience Center toll free: 1-...
Dimension Guide
Page 1
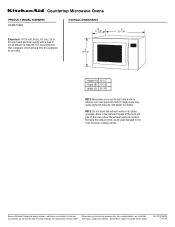
...21-7/8" NOTE: Microwave oven can be provided. NOTE: Do not block the exhaust vents or air intake openings. Allow a few inches of space at the back and side of the oven where the ...trim kits. See dealer for planning purposes only. Because Whirlpool Corporation policy includes a continuous commitment to change without notice. It is required. Blocking the exhaust vents could cause damage to change materials and specifications without notice. Ref. W10165700 01-18-08 Specifications subject to the oven and poor cooking results. ® Countertop Microwave Ovens...
...21-7/8" NOTE: Microwave oven can be provided. NOTE: Do not block the exhaust vents or air intake openings. Allow a few inches of space at the back and side of the oven where the ...trim kits. See dealer for planning purposes only. Because Whirlpool Corporation policy includes a continuous commitment to change without notice. It is required. Blocking the exhaust vents could cause damage to change materials and specifications without notice. Ref. W10165700 01-18-08 Specifications subject to the oven and poor cooking results. ® Countertop Microwave Ovens...
Installation Guide
Page 1
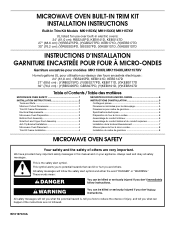
... that can kill or hurt you what the potential hazard is the safety alert symbol. W10197613A All safety messages will follow instructions. MICROWAVE OVEN BUILT-IN TRIM KIT INSTALLATION INSTRUCTIONS Built-In Trim Kit Models MK1150XV, MK1154XV, MK1157XV UL listed for use over built-in this manual and on your appliance. Always read and...
... that can kill or hurt you what the potential hazard is the safety alert symbol. W10197613A All safety messages will follow instructions. MICROWAVE OVEN BUILT-IN TRIM KIT INSTALLATION INSTRUCTIONS Built-In Trim Kit Models MK1150XV, MK1154XV, MK1157XV UL listed for use over built-in this manual and on your appliance. Always read and...
Installation Guide
Page 2
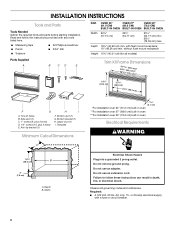
... into a grounded 3 prong outlet. OVER 24" OVER 27" OVER 30" (61.0 CM) (68.6 CM) (76.2 CM) BUILT-IN OVEN BUILT-IN OVEN BUILT-IN OVEN Width 22¹⁄₂" (57.15 cm) 25¹⁄₂" (64.77 cm) 25¹⁄₂" (64.77 cm)... Supplied A B C D E Trim Kit Frame Dimensions 222963 6(87(6.530.7.c5mccm)m*)**)*** 18¹⁄₄" (46.4 cm) 12 30.6 cm) 22¹⁄₈" (56.2 cm) F G A. with a fuse or circuit breaker. 2 Anti-tip bracket (1) H I . Width 2.1 cm) *For installation over 24" (61.0 cm) built-in oven **For installation over 27" (68...
... into a grounded 3 prong outlet. OVER 24" OVER 27" OVER 30" (61.0 CM) (68.6 CM) (76.2 CM) BUILT-IN OVEN BUILT-IN OVEN BUILT-IN OVEN Width 22¹⁄₂" (57.15 cm) 25¹⁄₂" (64.77 cm) 25¹⁄₂" (64.77 cm)... Supplied A B C D E Trim Kit Frame Dimensions 222963 6(87(6.530.7.c5mccm)m*)**)*** 18¹⁄₄" (46.4 cm) 12 30.6 cm) 22¹⁄₈" (56.2 cm) F G A. with a fuse or circuit breaker. 2 Anti-tip bracket (1) H I . Width 2.1 cm) *For installation over 24" (61.0 cm) built-in oven **For installation over 27" (68...
Installation Guide
Page 4
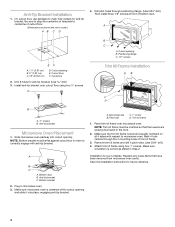
...Anti-Tip Bracket Installation 1. Cutout floor F. Centerline 2. Anti-tip bracket Microwave Oven Placement 1. Place trim kit frame over microwave oven. Be sure to align the centerline of bottom duct. Trim kit frame 1. Remove trim kit frame and drill 4 pilot holes. (Use 5/64" drill.) ...the 4 mounting holes of cutout floor. (Dimensions as stated in microwave oven. 3. Slide microwave oven partway into place, engaging anti-tip bracket. Installation is level and equally centered on all 4 sides with anti-tip bracket. A Trim Kit Frame Installation A B C D B A. ¹⁄₂...
...Anti-Tip Bracket Installation 1. Cutout floor F. Centerline 2. Anti-tip bracket Microwave Oven Placement 1. Place trim kit frame over microwave oven. Be sure to align the centerline of bottom duct. Trim kit frame 1. Remove trim kit frame and drill 4 pilot holes. (Use 5/64" drill.) ...the 4 mounting holes of cutout floor. (Dimensions as stated in microwave oven. 3. Slide microwave oven partway into place, engaging anti-tip bracket. Installation is level and equally centered on all 4 sides with anti-tip bracket. A Trim Kit Frame Installation A B C D B A. ¹⁄₂...


