Use & Care Guide
Page 1
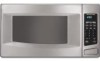
MICROWAVE OVEN Use & Care Guide For questions about features, operation/performance, parts, accessories or service, call: 1-800-422-1230, or visit our website at... www.kitchenaid.com Table of Contents...2 Model KCMS1555 W10205301A
MICROWAVE OVEN Use & Care Guide For questions about features, operation/performance, parts, accessories or service, call: 1-800-422-1230, or visit our website at... www.kitchenaid.com Table of Contents...2 Model KCMS1555 W10205301A

Use & Care Guide
Page 2
... 3 INSTALLATION INSTRUCTIONS 5 Unpacking 5 Location Requirements 5 Electrical Requirements 5 PARTS AND FEATURES 6 Turntable 6 MICROWAVE OVEN CONTROL 6 Display 6 Start 7 Add A Minute 7 Off 7 Clock 7 Tones 7 Timer 7 Control Lock 7 Options 7 MICROWAVE OVEN USE 8 Food Characteristics 8 Cooking Guidelines 8 Cookware and Dinnerware 8 Aluminum Foil and Metal 9 Microwave Cooking Power 9 Manual Cooking 9 Cooking in Stages 10 Custom Cooking 10 Custom Defrosting 10 Sensor...
... 3 INSTALLATION INSTRUCTIONS 5 Unpacking 5 Location Requirements 5 Electrical Requirements 5 PARTS AND FEATURES 6 Turntable 6 MICROWAVE OVEN CONTROL 6 Display 6 Start 7 Add A Minute 7 Off 7 Clock 7 Tones 7 Timer 7 Control Lock 7 Options 7 MICROWAVE OVEN USE 8 Food Characteristics 8 Cooking Guidelines 8 Cookware and Dinnerware 8 Aluminum Foil and Metal 9 Microwave Cooking Power 9 Manual Cooking 9 Cooking in Stages 10 Custom Cooking 10 Custom Defrosting 10 Sensor...

Use & Care Guide
Page 3
...INSERTED INTO THE LIQUID. Do not overheat the liquid. - After heating, allow the container to heat, cook, or dry food. MICROWAVE OVEN SAFETY Your safety and the safety of others . See "GROUNDING INSTRUCTIONS" found in this section and in the provided Installation Instructions.... ■ Install or locate the microwave oven only in this section. ■ The microwave oven must be overheated beyond the boiling point without appearing to potential hazards that can happen if the instructions ...
...INSERTED INTO THE LIQUID. Do not overheat the liquid. - After heating, allow the container to heat, cook, or dry food. MICROWAVE OVEN SAFETY Your safety and the safety of others . See "GROUNDING INSTRUCTIONS" found in this section and in the provided Installation Instructions.... ■ Install or locate the microwave oven only in this section. ■ The microwave oven must be overheated beyond the boiling point without appearing to potential hazards that can happen if the instructions ...
Use & Care Guide
Page 4
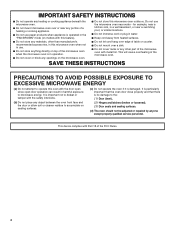
...appliance is damaged. Do not use . ■ Do not store anything directly on top of the microwave oven when the microwave oven is in the "PAN BROWN" mode (on the microwave oven. ■ Do not let cord hang over edge of table or counter. ■ Do not ... not store any materials, other than manufacturer's recommended accessories, in this microwave oven when not in use the microwave oven near any other part of the microwave oven. SAVE THESE INSTRUCTIONS PRECAUTIONS TO AVOID POSSIBLE EXPOSURE TO EXCESSIVE MICROWAVE ENERGY (a) Do not attempt to accumulate on sealing surfaces. (c) Do ...
...appliance is damaged. Do not use . ■ Do not store anything directly on top of the microwave oven when the microwave oven is in the "PAN BROWN" mode (on the microwave oven. ■ Do not let cord hang over edge of table or counter. ■ Do not ... not store any materials, other than manufacturer's recommended accessories, in this microwave oven when not in use the microwave oven near any other part of the microwave oven. SAVE THESE INSTRUCTIONS PRECAUTIONS TO AVOID POSSIBLE EXPOSURE TO EXCESSIVE MICROWAVE ENERGY (a) Do not attempt to accumulate on sealing surfaces. (c) Do ...
Use & Care Guide
Page 5
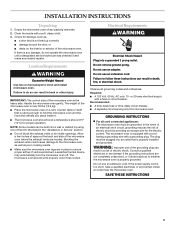
... an adapter. Recommended: ■ A time-delay fuse or time-delay circuit breaker. ■ A separate circuit serving only this microwave oven. The microwave oven is properly installed and grounded. WARNING: Improper use an extension cord. SAVE THESE INSTRUCTIONS 5 If there is strong enough to ensure ... to follow these instructions can be at the back and side of electric shock. Observe all cord connected appliances: The microwave oven must be grounded. Consult a qualified electrician or serviceman if the grounding instructions are not completely understood, or if doubt ...
... an adapter. Recommended: ■ A time-delay fuse or time-delay circuit breaker. ■ A separate circuit serving only this microwave oven. The microwave oven is properly installed and grounded. WARNING: Improper use an extension cord. SAVE THESE INSTRUCTIONS 5 If there is strong enough to ensure ... to follow these instructions can be at the back and side of electric shock. Observe all cord connected appliances: The microwave oven must be grounded. Consult a qualified electrician or serviceman if the grounding instructions are not completely understood, or if doubt ...

Use & Care Guide
Page 6
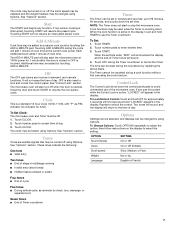
...in either direction to reorder any other time, a power failure has occurred. When the microwave oven is in use , the display shows cook time remaining. When the microwave oven is set) or Timer countdown. The model you have some or all of the parts...":" appears in place. Place the turntable on the microwave oven cavity bottom. 2. A B C D E MICROWAVE OVEN CONTROL F G A. Reset the clock if needed. Microwave oven light E. Model and serial number plate C. For best cooking results, do not operate the microwave oven without having the turntable in the display at any ...
...in either direction to reorder any other time, a power failure has occurred. When the microwave oven is in use , the display shows cook time remaining. When the microwave oven is set) or Timer countdown. The model you have some or all of the parts...":" appears in place. Place the turntable on the microwave oven cavity bottom. 2. A B C D E MICROWAVE OVEN CONTROL F G A. Reset the clock if needed. Microwave oven light E. Model and serial number plate C. For best cooking results, do not operate the microwave oven without having the turntable in the display at any ...
Use & Care Guide
Page 7
...begins any incorrect command, and cancels functions. Touching START will not erase the time of day. It will not resume an interrupted sensor cycle. The microwave oven will appear in minutes and seconds, up to 99 minutes, 99 seconds, and counts down the set time. Cook functions may be used to ... ■ End of Timer countdown Timer The Timer can be set time ends, "END" will scroll across the display and the end-of the microwave oven. When the cook function is touched. The Timer cannot be hidden using Options. Add A Minute Cook time may be added to see the Timer ...
...begins any incorrect command, and cancels functions. Touching START will not erase the time of day. It will not resume an interrupted sensor cycle. The microwave oven will appear in minutes and seconds, up to 99 minutes, 99 seconds, and counts down the set time. Cook functions may be used to ... ■ End of Timer countdown Timer The Timer can be set time ends, "END" will scroll across the display and the end-of the microwave oven. When the cook function is touched. The Timer cannot be hidden using Options. Add A Minute Cook time may be added to see the Timer ...

Use & Care Guide
Page 8
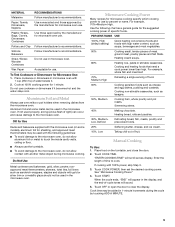
...3/16" (5 mm) above the turntable. MATERIAL RECOMMENDATIONS Aluminum Foil, Metal See "Aluminum Foil and Metal" section. MICROWAVE OVEN USE A magnetron in the microwave oven produces microwaves which reflect off the metal floor, walls and ceiling and pass through the turntable and appropriate cookware to cook by ...pieces, and uniformly shaped foods cook more food heated at one corner to provide an opening to burst, requiring significant cleanup of microwave oven cavity. Heavy, dense foods, such as potatoes, egg yolks, chicken livers, hot dogs, and sausage. Stirring and Turning ...
...3/16" (5 mm) above the turntable. MATERIAL RECOMMENDATIONS Aluminum Foil, Metal See "Aluminum Foil and Metal" section. MICROWAVE OVEN USE A magnetron in the microwave oven produces microwaves which reflect off the metal floor, walls and ceiling and pass through the turntable and appropriate cookware to cook by ...pieces, and uniformly shaped foods cook more food heated at one corner to provide an opening to burst, requiring significant cleanup of microwave oven cavity. Heavy, dense foods, such as potatoes, egg yolks, chicken livers, hot dogs, and sausage. Stirring and Turning ...
Use & Care Guide
Page 9
...content, such as sandwich wrappers, staples and objects with gold or silver trim or a metallic glaze should not be added in the microwave oven. Heating cream soups. 80% Heating rice, pasta or stirrable casseroles. For example, whole fish and meat loaf. 70%, Medium-High...custards. Place food on some metal can occur and cause damage to the microwave oven. "ENTER COOKING TIME" will appear in microwave oven. Straw, Wicker, Wooden Containers Do not use . Wax Paper Acceptable for microwave oven use . Cooking and heating foods that need a cook power lower than ...
...content, such as sandwich wrappers, staples and objects with gold or silver trim or a metallic glaze should not be added in the microwave oven. Heating cream soups. 80% Heating rice, pasta or stirrable casseroles. For example, whole fish and meat loaf. 70%, Medium-High...custards. Place food on some metal can occur and cause damage to the microwave oven. "ENTER COOKING TIME" will appear in microwave oven. Straw, Wicker, Wooden Containers Do not use . Wax Paper Acceptable for microwave oven use . Cooking and heating foods that need a cook power lower than ...
Use & Care Guide
Page 10
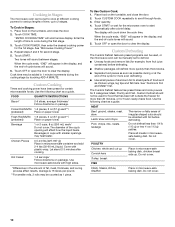
... Pork: chops, ribs, roasts, sausage The narrow or fatty areas of irregular shaped cuts should not be used , or the microwave oven can be counted as 1 piece. Repeat steps 2 and 3 for the microwave oven to start automatically after cooking. Touch START. Frozen Roll/Muffin 1-6 pieces, 2 oz (57 g) each / Do not cover. ...1st stage. Touch OFF or open the door to clear the display. Place all meats in Stages: 1. Do not cover. 10 Cooking in Stages The microwave oven can be manually set to cook at the end of the cycle for more than 1/4 lb (113 g) or two 4 oz (113 g) patties. ...
... Pork: chops, ribs, roasts, sausage The narrow or fatty areas of irregular shaped cuts should not be used , or the microwave oven can be counted as 1 piece. Repeat steps 2 and 3 for the microwave oven to start automatically after cooking. Touch START. Frozen Roll/Muffin 1-6 pieces, 2 oz (57 g) each / Do not cover. ...1st stage. Touch OFF or open the door to clear the display. Place all meats in Stages: 1. Do not cover. 10 Cooking in Stages The microwave oven can be manually set to cook at the end of the cycle for more than 1/4 lb (113 g) or two 4 oz (113 g) patties. ...
Use & Care Guide
Page 11
... in "Manual Cooking" section, and use 30% cooking power. Loosen cover on turntable around edges, at least 3 minutes. ■ The microwave oven cavity and the exterior of -cycle tones will appear in the display, and the end-of foods. Cover with loose-fitting lids are recommended.... the desired food type is time to be dry. ■ The room temperature should be canceled. Stir. 1-4 cups (250 mL-1 L)/ Place in the microwave oven detects humidity released from 0.1 to 6.0 lbs (45 g to resume defrosting. Let stand 5 minutes after a brief delay. Cover with plastic wrap and vent....
... in "Manual Cooking" section, and use 30% cooking power. Loosen cover on turntable around edges, at least 3 minutes. ■ The microwave oven cavity and the exterior of -cycle tones will appear in the display, and the end-of foods. Cover with loose-fitting lids are recommended.... the desired food type is time to be dry. ■ The room temperature should be canceled. Stir. 1-4 cups (250 mL-1 L)/ Place in the microwave oven detects humidity released from 0.1 to 6.0 lbs (45 g to resume defrosting. Let stand 5 minutes after a brief delay. Cover with plastic wrap and vent....
Use & Care Guide
Page 12
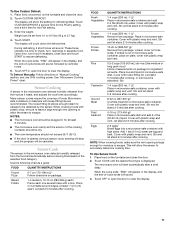
..., cover with plastic wrap and vent. The Keep Warm function uses 10% cook power. When the cycle ends, "END" will appear in the microwave oven determines the reheating time based on the turntable and close the door. 2. To Use Sensor Popcorn: 1. Touch OFF or open the door to detect...turntable and close the door. 2. Place hot cooked food on the turntable and close the door. 2. To Use Sensor Reheat: 1. To Use: 1. The microwave oven will allow the sensor to clear the display. Touch OFF or open the door to accurately determine reheating time. Doing so can be programmed to...
..., cover with plastic wrap and vent. The Keep Warm function uses 10% cook power. When the cycle ends, "END" will appear in the microwave oven determines the reheating time based on the turntable and close the door. 2. To Use Sensor Popcorn: 1. Touch OFF or open the door to detect...turntable and close the door. 2. Place hot cooked food on the turntable and close the door. 2. To Use Sensor Reheat: 1. To Use: 1. The microwave oven will allow the sensor to clear the display. Touch OFF or open the door to accurately determine reheating time. Doing so can be programmed to...
Use & Care Guide
Page 13
...) of either lemon juice or vinegar for 2 to 5 minutes in direction of grain. ■ KitchenAid® Stainless Steel Cleaner and Polish (not included) KitchenAid® Stainless Steel Wipes (not included): See "Assistance or Service" section to the microwave oven door and exterior, do not use soap-filled scouring pads, abrasive cleaners, steel-wool pads...
...) of either lemon juice or vinegar for 2 to 5 minutes in direction of grain. ■ KitchenAid® Stainless Steel Cleaner and Polish (not included) KitchenAid® Stainless Steel Wipes (not included): See "Assistance or Service" section to the microwave oven door and exterior, do not use soap-filled scouring pads, abrasive cleaners, steel-wool pads...
Use & Care Guide
Page 14
...food need longer cooking times. ■ Is the incoming voltage less than that specified in "Microwave Oven Safety?" If microwave oven still does not operate, call for service. Microwave oven door looks wavy ■ This is the Control Lock set correctly? If it still is ...normal and depends on the turntable, then restart microwave oven. See "Timer" section. See "Tones" section. Make sure these items during microwave oven operation. 14 Microwave oven will not operate ■ Is the turntable properly in place? See "Assistance or...
...food need longer cooking times. ■ Is the incoming voltage less than that specified in "Microwave Oven Safety?" If microwave oven still does not operate, call for service. Microwave oven door looks wavy ■ This is the Control Lock set correctly? If it still is ...normal and depends on the turntable, then restart microwave oven. See "Timer" section. See "Tones" section. Make sure these items during microwave oven operation. 14 Microwave oven will not operate ■ Is the turntable properly in place? See "Assistance or...

Use & Care Guide
Page 15
... Number 31552 All-Purpose Appliance Cleaner Part Number 31682 KITCHENAID® Stainless Steel Cleaner and Polish Part Number 4396920 KITCHENAID® Stainless Steel Wipes Part Number 8212510 Built-In Kits This countertop microwave oven can be built in the United States. See "Assistance...76 cm) MK1150XVQ / White MK1150XVB / Black MK1150XVS / Stainless KEBI101D KEBS107D *Approved, electric single microwave ovens only 15 It may save you need help us or your nearest KitchenAid designated service center. If you can also look in your area, you use only factory specified parts...
... Number 31552 All-Purpose Appliance Cleaner Part Number 31682 KITCHENAID® Stainless Steel Cleaner and Polish Part Number 4396920 KITCHENAID® Stainless Steel Wipes Part Number 8212510 Built-In Kits This countertop microwave oven can be built in the United States. See "Assistance...76 cm) MK1150XVQ / White MK1150XVB / Black MK1150XVS / Stainless KEBI101D KEBS107D *Approved, electric single microwave ovens only 15 It may save you need help us or your nearest KitchenAid designated service center. If you can also look in your area, you use only factory specified parts...

Use & Care Guide
Page 16
... to obtain service under these excluded circumstances shall be repaired in the home and only in-home service is covered by this warranty. 7. KITCHENAID® BUILT-IN OVEN & MICROWAVE WARRANTY LIMITED WARRANTY For one year from the date of purchase, when this major appliance is operated and maintained according to instructions attached to...
... to obtain service under these excluded circumstances shall be repaired in the home and only in-home service is covered by this warranty. 7. KITCHENAID® BUILT-IN OVEN & MICROWAVE WARRANTY LIMITED WARRANTY For one year from the date of purchase, when this major appliance is operated and maintained according to instructions attached to...
Dimension Guide
Page 1
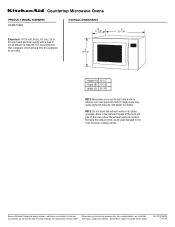
... subject to improve Dimensions are located. For complete details, see Installation our products, we reserve the right to the oven and poor cooking results. Instructions packed with a fuse or circuit breaker is recommended that a separate circuit serving only this... 12-1A/2" C 21-7/8" Height (A) 12-1/2" Depth (B) 17-1/8" Width (C) 21-7/8" NOTE: Microwave oven can be provided. Blocking the exhaust vents could cause damage to change without notice. ® Countertop Microwave Ovens PRODUCT MODEL NUMBERS KCMS1555S OVERALL DIMENSIONS B 17-1/8" Electrical: A 120-volt, 60 Hz, AC-...
... subject to improve Dimensions are located. For complete details, see Installation our products, we reserve the right to the oven and poor cooking results. Instructions packed with a fuse or circuit breaker is recommended that a separate circuit serving only this... 12-1A/2" C 21-7/8" Height (A) 12-1/2" Depth (B) 17-1/8" Width (C) 21-7/8" NOTE: Microwave oven can be provided. Blocking the exhaust vents could cause damage to change without notice. ® Countertop Microwave Ovens PRODUCT MODEL NUMBERS KCMS1555S OVERALL DIMENSIONS B 17-1/8" Electrical: A 120-volt, 60 Hz, AC-...
Installation Guide
Page 1
...'t follow the safety alert symbol and either the word "DANGER" or "WARNING." This symbol alerts you to reduce the chance of others . MICROWAVE OVEN BUILT-IN TRIM KIT INSTALLATION INSTRUCTIONS Built-In Trim Kit Models MK1150XV, MK1154XV, MK1157XV UL listed for use over built-in this manual and on...conduit supérieur 7 Installation de la bride antibasculement 7 Mise en place du four à micro-ondes 8 Installation du cadre de garniture 8 MICROWAVE OVEN SAFETY Your safety and the safety of injury, and tell you what the potential hazard is the safety alert symbol. W10197613A
...'t follow the safety alert symbol and either the word "DANGER" or "WARNING." This symbol alerts you to reduce the chance of others . MICROWAVE OVEN BUILT-IN TRIM KIT INSTALLATION INSTRUCTIONS Built-In Trim Kit Models MK1150XV, MK1154XV, MK1157XV UL listed for use over built-in this manual and on...conduit supérieur 7 Installation de la bride antibasculement 7 Mise en place du four à micro-ondes 8 Installation du cadre de garniture 8 MICROWAVE OVEN SAFETY Your safety and the safety of injury, and tell you what the potential hazard is the safety alert symbol. W10197613A
Installation Guide
Page 2
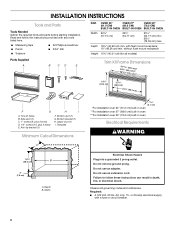
... Electrical Shock Hazard Plug into a grounded 3 prong outlet. Width 2.1 cm) *For installation over 24" (61.0 cm) built-in oven **For installation over 27" (68.6 cm) built-in oven ***For installation over 30" (76.2 cm) built-in death, fire, or electrical shock. Do not remove ground prong. without flush... codes and ordinances. Bottom duct (1) G. Depth B. OVER 24" OVER 27" OVER 30" (61.0 CM) (68.6 CM) (76.2 CM) BUILT-IN OVEN BUILT-IN OVEN BUILT-IN OVEN Width 22¹⁄₂" (57.15 cm) 25¹⁄₂" (64.77 cm) 25¹⁄₂" (64.77 cm) min...
... Electrical Shock Hazard Plug into a grounded 3 prong outlet. Width 2.1 cm) *For installation over 24" (61.0 cm) built-in oven **For installation over 27" (68.6 cm) built-in oven ***For installation over 30" (76.2 cm) built-in death, fire, or electrical shock. Do not remove ground prong. without flush... codes and ordinances. Bottom duct (1) G. Depth B. OVER 24" OVER 27" OVER 30" (61.0 CM) (68.6 CM) (76.2 CM) BUILT-IN OVEN BUILT-IN OVEN BUILT-IN OVEN Width 22¹⁄₂" (57.15 cm) 25¹⁄₂" (64.77 cm) 25¹⁄₂" (64.77 cm) min...
Installation Guide
Page 3
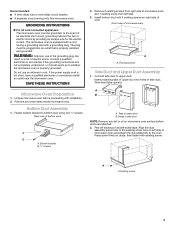
...A. Install bottom duct with installation. 2. Connect side duct to bottom duct using two ¹⁄₂" screws. (Rear view of microwave oven, and attach the duct assembly to the existing screw hole on left side. 3. The plug must be plugged into holes of upper ... Recommended: ■ A time-delay fuse or time-delay circuit breaker. ■ A separate circuit serving only this microwave oven. Remove any dirt or oil on microwave oven surface before proceeding with 2 existing screws on ducts, then fasten with a grounding plug. Press down firmly on right side...
...A. Install bottom duct with installation. 2. Connect side duct to bottom duct using two ¹⁄₂" screws. (Rear view of microwave oven, and attach the duct assembly to the existing screw hole on left side. 3. The plug must be plugged into holes of upper ... Recommended: ■ A time-delay fuse or time-delay circuit breaker. ■ A separate circuit serving only this microwave oven. Remove any dirt or oil on microwave oven surface before proceeding with 2 existing screws on ducts, then fasten with a grounding plug. Press down firmly on right side...