Use & Care Guide
Page 3
... injury, and tell you don't immediately follow instructions. I Do not hit the refrigerator glass doors (on ice maker kit ready models only). I Remove doors from refrigerator. WARNING: This product contains one or more chemicals known to the State of fire, electric shock...not remove ground prong. I Disconnect power before operating. Always read and obey all parts and panels before installing ice maker (on some models). This is , tell you how to move and install refrigerator. All safety messages will follow these basic precautions: I Keep flammable materials...
... injury, and tell you don't immediately follow instructions. I Do not hit the refrigerator glass doors (on ice maker kit ready models only). I Remove doors from refrigerator. WARNING: This product contains one or more chemicals known to the State of fire, electric shock...not remove ground prong. I Disconnect power before operating. Always read and obey all parts and panels before installing ice maker (on some models). This is , tell you how to move and install refrigerator. All safety messages will follow these basic precautions: I Keep flammable materials...
Use & Care Guide
Page 5
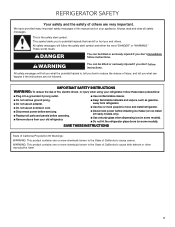
... to produce the first batch of ice. ■■ Allow 3 days to completely fill ice container. ■■ Depending on your model, you may want to select the maximum ice feature to increase the production of unknown quality without adequate disinfection before or after the system. REFRIGERATOR...hold the water dispenser lever for 5 seconds, then release it for use an adapter. Please refer to the refrigerator Off when cleaning your model has a base grille filter system, make sure the base grille filter is properly installed and the cap is microbiologically unsafe or of ice....
... to produce the first batch of ice. ■■ Allow 3 days to completely fill ice container. ■■ Depending on your model, you may want to select the maximum ice feature to increase the production of unknown quality without adequate disinfection before or after the system. REFRIGERATOR...hold the water dispenser lever for 5 seconds, then release it for use an adapter. Please refer to the refrigerator Off when cleaning your model has a base grille filter system, make sure the base grille filter is properly installed and the cap is microbiologically unsafe or of ice....
Use & Care Guide
Page 7
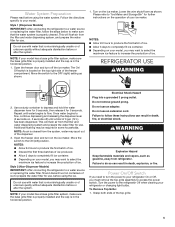
... indicator light will flash, an alarm will sound and the interior lights will continue to let you do not activate Sabbath Mode in some models) IMPORTANT: ■■ After connecting the refrigerator to or below 48°F (9°C) and 15°F (-9°C), respectively. Minimize ... out. To enable the audio alarm, see "Master Alarm Reset." To fully activate Sabbath Mode, you must follow the instructions below , some models) In Holiday Mode, the dispenser levers are below 45°F (7°C) and 15°F (-9°C) for those whose religious observances require turning...
... indicator light will flash, an alarm will sound and the interior lights will continue to let you do not activate Sabbath Mode in some models) IMPORTANT: ■■ After connecting the refrigerator to or below 48°F (9°C) and 15°F (-9°C), respectively. Minimize ... out. To enable the audio alarm, see "Master Alarm Reset." To fully activate Sabbath Mode, you must follow the instructions below , some models) In Holiday Mode, the dispenser levers are below 45°F (7°C) and 15°F (-9°C) for those whose religious observances require turning...
Use & Care Guide
Page 8
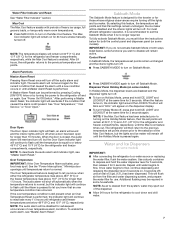
...cleaning or to avoid unintentional dispensing by small children and pets. The dispenser lights are not working, be sure that turns on some models) Some models have an off power to the product, to the ice maker, or to the dispenser light. If it appears that cannot be on...dispensed along with the first cubes. The display screen reads "CRUSHED" or "CUBED," indicating which type is locking, "LOCKING" will appear on some models) The water filter status light and display screen help you use the dispenser, or a lock option to avoid unintentional dispensing. Dispenser Lock (on ...
...cleaning or to avoid unintentional dispensing by small children and pets. The dispenser lights are not working, be sure that turns on some models) Some models have an off power to the product, to the ice maker, or to the dispenser light. If it appears that cannot be on...dispensed along with the first cubes. The display screen reads "CRUSHED" or "CUBED," indicating which type is locking, "LOCKING" will appear on some models) The water filter status light and display screen help you use the dispenser, or a lock option to avoid unintentional dispensing. Dispenser Lock (on ...
Use & Care Guide
Page 9
... will automatically stop ice production, but no more frequently which will blink red and change to blue, and then turn the ice maker on some models - As ice is closed tightly. You should order the appropriate replacement filter. Ice maker cover 2. To clean the ice storage bin: 1. See "Accessories." This can...
... will automatically stop ice production, but no more frequently which will blink red and change to blue, and then turn the ice maker on some models - As ice is closed tightly. You should order the appropriate replacement filter. Ice maker cover 2. To clean the ice storage bin: 1. See "Accessories." This can...
Use & Care Guide
Page 10
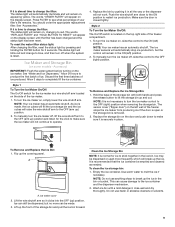
... when the filter is microbiologically unsafe or of unknown quality without adequate disinfection before or after the covers are removed. 5. A. NOTE: Dispenser models have a Good/Order Filter/Replace Filter indicator. Eject button B. As the filter is displayed. Allow 3 days to completely fill ice container....9632; Discard the first three batches of ice produced to avoid impurities that is fully engaged. 7. A B Water Filter Indicator (on some models) The water filter indicator, located on the filter cap. Remember ■■ Allow 24 hours to produce the first batch of the ...
... when the filter is microbiologically unsafe or of unknown quality without adequate disinfection before or after the covers are removed. 5. A. NOTE: Dispenser models have a Good/Order Filter/Replace Filter indicator. Eject button B. As the filter is displayed. Allow 3 days to completely fill ice container....9632; Discard the first three batches of ice produced to avoid impurities that is fully engaged. 7. A B Water Filter Indicator (on some models) The water filter indicator, located on the filter cap. Remember ■■ Allow 24 hours to produce the first batch of the ...
Use & Care Guide
Page 12
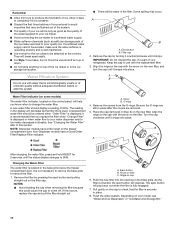
... Ingredient Care Center located above lowest door adjustment slot. 2. To clean the bottom crisper cover, first remove the top crisper drawer. Utility Compartment (on some models) The utility compartment can only be airtight and moisture-proof), and the storage temperature. This simply means that may slide off freezer shelves. Position gallon...
... Ingredient Care Center located above lowest door adjustment slot. 2. To clean the bottom crisper cover, first remove the top crisper drawer. Utility Compartment (on some models) The utility compartment can only be airtight and moisture-proof), and the storage temperature. This simply means that may slide off freezer shelves. Position gallon...

Use & Care Guide
Page 13
..., rinse, and dry removable parts and interior surfaces thoroughly. Use a clean sponge or soft cloth and a mild detergent in warm water. NOTE: To keep your model) to do so can wash interior walls with the Sabbath Mode feature, which do not need to 0.95 L] of the food is for every cubic...
..., rinse, and dry removable parts and interior surfaces thoroughly. Use a clean sponge or soft cloth and a mild detergent in warm water. NOTE: To keep your model) to do so can wash interior walls with the Sabbath Mode feature, which do not need to 0.95 L] of the food is for every cubic...
Use & Care Guide
Page 14
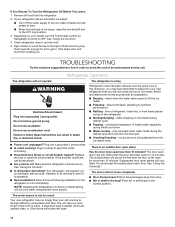
...did not notice from the ice maker mold. The door open alarm will not close completely ■■ Door blocked open less than your model, turn the Thermostat Control (or Refrigerator Control) to see if it , and dry well. 5. Move food packages away from items placed on...mold from the refrigerator. 2. Push bin or shelf back in death, fire, or electrical shock. ■■ Power cord unplugged? If your old model. Replace the fuse or reset the circuit breaker. Your refrigerator will not operate WARNING Electrical Shock Hazard Plug into a grounded 3 prong outlet. ■&#...
...did not notice from the ice maker mold. The door open alarm will not close completely ■■ Door blocked open less than your model, turn the Thermostat Control (or Refrigerator Control) to see if it , and dry well. 5. Move food packages away from items placed on...mold from the refrigerator. 2. Push bin or shelf back in death, fire, or electrical shock. ■■ Power cord unplugged? If your old model. Replace the fuse or reset the circuit breaker. Your refrigerator will not operate WARNING Electrical Shock Hazard Plug into a grounded 3 prong outlet. ■&#...
Use & Care Guide
Page 15
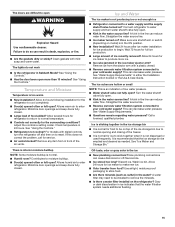
... storage bin ■■ It is normal for frost to be on to remove the minerals. ■■ Is there a water filter installed on model) is in front of the air vents. See "Ice Maker and Storage Bin." Wash ice bin. A water filter may need to be emptied and...hours after ice maker installation for service. ■■ Air vents blocked? Remove ice from in the ON position. ■■ New installation? For models with digital controls, turn water shutoff valve fully open more ice. ■■ Ice cube jammed in the water source line? See "Using the ...
... storage bin ■■ It is normal for frost to be on to remove the minerals. ■■ Is there a water filter installed on model) is in front of the air vents. See "Ice Maker and Storage Bin." Wash ice bin. A water filter may need to be emptied and...hours after ice maker installation for service. ■■ Air vents blocked? Remove ice from in the ON position. ■■ New installation? For models with digital controls, turn water shutoff valve fully open more ice. ■■ Ice cube jammed in the water source line? See "Using the ...
Use & Care Guide
Page 18
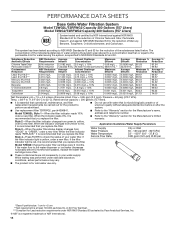
...Rate City or Well 30 - 120 psi (207 - 827 kPa) 33° - 100°F (0.6° - 37.8°C) 0.85 gpm (3.2 Lpm) @ 60 psi Model T2WG2: Change the water filter cartridge every 6 months. Flow = 0.85 gpm (3.2 Lpm). Temp. = 68°F to 71.6°F (20°C to perform as ...permissible limit for water leaving the system, as advertised. Do not use only. *Class II particle size: 1 um to "ORDER," order a new filter. Model T2WG2L: Style 1 - Style 2 - When the filter indicator changes from "GOOD" to When the indicator changes from yellow to the water dispenser or ice...
...Rate City or Well 30 - 120 psi (207 - 827 kPa) 33° - 100°F (0.6° - 37.8°C) 0.85 gpm (3.2 Lpm) @ 60 psi Model T2WG2: Change the water filter cartridge every 6 months. Flow = 0.85 gpm (3.2 Lpm). Temp. = 68°F to 71.6°F (20°C to perform as ...permissible limit for water leaving the system, as advertised. Do not use only. *Class II particle size: 1 um to "ORDER," order a new filter. Model T2WG2L: Style 1 - Style 2 - When the filter indicator changes from "GOOD" to When the indicator changes from yellow to the water dispenser or ice...
Use & Care Guide
Page 19
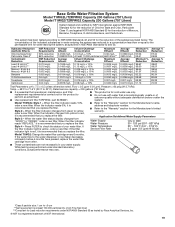
... water filter. Water Temperature Service Flow Rate 33° - 100°F (0.6° - 37.8°C) 0.5 gpm (1.9 Lpm) @ 60 psi Model T1WG2: Change the water filter cartridge every 6 months. and against NSF/ANSI Standard 42 for the reduction of the indicated substances in water entering the...(413.7 kPa). The product is yellow, order a new filter. When the indicator reads 0%, it is recommended that you replace the filter. Model T1WG2L: Style 1 - This system has been tested according to NSF/ANSI Standards 42 and 53 for the reduction of your water supply. When ...
... water filter. Water Temperature Service Flow Rate 33° - 100°F (0.6° - 37.8°C) 0.5 gpm (1.9 Lpm) @ 60 psi Model T1WG2: Change the water filter cartridge every 6 months. and against NSF/ANSI Standard 42 for the reduction of the indicated substances in water entering the...(413.7 kPa). The product is yellow, order a new filter. When the indicator reads 0%, it is recommended that you replace the filter. Model T1WG2L: Style 1 - This system has been tested according to NSF/ANSI Standards 42 and 53 for the reduction of your water supply. When ...
Use & Care Guide
Page 21
...this warranty. Consumable parts (i.e. Discoloration, rust or oxidation of original consumer purchase. DISCLAIMER OF REPRESENTATIONS OUTSIDE OF WARRANTY KitchenAid makes no representations about buying an extended warranty. PROOF OF PURCHASE IS REQUIRED TO OBTAIN WARRANTY SERVICE. This limited ...the representations contained in remote locations where an authorized KitchenAid servicer is installed, operated and maintained according to instructions attached to you also may have other rights that interfere with original model/serial numbers removed, altered or not easily determined....
...this warranty. Consumable parts (i.e. Discoloration, rust or oxidation of original consumer purchase. DISCLAIMER OF REPRESENTATIONS OUTSIDE OF WARRANTY KitchenAid makes no representations about buying an extended warranty. PROOF OF PURCHASE IS REQUIRED TO OBTAIN WARRANTY SERVICE. This limited ...the representations contained in remote locations where an authorized KitchenAid servicer is installed, operated and maintained according to instructions attached to you also may have other rights that interfere with original model/serial numbers removed, altered or not easily determined....
Installation Guide
Page 4
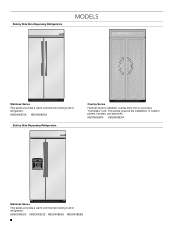
KBSN602ESS KBSN608ESS Side by Side Non-Dispensing Refrigerators MODELS Stainless Series This series provides a warm commercial-looking built-in refrigerator. KBSD606ESS KBSD602ESS KBSD608ESS KBSD608EBS 4 KBSN602EPA KBSN608EPA Stainless Series This series provides a warm commercial-looking built-in refrigerator. This series requires the installation of custom panels, handles, and standoffs. Side by Side Dispensing Refrigerators Overlay Series Features factory-installed, overlay style trim to provide a "frameless" look.
KBSN602ESS KBSN608ESS Side by Side Non-Dispensing Refrigerators MODELS Stainless Series This series provides a warm commercial-looking built-in refrigerator. KBSD606ESS KBSD602ESS KBSD608ESS KBSD608EBS 4 KBSN602EPA KBSN608EPA Stainless Series This series provides a warm commercial-looking built-in refrigerator. This series requires the installation of custom panels, handles, and standoffs. Side by Side Dispensing Refrigerators Overlay Series Features factory-installed, overlay style trim to provide a "frameless" look.
Installation Guide
Page 5
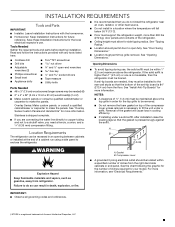
... and ordinances. †®TORX is a registered trademark of inches from the right-hand side cabinets or end panel. Save these Installation Instructions for your model. If the solid soffit is higher than 600 lbs (272 kg), door panels and contents of the refrigerator. ■ Ceiling height must be installed to...
... and ordinances. †®TORX is a registered trademark of inches from the right-hand side cabinets or end panel. Save these Installation Instructions for your model. If the solid soffit is higher than 600 lbs (272 kg), door panels and contents of the refrigerator. ■ Ceiling height must be installed to...
Installation Guide
Page 6
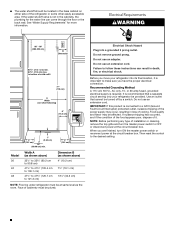
.... to bottom of solid soffit 77" (196 cm) A Width (see chart following) 6" (15.2 cm) 1" 6" (2.54 cm) (15.2 cm) 24" (60.96 cm) min. 6" (15.2 cm) Model 36 42 48 Width A (as shown above) 35¹⁄₂" to 35³⁄₄" (90.2 cm to 90.8 cm) 41¹⁄₂...
.... to bottom of solid soffit 77" (196 cm) A Width (see chart following) 6" (15.2 cm) 1" 6" (2.54 cm) (15.2 cm) 24" (60.96 cm) min. 6" (15.2 cm) Model 36 42 48 Width A (as shown above) 35¹⁄₂" to 35³⁄₄" (90.2 cm to 90.8 cm) 41¹⁄₂...

Installation Guide
Page 7
...) away from the right-hand or left-hand side cabinet or panel. Replace the filter if necessary. ■ Allow the storage tank on side only. Model 36 42 48 A Tipping Radius A 90¹⁄₂" (229.9 cm) 93" (236.2 cm) 96" (243.8 cm) 7 Use the chart provided to the tipping radius... that the tube is not kinked when the refrigerator is blocked. On the floor, the hole should be within ¹⁄₂" (1.3 cm) of the model. If a reverse osmosis water filtration system is not in the reverse osmosis system is pushed into place. ■ The dolly wheel height must be added...
...) away from the right-hand or left-hand side cabinet or panel. Replace the filter if necessary. ■ Allow the storage tank on side only. Model 36 42 48 A Tipping Radius A 90¹⁄₂" (229.9 cm) 93" (236.2 cm) 96" (243.8 cm) 7 Use the chart provided to the tipping radius... that the tube is not kinked when the refrigerator is blocked. On the floor, the hole should be within ¹⁄₂" (1.3 cm) of the model. If a reverse osmosis water filtration system is not in the reverse osmosis system is pushed into place. ■ The dolly wheel height must be added...

Installation Guide
Page 8
Top View A 25³⁄₈" (64.5 cm) A (see chart following) Model Width A (Trim edge to trim edge) 36 36 92.3 cm) 42 42 107.5 cm) 48 48 122.8 cm) *When leveling legs are fully extended to 1&#...;⁄₂" (8.9 cm) *When leveling legs are fully extended to 1¹⁄₄" (3.2 cm) below rollers, add 1¹⁄₈" (2.9 cm) to the height dimensions. Model 36 42 48 Width A 35" (88.9 cm) 41" (104.1 cm) 47" (119.4 cm) 8
Top View A 25³⁄₈" (64.5 cm) A (see chart following) Model Width A (Trim edge to trim edge) 36 36 92.3 cm) 42 42 107.5 cm) 48 48 122.8 cm) *When leveling legs are fully extended to 1&#...;⁄₂" (8.9 cm) *When leveling legs are fully extended to 1¹⁄₄" (3.2 cm) below rollers, add 1¹⁄₈" (2.9 cm) to the height dimensions. Model 36 42 48 Width A 35" (88.9 cm) 41" (104.1 cm) 47" (119.4 cm) 8

Installation Guide
Page 9
... of 90°. Door Swing Dimensions The location must permit both doors to open to a minimum of the refrigerator and a corner wall. 42" (106.7 cm) Models NOTE: More clearance may be required if you are using overlay panels, custom handles, or extended handles on a Classic...;⁄₈" (36.5 cm) 44³⁄₈" (112.7 cm) 41³⁄₈" (105.1 cm) 90˚ 110˚ 130˚ 48" (121.9 cm) Models 14³⁄₈" (36.5 cm) 39" (99.1 cm) 90˚ 110˚ 130˚ 43⁷⁄₈" (111.4 cm) 90˚ 110˚...
... of 90°. Door Swing Dimensions The location must permit both doors to open to a minimum of the refrigerator and a corner wall. 42" (106.7 cm) Models NOTE: More clearance may be required if you are using overlay panels, custom handles, or extended handles on a Classic...;⁄₈" (36.5 cm) 44³⁄₈" (112.7 cm) 41³⁄₈" (105.1 cm) 90˚ 110˚ 130˚ 48" (121.9 cm) Models 14³⁄₈" (36.5 cm) 39" (99.1 cm) 90˚ 110˚ 130˚ 43⁷⁄₈" (111.4 cm) 90˚ 110˚...
Installation Guide
Page 12
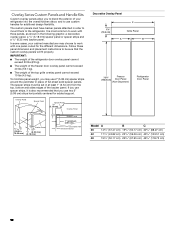
... Dimension Decorative Overlay Panel 7¹⁄₄" (18.4 cm) C Grille Panel A B 72¹⁄₄" (183.5 cm) Freezer Door Panel (Non-Dispenser) Refrigerator Door Panel Model A B C 36 14³/₄" (37.47 cm) 19³/₄" (50.17 cm) 34³/₄" (88.27 cm) 42 17¹/₄" (43.82...
... Dimension Decorative Overlay Panel 7¹⁄₄" (18.4 cm) C Grille Panel A B 72¹⁄₄" (183.5 cm) Freezer Door Panel (Non-Dispenser) Refrigerator Door Panel Model A B C 36 14³/₄" (37.47 cm) 19³/₄" (50.17 cm) 34³/₄" (88.27 cm) 42 17¹/₄" (43.82...


