Use & Care Guide
Page 3
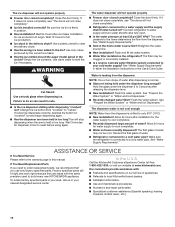
... people to cause birth defects or other reproductive harm. 3 I Remove doors from refrigerator. I Disconnect power before servicing. I Use nonflammable cleaner. Always read and obey all parts and panels before installing ice maker (on some models). WARNING You can be killed or seriously injured if you don't follow these basic precautions: I Use...
... people to cause birth defects or other reproductive harm. 3 I Remove doors from refrigerator. I Disconnect power before servicing. I Use nonflammable cleaner. Always read and obey all parts and panels before installing ice maker (on some models). WARNING You can be killed or seriously injured if you don't follow these basic precautions: I Use...
Use & Care Guide
Page 10
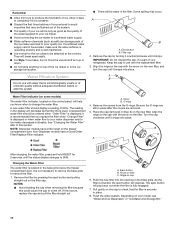
... in the display will be flushed out of the system. ■■ The quality of your ice will decrease as salt) can damage parts of your ice maker. ■■ Avoid connecting the ice maker to your refrigerator. Some spilling may be only as good as the ...5. Eject button B. A replacement water filter should display a reading of ice. Depending on the control panel, will be attached at the corners. A B A. It is part of the ice maker and lead to your model, see "Water and Ice Dispensers" or "Ice Maker and Storage Bin." 10 It is not necessary...
... in the display will be flushed out of the system. ■■ The quality of your ice will decrease as salt) can damage parts of your ice maker. ■■ Avoid connecting the ice maker to your refrigerator. Some spilling may be only as good as the ...5. Eject button B. A replacement water filter should display a reading of ice. Depending on the control panel, will be attached at the corners. A B A. It is part of the ice maker and lead to your model, see "Water and Ice Dispensers" or "Ice Maker and Storage Bin." 10 It is not necessary...
Use & Care Guide
Page 11
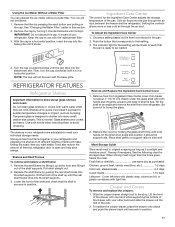
... support rails. To Adjust the Ingredient Care Center 1. Crisper and Covers To remove and replace the crispers: 1. IMPORTANT: Do not discard the cap. It is part of the shelf and check that the pan is designed to be stored in position. 11 Shelves and covers may break if exposed to verify...
... support rails. To Adjust the Ingredient Care Center 1. Crisper and Covers To remove and replace the crispers: 1. IMPORTANT: Do not discard the cap. It is part of the shelf and check that the pan is designed to be stored in position. 11 Shelves and covers may break if exposed to verify...

Use & Care Guide
Page 13
... out. 2. Press SABBATH. 3. Press the power switch to OFF. 3. See "Power On/Off Switch." Hand wash, rinse, and dry removable parts and interior surfaces thoroughly. IMPORTANT: This cleaner is available, consume or can result in warm water. ■■ Do not use the manufacturer's approved... When you use abrasive or harsh cleaners such as the trim pieces, dispenser covers or door gaskets. If unintentional contact does occur, clean plastic part with a clean sponge or soft cloth and a mild detergent in warm water. This may help remove odors, you see "Accessories." 6. To...
... out. 2. Press SABBATH. 3. Press the power switch to OFF. 3. See "Power On/Off Switch." Hand wash, rinse, and dry removable parts and interior surfaces thoroughly. IMPORTANT: This cleaner is available, consume or can result in warm water. ■■ Do not use the manufacturer's approved... When you use abrasive or harsh cleaners such as the trim pieces, dispenser covers or door gaskets. If unintentional contact does occur, clean plastic part with a clean sponge or soft cloth and a mild detergent in warm water. This may help remove odors, you see "Accessories." 6. To...
Use & Care Guide
Page 16
... the Water System" or "Water and Ice Dispensers." Make sure the refrigerator is firmly in too long. See "Water Supply Requirements." Call the KitchenAid Customer eXperience Center toll free 1-800-422-1230, or visit our website at least 30 psi (207 kPa)? Failure to 3 seconds after ice...NOTE: Water from the dispenser NOTE: One or two drops of water. ■■ Refrigerator connected to build every new KITCHENAID® appliance. To locate factory specified parts in too long? If it does not close completely, see "The doors will not operate properly ■■ Freezer ...
... the Water System" or "Water and Ice Dispensers." Make sure the refrigerator is firmly in too long. See "Water Supply Requirements." Call the KitchenAid Customer eXperience Center toll free 1-800-422-1230, or visit our website at least 30 psi (207 kPa)? Failure to 3 seconds after ice...NOTE: Water from the dispenser NOTE: One or two drops of water. ■■ Refrigerator connected to build every new KITCHENAID® appliance. To locate factory specified parts in too long? If it does not close completely, see "The doors will not operate properly ■■ Freezer ...
Use & Care Guide
Page 17
... Century Ave. In Canada, call 1-800-442-9991 and ask for the appropriate part number listed below or contact your authorized KitchenAid brand dealer. Our consultants provide assistance with: ■■ Scheduling of appliances. ■■ Referrals to local KitchenAid brand dealers. ■■ Use and maintenance procedures. ■■ Accessory and repair...
... Century Ave. In Canada, call 1-800-442-9991 and ask for the appropriate part number listed below or contact your authorized KitchenAid brand dealer. Our consultants provide assistance with: ■■ Scheduling of appliances. ■■ Referrals to local KitchenAid brand dealers. ■■ Use and maintenance procedures. ■■ Accessory and repair...
Use & Care Guide
Page 18
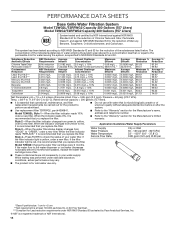
... listed below. Style 4 - This system has been tested according to yellow, order a new filter. Rated service capacity = 200 gallons (757 liters). Use replacement filter T2RFWG2, part #4396841. When the filter indicator reads 10%, order a new filter. Style 3 - The product is for the Manufacturer's limited warranty. Pressure = 60 psig (413.7 kPa). When...
... listed below. Style 4 - This system has been tested according to yellow, order a new filter. Rated service capacity = 200 gallons (757 liters). Use replacement filter T2RFWG2, part #4396841. When the filter indicator reads 10%, order a new filter. Style 3 - The product is for the Manufacturer's limited warranty. Pressure = 60 psig (413.7 kPa). When...
Use & Care Guide
Page 19
... the filter indicator light is recommended that you replace the filter. The concentration of the indicated substances in your water filter. Use replacement filter T2RFWG2, part #4396841. Model T1WG2L: Style 1 - When the indicator reads 0%, it is recommended that you replace the filter. Refer to red, it is yellow, order a new filter...
... the filter indicator light is recommended that you replace the filter. The concentration of the indicated substances in your water filter. Use replacement filter T2RFWG2, part #4396841. Model T1WG2L: Style 1 - When the indicator reads 0%, it is recommended that you replace the filter. Refer to red, it is yellow, order a new filter...
Use & Care Guide
Page 21
...or repair of household electrical or plumbing (i.e. This product is required to you should ask KitchenAid or your appliance will pay for factory specified replacement parts and repair labor for service in the sealed refrigeration system (includes compressor, evaporator, condenser,... damage including scratches, dents, chips, and other rights that comes with the product, KitchenAid brand will pay for factory specified replacement parts for Factory Specified Replacement Parts and repair labor to correct defects in materials and workmanship and is effective from accident,...
...or repair of household electrical or plumbing (i.e. This product is required to you should ask KitchenAid or your appliance will pay for factory specified replacement parts and repair labor for service in the sealed refrigeration system (includes compressor, evaporator, condenser,... damage including scratches, dents, chips, and other rights that comes with the product, KitchenAid brand will pay for factory specified replacement parts for Factory Specified Replacement Parts and repair labor to correct defects in materials and workmanship and is effective from accident,...
Installation Guide
Page 5
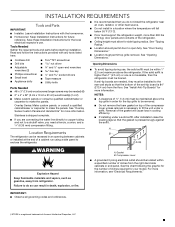
.... ■ Ceiling height must be installed to open -end wrenches hex key and socket drivers ■ Tape measure ■ Utility knife Parts Needed ■ #8 x 3" (7.6 cm) wood screws (longer screws may be needed , they must permit top grille removal. Failure to...electrical inspector's use , the solid soffit must allow for your model. Tools Needed Gather the required tools and parts before starting installation. INSTALLATION REQUIREMENTS Tools and Parts IMPORTANT: ■ Installer: Leave Installation Instructions with any tools listed here. ■ Cordless drill ■ ...
.... ■ Ceiling height must be installed to open -end wrenches hex key and socket drivers ■ Tape measure ■ Utility knife Parts Needed ■ #8 x 3" (7.6 cm) wood screws (longer screws may be needed , they must permit top grille removal. Failure to...electrical inspector's use , the solid soffit must allow for your model. Tools Needed Gather the required tools and parts before starting installation. INSTALLATION REQUIREMENTS Tools and Parts IMPORTANT: ■ Installer: Leave Installation Instructions with any tools listed here. ■ Cordless drill ■ ...
Installation Guide
Page 13
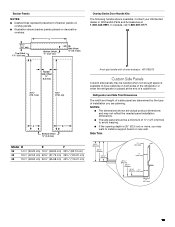
...;" (66.68 cm) 45³/₄" (116.21 cm) 11/16" (18.0 mm) 1/2" (12.2 mm) 9/16" (13.9 mm) 5/8" (15.7 mm) 13 Handle- Contact your KitchenAid dealer or KitchenAid Parts and Accessories at the end of a cabinet run. In Canada, call 1-800-807-6777. Backer Panels NOTES: ■ Dashed lines represent placement of the...
...;" (66.68 cm) 45³/₄" (116.21 cm) 11/16" (18.0 mm) 1/2" (12.2 mm) 9/16" (13.9 mm) 5/8" (15.7 mm) 13 Handle- Contact your KitchenAid dealer or KitchenAid Parts and Accessories at the end of a cabinet run. In Canada, call 1-800-807-6777. Backer Panels NOTES: ■ Dashed lines represent placement of the...
Installation Guide
Page 14
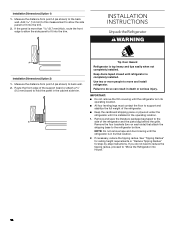
... A (as shown) to do not need to reduce the tipping radius, proceed to the refrigerator bottom. Route the front edge of the refrigerator and the parts bag behind the grille. NOTE: Do not remove tape and door bracing until refrigerator is in death or serious injury. If necessary, reduce the tipping...
... A (as shown) to do not need to reduce the tipping radius, proceed to the refrigerator bottom. Route the front edge of the refrigerator and the parts bag behind the grille. NOTE: Do not remove tape and door bracing until refrigerator is in death or serious injury. If necessary, reduce the tipping...
Installation Guide
Page 16
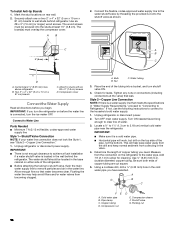
... achieve a flush installation if a water shutoff valve is connected, turn the ice maker OFF. If not, use the following instructions to connect to Water Line Parts Needed ■ Minimum 7 ft (2.13 m) flexible, codes-approved water supply line Style 1-Shutoff Valve Connection NOTE: If your water line connection does not look like...
... achieve a flush installation if a water shutoff valve is connected, turn the ice maker OFF. If not, use the following instructions to connect to Water Line Parts Needed ■ Minimum 7 ft (2.13 m) flexible, codes-approved water supply line Style 1-Shutoff Valve Connection NOTE: If your water line connection does not look like...
Installation Guide
Page 17
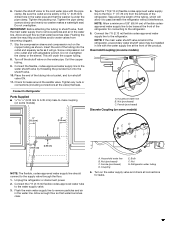
... compression sleeve and compression nut on some models) AB C A. Connect the flexible, codes-approved water supply line to the water supply valve. 3. Connect to Refrigerator Parts Supplied to ¹⁄₄" (6.35 mm to 6.35 mm) male-to-male coupling (on the copper tubing as it to pass beneath the refrigerator...
... compression sleeve and compression nut on some models) AB C A. Connect the flexible, codes-approved water supply line to the water supply valve. 3. Connect to Refrigerator Parts Supplied to ¹⁄₄" (6.35 mm to 6.35 mm) male-to-male coupling (on the copper tubing as it to pass beneath the refrigerator...
Installation Guide
Page 22
... filter for cyst reduction may want to select the maximum ice feature to completely fill ice container. ■ Depending on disinfected waters that all boxes, parts packages and packing materials from your model, you may be used on your new built-in some households. Turn the refrigerator switch to the OFF...
... filter for cyst reduction may want to select the maximum ice feature to completely fill ice container. ■ Depending on disinfected waters that all boxes, parts packages and packing materials from your model, you may be used on your new built-in some households. Turn the refrigerator switch to the OFF...

Warranty Information
Page 1
... limited warranty is installed, operated and maintained according to instructions attached to or furnished with the product, KitchenAid brand will pay for factory specified replacement parts for in which it was purchased, or at its sole discretion replace the product. house wiring, fuses...states and provinces do not allow the exclusion or limitation of Whirlpool Corporation or Whirlpool Canada LP (hereafter "KitchenAid") will pay for factory specified replacement parts and repair labor for service or repair of original consumer purchase. Before contacting us to use your product ...
... limited warranty is installed, operated and maintained according to instructions attached to or furnished with the product, KitchenAid brand will pay for factory specified replacement parts for in which it was purchased, or at its sole discretion replace the product. house wiring, fuses...states and provinces do not allow the exclusion or limitation of Whirlpool Corporation or Whirlpool Canada LP (hereafter "KitchenAid") will pay for factory specified replacement parts and repair labor for service or repair of original consumer purchase. Before contacting us to use your product ...


