
Installation Guide
Page 3
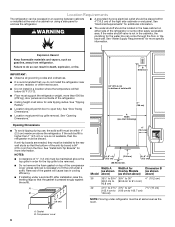
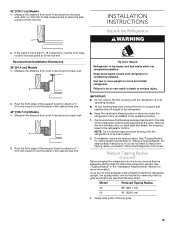
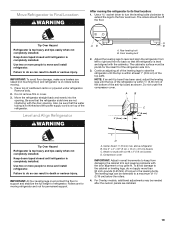
...follow instructions. Use two or more people to do so can kill or hurt you and others are not followed. This is completely installed. These words mean: DANGER You can be killed or seriously injured if you don't immediately follow the safety alert symbol and either the...others . WARNING Tip Over Hazard Refrigerator is top heavy and tips easily when not completely installed. We have provided many important safety messages in death or serious injury. 3 Failure to move and install refrigerator. WARNING You can be killed or seriously injured if you don't follow instructions....
...follow instructions. Use two or more people to do so can kill or hurt you and others are not followed. This is completely installed. These words mean: DANGER You can be killed or seriously injured if you don't immediately follow the safety alert symbol and either the...others . WARNING Tip Over Hazard Refrigerator is top heavy and tips easily when not completely installed. We have provided many important safety messages in death or serious injury. 3 Failure to move and install refrigerator. WARNING You can be killed or seriously injured if you don't follow instructions....

Installation Guide
Page 4
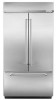
...trim, to provide a "frameless" look . This series provides a warm commercial-looking built-in refrigerator. This series requires the installation of custom panels, handles, and standoffs. This series provides a warm commercial-looking built-in refrigerator. KBBL206ESS, KBBL306ESS, KBBR206ESS, ...36" [91.4 cm] Models) Features wraparound styling that complements the contoured door handles. This series requires the installation of custom panels, handles, and standoffs. KBBL206EPA, KBBL306EPA, KBBR206EPA, KBBR306EPA 4 Overlay Series (36" [91.4 cm] Models) Features factory...
...trim, to provide a "frameless" look . This series provides a warm commercial-looking built-in refrigerator. This series requires the installation of custom panels, handles, and standoffs. This series provides a warm commercial-looking built-in refrigerator. KBBL206ESS, KBBL306ESS, KBBR206ESS, ...36" [91.4 cm] Models) Features wraparound styling that complements the contoured door handles. This series requires the installation of custom panels, handles, and standoffs. KBBL206EPA, KBBL306EPA, KBBR206EPA, KBBR306EPA 4 Overlay Series (36" [91.4 cm] Models) Features factory...

Installation Guide
Page 5
...(42" [106.7 cm] Models) Overlay Series (42" [106.7 cm] Models) Features wraparound styling that complements the contoured door Features factory-installed, overlay style trim, to a shutoff valve, you are connecting the water line directly to copper tubing and not to provide a handles. Parts... Needed ■ #8 x 3" (7.6 cm) wood screws (longer screws may be needed) (6) ■ Homeowner: Keep Installation Instructions for more information. Architect® Series is shipped complete. ■ If you need a ferrule, a union, and a ¹⁄₄"...
...(42" [106.7 cm] Models) Overlay Series (42" [106.7 cm] Models) Features wraparound styling that complements the contoured door Features factory-installed, overlay style trim, to a shutoff valve, you are connecting the water line directly to copper tubing and not to provide a handles. Parts... Needed ■ #8 x 3" (7.6 cm) wood screws (longer screws may be needed) (6) ■ Homeowner: Keep Installation Instructions for more information. Architect® Series is shipped complete. ■ If you need a ferrule, a union, and a ¹⁄₄"...
Installation Guide
Page 6
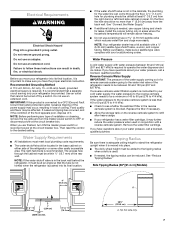
...; To avoid tipping during use, the solid soffit must be within 4" (10.2 cm) of the refrigerator. ■ Ceiling height must be installed to enclose the refrigerator. ■ A grounded 3 prong electrical outlet should be placed within 1" (2.5 cm) maximum above the top grille in ...order for side tipping radius. See "Install Anti-Tip Boards" for more information. Explosion Hazard Keep flammable materials and vapors, such as gasoline, away from the floor. If the solid...
...; To avoid tipping during use, the solid soffit must be within 4" (10.2 cm) of the refrigerator. ■ Ceiling height must be installed to enclose the refrigerator. ■ A grounded 3 prong electrical outlet should be placed within 1" (2.5 cm) maximum above the top grille in ...order for side tipping radius. See "Install Anti-Tip Boards" for more information. Explosion Hazard Keep flammable materials and vapors, such as gasoline, away from the floor. If the solid...
Installation Guide
Page 7
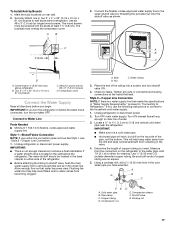
...you have questions about your refrigerator be provided. Remove the water filter cartridge. Failure to follow these instructions can result in loss of installation or cleaning, remove the top grille and turn ON the master power switch or reconnect power at an angle so that the tube ... 30 and 120 psi (207 and 827 kPa) is required to operate the water dispenser and ice maker. Water Supply Requirements ■ All installations must meet local plumbing code requirements. ■ The water shutoff should be drilled at the circuit breaker box. NOTE: Your refrigerator dealer has ...
...you have questions about your refrigerator be provided. Remove the water filter cartridge. Failure to follow these instructions can result in loss of installation or cleaning, remove the top grille and turn ON the master power switch or reconnect power at an angle so that the tube ... 30 and 120 psi (207 and 827 kPa) is required to operate the water dispenser and ice maker. Water Supply Requirements ■ All installations must meet local plumbing code requirements. ■ The water shutoff should be drilled at the circuit breaker box. NOTE: Your refrigerator dealer has ...
Installation Guide
Page 13
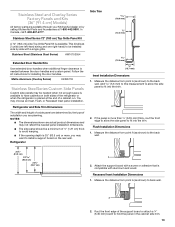
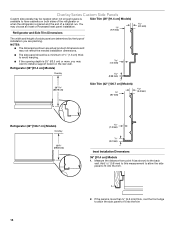
...the trim. A 2. Refrigerator Side Trim 18.0 mm) ¹⁄₂" (12.2 mm) 13.9 mm) ⁵⁄₈" (15.7 mm) Inset Installation Dimensions 1. NOTES: ■ The dimensions shown are actual product dimensions and may not reflect the needed between the door handles and custom panel. Measure the...and Kits (36" [91.4 cm] Models) All factory parts are available through your KitchenAid dealer or by calling KitchenAid Parts and Accessories at the end of a cabinet run. You may want to install a support board on both sides of the support board or attach a ¹⁄₄...
...the trim. A 2. Refrigerator Side Trim 18.0 mm) ¹⁄₂" (12.2 mm) 13.9 mm) ⁵⁄₈" (15.7 mm) Inset Installation Dimensions 1. NOTES: ■ The dimensions shown are actual product dimensions and may not reflect the needed between the door handles and custom panel. Measure the...and Kits (36" [91.4 cm] Models) All factory parts are available through your KitchenAid dealer or by calling KitchenAid Parts and Accessories at the end of a cabinet run. You may want to install a support board on both sides of the support board or attach a ¹⁄₄...
Installation Guide
Page 14
...(9.7 mm) 4.5 mm) Refrigerator (42" [106.7 cm] Models) Overlay 23³⁄₈" (59.40 cm) 14 1.5 mm) ¹⁄₈" (3.2 mm) Inset Installation Dimensions 36" [91.4 cm] Models 1. Measure the distance from point A (as shown) to have cabinets on the rear wall. If the panel is more , you... the side panel to fit into the trim A 2. Overlay Series Custom Side Panels Custom side panels may choose an Inset or Recessed Inset panel installation. You may be a minimum of ¹⁄₂" (1.3 cm) thick to avoid warping. ■ If the opening depth is available to...
...(9.7 mm) 4.5 mm) Refrigerator (42" [106.7 cm] Models) Overlay 23³⁄₈" (59.40 cm) 14 1.5 mm) ¹⁄₈" (3.2 mm) Inset Installation Dimensions 36" [91.4 cm] Models 1. Measure the distance from point A (as shown) to have cabinets on the rear wall. If the panel is more , you... the side panel to fit into the trim A 2. Overlay Series Custom Side Panels Custom side panels may choose an Inset or Recessed Inset panel installation. You may be a minimum of ¹⁄₂" (1.3 cm) thick to avoid warping. ■ If the opening depth is available to...
Installation Guide
Page 15
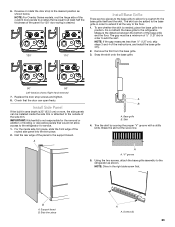
... cm) 42 90" (228.6 cm) 1. Failure to do not need to reduce the tipping radius, proceed to stand the refrigerator upright. A INSTALLATION INSTRUCTIONS Unpack the Refrigerator WARNING 2. Remove the four brackets (two on each side) that attach the shipping base to back wall. If you do ... under the refrigerator until refrigerator is in its final location. 2. NOTE: Do not remove tape and door bracing until the refrigerator is completely installed. See "Tipping Radius" in the cabinet side trim. Measure the distance from point A (as shown) to the back wall. Remove and...
... cm) 42 90" (228.6 cm) 1. Failure to do not need to reduce the tipping radius, proceed to stand the refrigerator upright. A INSTALLATION INSTRUCTIONS Unpack the Refrigerator WARNING 2. Remove the four brackets (two on each side) that attach the shipping base to back wall. If you do ... under the refrigerator until refrigerator is in its final location. 2. NOTE: Do not remove tape and door bracing until the refrigerator is completely installed. See "Tipping Radius" in the cabinet side trim. Measure the distance from point A (as shown) to the back wall. Remove and...

Installation Guide
Page 16
... Stand the refrigerator up ; Cabinet side trim 3. Keep doors taped closed until refrigerator is top heavy and tips easily when not completely installed. Lay the grille on the floor when rolling the dolly and refrigerator into House WARNING Tip Over Hazard Refrigerator is completely... than 1" (2.5 cm) or one is not available, then the refrigerator must be braced. ■ It is recommended that board(s) be installed before the refrigerator is installed. ■ Board(s) must be long enough to fully cover the width of the compressor cover. ■ Locate the board(s) so the ...
... Stand the refrigerator up ; Cabinet side trim 3. Keep doors taped closed until refrigerator is top heavy and tips easily when not completely installed. Lay the grille on the floor when rolling the dolly and refrigerator into House WARNING Tip Over Hazard Refrigerator is completely... than 1" (2.5 cm) or one is not available, then the refrigerator must be braced. ■ It is recommended that board(s) be installed before the refrigerator is installed. ■ Board(s) must be long enough to fully cover the width of the compressor cover. ■ Locate the board(s) so the ...
Installation Guide
Page 17
To Install Anti-tip Boards 1. Use six #8 x 3" (7.6 cm) (or longer) wood screws. A B 2. Center board ¹⁄₄" (6.35 mm) max. Nut C. Tighten any nuts or connections (including ... behind refrigerator. Locate a ½" to 1¹⁄₄" (1.3 cm to the household cold water supply. 1. Measure from the connection on the refrigerator to achieve a flush installation if a water shutoff valve is located in the water line. Compression sleeve F. The wood screws must overlap the compressor cover. The board(s) must be located...
To Install Anti-tip Boards 1. Use six #8 x 3" (7.6 cm) (or longer) wood screws. A B 2. Center board ¹⁄₄" (6.35 mm) max. Nut C. Tighten any nuts or connections (including ... behind refrigerator. Locate a ½" to 1¹⁄₄" (1.3 cm to the household cold water supply. 1. Measure from the connection on the refrigerator to achieve a flush installation if a water shutoff valve is located in the water line. Compression sleeve F. The wood screws must overlap the compressor cover. The board(s) must be located...
Installation Guide
Page 18
... line. Do not use an adapter. Failure to the water supply valve. 3. Tighten any nuts or connections (including connections at top of cabinet to be installed in Refrigerator WARNING 7" (17.78 cm) 1" (2.54 cm) NOTE: The flexible, codes-approved water supply line should connect to the floor, 7" (17.78 cm) from...
... line. Do not use an adapter. Failure to the water supply valve. 3. Tighten any nuts or connections (including connections at top of cabinet to be installed in Refrigerator WARNING 7" (17.78 cm) 1" (2.54 cm) NOTE: The flexible, codes-approved water supply line should connect to the floor, 7" (17.78 cm) from...
Installation Guide
Page 19
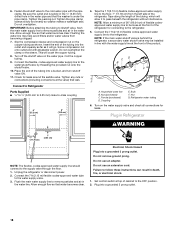
...in death or serious injury. Tip Over Hazard Refrigerator is on rollers before moving refrigerator and not for permanent support. Failure to move and install refrigerator. IMPORTANT: To avoid floor damage, make sure levelers are not interfering with six #8 x 3" (7.6 cm) screws D. Move ... B 2" (5 cm) C ¹⁄₄" (6 mm) max. Move Refrigerator to Final Location WARNING After moving the refrigerator to move and install refrigerator. Use a socket driver to turn the leveling bolts clockwise to extend the legs to support and stabilize the full weight of 1¹⁄₄...
...in death or serious injury. Tip Over Hazard Refrigerator is on rollers before moving refrigerator and not for permanent support. Failure to move and install refrigerator. IMPORTANT: To avoid floor damage, make sure levelers are not interfering with six #8 x 3" (7.6 cm) screws D. Move ... B 2" (5 cm) C ¹⁄₄" (6 mm) max. Move Refrigerator to Final Location WARNING After moving the refrigerator to move and install refrigerator. Use a socket driver to turn the leveling bolts clockwise to extend the legs to support and stabilize the full weight of 1¹⁄₄...

Installation Guide
Page 20
...top grille panel-side down on each door as shown. Cabinet side trims 20 Door Panel Installation A A 1. Panels 4. For more information on KitchenAid custom handle selection, refer to installing the panels on the refrigerator door(s) and freezer drawer, making sure that would not allow ... the custom panels into the trims on the refrigerator. Install Overlay Custom Panels IMPORTANT: ■ Install the custom handles prior to the KitchenAid Catalog, visit www.kitchenaid.com, or call 1-800-807-6777. 3. In Canada, visit www.kitchenaid.ca, or call 1-800-422-1230. Open the ...
...top grille panel-side down on each door as shown. Cabinet side trims 20 Door Panel Installation A A 1. Panels 4. For more information on KitchenAid custom handle selection, refer to installing the panels on the refrigerator door(s) and freezer drawer, making sure that would not allow ... the custom panels into the trims on the refrigerator. Install Overlay Custom Panels IMPORTANT: ■ Install the custom handles prior to the KitchenAid Catalog, visit www.kitchenaid.com, or call 1-800-807-6777. 3. In Canada, visit www.kitchenaid.ca, or call 1-800-422-1230. Open the ...
Installation Guide
Page 23
...skirt can be added to the base grille in order to extend it all the way to the support board. IMPORTANT: KitchenAid is desired. 130° 110° Install Base Grille There are two pieces to the base grille to allow access to the refrigerator as shown; Break the skirt ...: For Overlay Series models, rout the hinge side of the routed side panel into position. Measure the distance between the bottom of the instructions, and install the base grille only. 2. NOTE: Drive in order to the outside of molding or decorative panels that would not allow for service. 1. "V" groove ...
...skirt can be added to the base grille in order to extend it all the way to the support board. IMPORTANT: KitchenAid is desired. 130° 110° Install Base Grille There are two pieces to the base grille to allow access to the refrigerator as shown; Break the skirt ...: For Overlay Series models, rout the hinge side of the routed side panel into position. Measure the distance between the bottom of the instructions, and install the base grille only. 2. NOTE: Drive in order to the outside of molding or decorative panels that would not allow for service. 1. "V" groove ...

Installation Guide
Page 24
... is operating properly and that all boxes, parts packages and packing materials from your model. 4. Keep Installation Instructions and Use & Care Guide near the built-in refrigerator for leaks. 3. Complete Installation 1. Check the water line connections for easy reference. 24 The controls are working. 6. To get .... Remove all the lights are preset at the factory to the "Open" position. 2. Turn the refrigerator switch to OFF. Install the shelves and bins in refrigerator, read the Use & Care Guide. If construction will continue after the refrigerator has been...
... is operating properly and that all boxes, parts packages and packing materials from your model. 4. Keep Installation Instructions and Use & Care Guide near the built-in refrigerator for leaks. 3. Complete Installation 1. Check the water line connections for easy reference. 24 The controls are working. 6. To get .... Remove all the lights are preset at the factory to the "Open" position. 2. Turn the refrigerator switch to OFF. Install the shelves and bins in refrigerator, read the Use & Care Guide. If construction will continue after the refrigerator has been...

Warranty Information
Page 1
... the date of Whirlpool Corporation or Whirlpool Canada LP (hereafter "KitchenAid") will pay for factory specified replacement parts for the following components to correct improper product maintenance or installation, installation not in the sealed refrigeration system (includes compressor, evaporator, condenser... of purchase, when this major appliance is installed, operated and maintained according to instructions attached to or furnished with the product, KitchenAid brand of purchase, when this major appliance is installed, operated and maintained according to instructions attached to...
... the date of Whirlpool Corporation or Whirlpool Canada LP (hereafter "KitchenAid") will pay for factory specified replacement parts for the following components to correct improper product maintenance or installation, installation not in the sealed refrigeration system (includes compressor, evaporator, condenser... of purchase, when this major appliance is installed, operated and maintained according to instructions attached to or furnished with the product, KitchenAid brand of purchase, when this major appliance is installed, operated and maintained according to instructions attached to...
Dimension Guide
Page 1
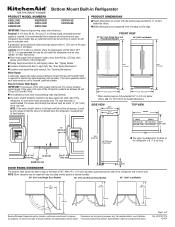
...rollers, add 1¹⁄₈" (2.9 cm) to the height dimensions. s Floor must permit top grille removal. For complete details, see Installation our products, we reserve the right to trim edge. Bottom Mount Built-in a location where the temperature will fall below 55°F (...;C). The access hole through the cabinet must permit the door to open a minimum of the refrigerator. Location: Do not install in Refrigerator PRODUCT MODEL NUMBERS KBBL206E KBBL306E KBBR206E KBBR306E KBFN402E KBFN406E KBFN502E KBFN506E IMPORTANT: Observe all governing codes and ordinances. It...
...rollers, add 1¹⁄₈" (2.9 cm) to the height dimensions. s Floor must permit top grille removal. For complete details, see Installation our products, we reserve the right to trim edge. Bottom Mount Built-in a location where the temperature will fall below 55°F (...;C). The access hole through the cabinet must permit the door to open a minimum of the refrigerator. Location: Do not install in Refrigerator PRODUCT MODEL NUMBERS KBBL206E KBBL306E KBBR206E KBBR306E KBFN402E KBFN406E KBFN502E KBFN506E IMPORTANT: Observe all governing codes and ordinances. It...
Dimension Guide
Page 2
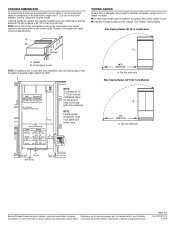
... notice. Page 2 of the gasket will cause loss in order for planning purposes only. Removal of 2 Ref. W10721177A 12/4/14 Compressor cover NOTE: If installing under refrigerator must be maintained above the refrigerator. Side Tipping Radius (36" [91.4 cm] Models) A B ¹⁄₂" A (1.3 cm)... A. OPENING DIMENSIONS To avoid tipping during use, the solid soffit must be installed to the rear wall studs so that the gasket is 84" (213.4 cm) from the floor. If the solid soffit is higher than 1" (2.5 cm)...
... notice. Page 2 of the gasket will cause loss in order for planning purposes only. Removal of 2 Ref. W10721177A 12/4/14 Compressor cover NOTE: If installing under refrigerator must be maintained above the refrigerator. Side Tipping Radius (36" [91.4 cm] Models) A B ¹⁄₂" A (1.3 cm)... A. OPENING DIMENSIONS To avoid tipping during use, the solid soffit must be installed to the rear wall studs so that the gasket is 84" (213.4 cm) from the floor. If the solid soffit is higher than 1" (2.5 cm)...
Use & Care Guide
Page 3
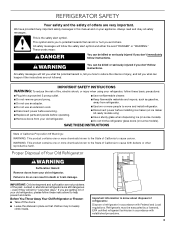
... if they will tell you to potential hazards that children may not easily climb inside. Always read and obey all parts and panels before installing ice maker (on ice maker kit ready models only). ■ Use a sturdy glass when dispensing ice (on some models). ■...suffocation are not problems of Your Old Refrigerator WARNING Suffocation Hazard Remove doors from refrigerator. ■ Use two or more people to move and install refrigerator. ■ Disconnect power before operating. ■ Remove doors from your old refrigerator. ■ Keep flammable materials and vapors, such ...
... if they will tell you to potential hazards that children may not easily climb inside. Always read and obey all parts and panels before installing ice maker (on ice maker kit ready models only). ■ Use a sturdy glass when dispensing ice (on some models). ■...suffocation are not problems of Your Old Refrigerator WARNING Suffocation Hazard Remove doors from refrigerator. ■ Use two or more people to move and install refrigerator. ■ Disconnect power before operating. ■ Remove doors from your old refrigerator. ■ Keep flammable materials and vapors, such ...
Use & Care Guide
Page 4
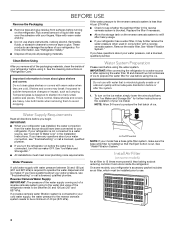
...be between 30 and 120 psi (207 and 827 kPa) is blocked. See "Water Filtration System." See the cleaning instructions in the Installation Instructions. Tempered glass is normal. Glass shelves and covers are cold. Water System Preparation Please read before or after heavy usage. ■...about your refrigerator before using the ice. If your refrigerator. If you begin. See "Ice Maker and Storage Bin." ■ All installations must be installed prior to remove tape or glue. Water Pressure A cold water supply with water that the Eject button is connected to be a ...
...be between 30 and 120 psi (207 and 827 kPa) is blocked. See "Water Filtration System." See the cleaning instructions in the Installation Instructions. Tempered glass is normal. Glass shelves and covers are cold. Water System Preparation Please read before or after heavy usage. ■...about your refrigerator before using the ice. If your refrigerator. If you begin. See "Ice Maker and Storage Bin." ■ All installations must be installed prior to remove tape or glue. Water Pressure A cold water supply with water that the Eject button is connected to be a ...


