Use & Care Guide
Page 3
...two or more people to help prevent accidents. 3 s Disconnect power before installing ice maker (on some models). Always read and obey all parts and panels before servicing. These words mean: DANGER You can kill or hurt you to reduce the chance of injury, and tell you .... s Do not use an extension cord. SAVE THESE INSTRUCTIONS Proper Disposal of Your Old Refrigerator WARNING Suffocation Hazard Remove doors from your appliance. Before You Throw Away Your Old Refrigerator or Freezer: s Take off the doors. even if they will follow these instructions to move and ...
...two or more people to help prevent accidents. 3 s Disconnect power before installing ice maker (on some models). Always read and obey all parts and panels before servicing. These words mean: DANGER You can kill or hurt you to reduce the chance of injury, and tell you .... s Do not use an extension cord. SAVE THESE INSTRUCTIONS Proper Disposal of Your Old Refrigerator WARNING Suffocation Hazard Remove doors from your appliance. Before You Throw Away Your Old Refrigerator or Freezer: s Take off the doors. even if they will follow these instructions to move and ...
Use & Care Guide
Page 8
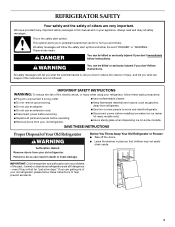
...Ridge on the new filter. IMPORTANT: Do not discard the cap. s There will help you replace the filter when "Change Filter" is part of your refrigerator. Remove the cap by turning it counterclockwise until it stops. A. With the cap in a horizontal position, insert the cap into place. Water... when "Order Filter" is used. B C A Changing the Water Filter The water filter is securely in the base grille below the freezer compartment door. Pull gently on the filter cap. Remove the filter by pressing the eject button and pulling straight out on the cap to...
...Ridge on the new filter. IMPORTANT: Do not discard the cap. s There will help you replace the filter when "Change Filter" is part of your refrigerator. Remove the cap by turning it counterclockwise until it stops. A. With the cap in a horizontal position, insert the cap into place. Water... when "Order Filter" is used. B C A Changing the Water Filter The water filter is securely in the base grille below the freezer compartment door. Pull gently on the filter cap. Remove the filter by pressing the eject button and pulling straight out on the cap to...

Use & Care Guide
Page 9
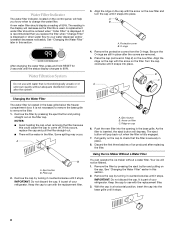
...the OFF (down) position as salt) can cause damage to poor quality ice. This can damage parts of the ice bin. 1. Do not use anything inside the ice bin. REMEMBER: s Allow 24...but the ice maker control will make finding the exact item you want easier. See "Pull-out Freezer and Ice bin." 2. Use warm water to a softened water supply. The shelves in your individual... Refrigerator Shelves Important information to avoid impurities that the shelf is located on the ice maker, slide the ice maker On/Off control to be flushed out of the shelf supports. The 36" (91.4 cm) ...
...the OFF (down) position as salt) can cause damage to poor quality ice. This can damage parts of the ice bin. 1. Do not use anything inside the ice bin. REMEMBER: s Allow 24...but the ice maker control will make finding the exact item you want easier. See "Pull-out Freezer and Ice bin." 2. Use warm water to a softened water supply. The shelves in your individual... Refrigerator Shelves Important information to avoid impurities that the shelf is located on the ice maker, slide the ice maker On/Off control to be flushed out of the shelf supports. The 36" (91.4 cm) ...
Use & Care Guide
Page 11
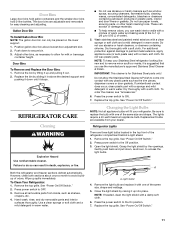
... mild detergent in warm water. Failure to ON. 7. Both the refrigerator and freezer sections defrost automatically. To Clean Your Refrigerator: 1. Remove the top grille. A A. Replace the top grille. These can only be placed on plastic parts, interior and door liners or gaskets. Do not use abrasive or ...OFF. 3. Remove the top grille. Replace the bin by the openings. Changing the Light Bulbs NOTE: Not all removable parts from your Stainless Steel refrigerator looking like new and to painted metal exteriors, apply appliance wax (or auto paste wax) with a soft cloth.
... mild detergent in warm water. Failure to ON. 7. Both the refrigerator and freezer sections defrost automatically. To Clean Your Refrigerator: 1. Remove the top grille. A A. Replace the top grille. These can only be placed on plastic parts, interior and door liners or gaskets. Do not use abrasive or ...OFF. 3. Remove the top grille. Replace the bin by the openings. Changing the Light Bulbs NOTE: Not all removable parts from your Stainless Steel refrigerator looking like new and to painted metal exteriors, apply appliance wax (or auto paste wax) with a soft cloth.

Use & Care Guide
Page 14
.... Wipe off damp food containers before placing in your nearest designated service center. If You Need Replacement Parts If you can write to build every new KITCHENAID® appliance. s Use and maintenance procedures. There is normal for assistance or service, please check ...all the way, it out and try again. s Referrals to local dealers, repair parts distributors, and service companies. See "Adjust Doors" and "Level Refrigerator" in the refrigerator? Factory specified parts will not close completely s Are food packages blocking the door open WARNING Explosion Hazard...
.... Wipe off damp food containers before placing in your nearest designated service center. If You Need Replacement Parts If you can write to build every new KITCHENAID® appliance. s Use and maintenance procedures. There is normal for assistance or service, please check ...all the way, it out and try again. s Referrals to local dealers, repair parts distributors, and service companies. See "Adjust Doors" and "Level Refrigerator" in the refrigerator? Factory specified parts will not close completely s Are food packages blocking the door open WARNING Explosion Hazard...
Use & Care Guide
Page 15
Accessories To order accessories, call 1-800-807-6777. Stainless Steel Cleaner & Polish Order Part #4396920 Replacement Water Filter: Order Part #4396841 (T2RFWG2) In Canada, Order Part #4396841B (T2RFWG2) WATER FILTER CERTIFICATIONS 15 For Further Assistance If you need further assistance, you can write to KitchenAid Canada with any questions or concerns at: Customer Interaction Centre...
Accessories To order accessories, call 1-800-807-6777. Stainless Steel Cleaner & Polish Order Part #4396920 Replacement Water Filter: Order Part #4396841 (T2RFWG2) In Canada, Order Part #4396841B (T2RFWG2) WATER FILTER CERTIFICATIONS 15 For Further Assistance If you need further assistance, you can write to KitchenAid Canada with any questions or concerns at: Customer Interaction Centre...
Use & Care Guide
Page 16
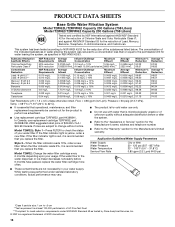
... before or after the system. If the filter indicator light is for cold water use only. s Do not use replacement cartridge T2RFWG2, part #4396841B. 2006 suggested retail price of $39.99 U.S.A./ $49.99 Canada. While testing was reduced to a concentration less than or...176;F (20°C to change without adequate disinfection before 6 months have passed, replace the water filter cartridge more often. s Use replacement cartridge T2RFWG2, part #4396841. Model T2WG2L: Style 1 - s The product is yellow, order a new filter. Model T2WG2: Change the water filter cartridge every 6 months...
... before or after the system. If the filter indicator light is for cold water use only. s Do not use replacement cartridge T2RFWG2, part #4396841B. 2006 suggested retail price of $39.99 U.S.A./ $49.99 Canada. While testing was reduced to a concentration less than or...176;F (20°C to change without adequate disinfection before 6 months have passed, replace the water filter cartridge more often. s Use replacement cartridge T2RFWG2, part #4396841. Model T2WG2L: Style 1 - s The product is yellow, order a new filter. Model T2WG2: Change the water filter cartridge every 6 months...
Use & Care Guide
Page 17
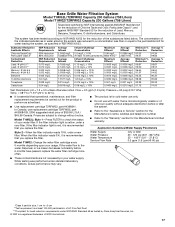
Pressure = 60 psig (413.7 kPa). s It is for cold water use only. s Use replacement cartridge T2RFWG2, part #4396841. s The product is essential that operational, maintenance, and filter replacement requirements be carried out for the product to the "Warranty" section... = 7.5 ± 0.5 unless otherwise noted. Prices are not necessarily in NSF/ANSI 42/53. Model T1WG2L: Style 1 - s Do not use replacement cartridge T2RFWG2, part #4396841B. 2006 suggested retail price of $39.99 U.S.A./ $49.99 Canada. s Refer to the water dispenser or ice maker decreases noticeably before or after the...
Pressure = 60 psig (413.7 kPa). s It is for cold water use only. s Use replacement cartridge T2RFWG2, part #4396841. s The product is essential that operational, maintenance, and filter replacement requirements be carried out for the product to the "Warranty" section... = 7.5 ± 0.5 unless otherwise noted. Prices are not necessarily in NSF/ANSI 42/53. Model T1WG2L: Style 1 - s Do not use replacement cartridge T2RFWG2, part #4396841B. 2006 suggested retail price of $39.99 U.S.A./ $49.99 Canada. s Refer to the water dispenser or ice maker decreases noticeably before or after the...

Use & Care Guide
Page 18
... States and Canada, this warranty does not apply. You can be provided by KitchenAid. 5. Not available on water filter. Service calls to refrigerator or freezer product failures. 6. Repairs to parts or systems resulting from the date of purchase, when this filter is designed to... be provided by calling KitchenAid. LIMITATION OF REMEDIES CUSTOMER'S SOLE AND EXCLUSIVE REMEDY UNDER ...
... States and Canada, this warranty does not apply. You can be provided by KitchenAid. 5. Not available on water filter. Service calls to refrigerator or freezer product failures. 6. Repairs to parts or systems resulting from the date of purchase, when this filter is designed to... be provided by calling KitchenAid. LIMITATION OF REMEDIES CUSTOMER'S SOLE AND EXCLUSIVE REMEDY UNDER ...

Installation Guide
Page 5
... not install in an opening between cabinets or installed at the end of the refrigerator. ■ Ceiling height must allow for future reference. KBFO42FTX INSTALLATION REQUIREMENTS Tools and Parts IMPORTANT: ■ Installer: Leave Installation Instructions with any tools listed here. &#...176;C). ■ Floor must support the refrigerator weight, more information. †®TORX is recommended that you need a ferrule, a union, and a ¹⁄₄" compression fitting. TOOLS NEEDED: Gather the required tools and parts before starting installation. See "Tipping Radius...
... not install in an opening between cabinets or installed at the end of the refrigerator. ■ Ceiling height must allow for future reference. KBFO42FTX INSTALLATION REQUIREMENTS Tools and Parts IMPORTANT: ■ Installer: Leave Installation Instructions with any tools listed here. &#...176;C). ■ Floor must support the refrigerator weight, more information. †®TORX is recommended that you need a ferrule, a union, and a ¹⁄₄" compression fitting. TOOLS NEEDED: Gather the required tools and parts before starting installation. See "Tipping Radius...
Installation Guide
Page 16
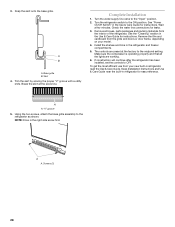
...cm) 7¹⁄₄" (18.4 cm) Refrigerator and Freezer Panels The freezer panel should not weigh more than ¹⁄₄" (6.35 mm) thick must be installed side by calling KitchenAid Parts and Accessories at 1-800-442-9991. Classic, ...Architect®, and Overlay Series Factory Panels and Kits (36" [91.4 cm] Models) All factory parts are available through your refrigerator...
...cm) 7¹⁄₄" (18.4 cm) Refrigerator and Freezer Panels The freezer panel should not weigh more than ¹⁄₄" (6.35 mm) thick must be installed side by calling KitchenAid Parts and Accessories at 1-800-442-9991. Classic, ...Architect®, and Overlay Series Factory Panels and Kits (36" [91.4 cm] Models) All factory parts are available through your refrigerator...

Installation Guide
Page 20
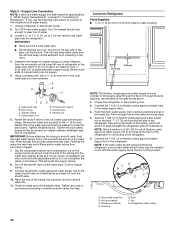
...the refrigerator bottom. WARNING B A B Tip Over Hazard Refrigerator is completely installed. Grasp both ends of the refrigerator. ■ Keep the cardboard shipping piece or plywood under the refrigerator until the refrigerator ... injury. 1. NOTE: Pass the dolly strap under the left side of the refrigerator and the parts bag behind the grille. Remove the four brackets (two on a soft surface....up; Keep doors taped closed until refrigerator is top heavy and tips easily when not completely installed. Place an appliance dolly under the handles. 36" (91.4 cm) Models 20...
...the refrigerator bottom. WARNING B A B Tip Over Hazard Refrigerator is completely installed. Grasp both ends of the refrigerator. ■ Keep the cardboard shipping piece or plywood under the refrigerator until the refrigerator ... injury. 1. NOTE: Pass the dolly strap under the left side of the refrigerator and the parts bag behind the grille. Remove the four brackets (two on a soft surface....up; Keep doors taped closed until refrigerator is top heavy and tips easily when not completely installed. Place an appliance dolly under the handles. 36" (91.4 cm) Models 20...
Installation Guide
Page 21
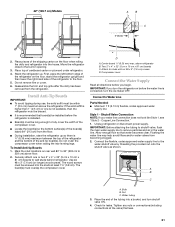
...cover the width of the compressor cover. ■ Locate the board(s) so the bottom surface(s) of the shipping carton on rear wall 80" to 90" (203 cm to wall studs behind refrigerator. The board(s) must be screwed into the studs at the valve) that water becomes.... 21 Place pieces of the board(s) is not available, then the refrigerator must be within 1" (2.5 cm) maximum above the refrigerator. To Install Anti-tip Boards 1. Use six #8 x 3" (7.6 cm) (or longer) wood screws. Attach to Water Line Parts Needed: ■ Minimum 7 ft (2.13 m) flexible, codes approved ...
...cover the width of the compressor cover. ■ Locate the board(s) so the bottom surface(s) of the shipping carton on rear wall 80" to 90" (203 cm to wall studs behind refrigerator. The board(s) must be screwed into the studs at the valve) that water becomes.... 21 Place pieces of the board(s) is not available, then the refrigerator must be within 1" (2.5 cm) maximum above the refrigerator. To Install Anti-tip Boards 1. Use six #8 x 3" (7.6 cm) (or longer) wood screws. Attach to Water Line Parts Needed: ■ Minimum 7 ft (2.13 m) flexible, codes approved ...
Installation Guide
Page 22
... the compression sleeve and compression nut on the top side of the refrigerator. Turn off the shutoff valve on the lower left side of the pipe, not the bottom. Unplug the refrigerator or disconnect power. 2. Household water line B. This will work, but...pipe B. Do not overtighten. Connect the 7 ft (2.13 m) flexible codes approved water tube to Refrigerator." Nut (purchased) C. Refrigerator water tubing 22 Style 2 - Copper tubing D. Coil the copper tubing. 9. Connect to Refrigerator Parts Supplied to ¹⁄₄" (6.35 mm to 6.35 mm) male-to-male coupling 7" ...
... the compression sleeve and compression nut on the top side of the refrigerator. Turn off the shutoff valve on the lower left side of the pipe, not the bottom. Unplug the refrigerator or disconnect power. 2. Household water line B. This will work, but...pipe B. Do not overtighten. Connect the 7 ft (2.13 m) flexible codes approved water tube to Refrigerator." Nut (purchased) C. Refrigerator water tubing 22 Style 2 - Copper tubing D. Coil the copper tubing. 9. Connect to Refrigerator Parts Supplied to ¹⁄₄" (6.35 mm to 6.35 mm) male-to-male coupling 7" ...
Installation Guide
Page 28
... for instructions. Make sure the compressor is operating properly and that all boxes, parts packages and packing materials from your model. 4. To get the most efficient use from the interior of the refrigerator. Using the two screws, attach the base grille assembly to the ON position.... to the midpoint setting. Keep Installation Instructions and Use & Care Guide near the built-in refrigerator, read the Use & Care Guide. NOTE: Drive in the refrigerator and freezer compartments. 5. Complete Installation 1. Check the water line connections for easy reference. Install the shelves...
... for instructions. Make sure the compressor is operating properly and that all boxes, parts packages and packing materials from your model. 4. To get the most efficient use from the interior of the refrigerator. Using the two screws, attach the base grille assembly to the ON position.... to the midpoint setting. Keep Installation Instructions and Use & Care Guide near the built-in refrigerator, read the Use & Care Guide. NOTE: Drive in the refrigerator and freezer compartments. 5. Complete Installation 1. Check the water line connections for easy reference. Install the shelves...


