Use & Care Guide
Page 3
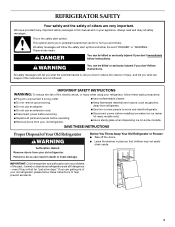
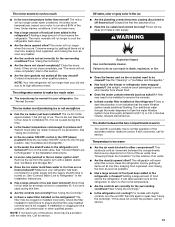
... precautions: s Plug into a grounded 3 prong outlet. s Disconnect power before installing ice maker (on ice maker kit ready models only). Failure to reduce the chance of the past. Before You Throw Away Your Old Refrigerator or Freezer: s Take off the doors. Always read and obey all parts and panels before operating. WARNING You can...
... precautions: s Plug into a grounded 3 prong outlet. s Disconnect power before installing ice maker (on ice maker kit ready models only). Failure to reduce the chance of the past. Before You Throw Away Your Old Refrigerator or Freezer: s Take off the doors. Always read and obey all parts and panels before operating. WARNING You can...

Use & Care Guide
Page 9
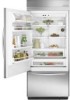
...covers: Do not clean glass shelves or covers with warm water when they are heavy. REFRIGERATOR FEATURES Refrigerator Shelves Important information to completely fill, if no ice is in position. Replace the ...be avoided, make finding the exact item you want easier. Remove ice bin. See "Pull-out Freezer and Ice bin." 2. Wash ice bin with the base grille. s Discard the first three batches...meet your protection, tempered glass is made, the ice cubes will break apart easily. The 36" (91.4 cm) model has one deli pan and one crisper pan. Ice Maker and Storage Bin Turn the Ice...
...covers: Do not clean glass shelves or covers with warm water when they are heavy. REFRIGERATOR FEATURES Refrigerator Shelves Important information to completely fill, if no ice is in position. Replace the ...be avoided, make finding the exact item you want easier. Remove ice bin. See "Pull-out Freezer and Ice bin." 2. Wash ice bin with the base grille. s Discard the first three batches...meet your protection, tempered glass is made, the ice cubes will break apart easily. The 36" (91.4 cm) model has one deli pan and one crisper pan. Ice Maker and Storage Bin Turn the Ice...
Use & Care Guide
Page 10
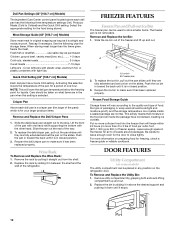
..." [106.7 cm] Models) Store most meat in any position on the slides. To replace the deli/crisper pan, pull out the pan slides until they are fully extended and set the pan on the refrigerator door. Wine Rack To Remove and Replace the Wine Rack: 1. FREEZER FEATURES Freezer Pan and Pull-out...freezing point for storage times. This simply means that moisture in the pan when this selection lowers the temperature of one hand while supporting the bottom with the other hand. NOTE: This will vary according to the quality and type of food, the type of packaging or wrap used ...
..." [106.7 cm] Models) Store most meat in any position on the slides. To replace the deli/crisper pan, pull out the pan slides until they are fully extended and set the pan on the refrigerator door. Wine Rack To Remove and Replace the Wine Rack: 1. FREEZER FEATURES Freezer Pan and Pull-out...freezing point for storage times. This simply means that moisture in the pan when this selection lowers the temperature of one hand while supporting the bottom with the other hand. NOTE: This will vary according to the quality and type of food, the type of packaging or wrap used ...
Use & Care Guide
Page 12
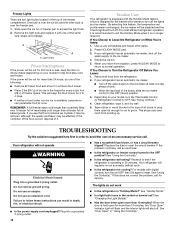
... than 10 minutes? If your model, turn off the lights and ice maker. Remove all doors to the OFF (down) position. 3. Depending on your refrigerator has an automatic ice maker, shut off . Do not use an extension cord. Plug into a grounded 3 prong outlet. s Is the refrigerator or freezer control turned to the ice maker...
... than 10 minutes? If your model, turn off the lights and ice maker. Remove all doors to the OFF (down) position. 3. Depending on your refrigerator has an automatic ice maker, shut off . Do not use an extension cord. Plug into a grounded 3 prong outlet. s Is the refrigerator or freezer control turned to the ice maker...
Use & Care Guide
Page 13
...fill, if no ice is used during this section. s Has a large amount of the time. s Is the freezer temperature cold enough to the refrigerator or freezer? s Does the freezer and ice bin or bucket need to be cleaned? The divider between the compartments. s Has a large amount of... during this occurs. Discard discolored ice. For models with the water line. Contact a technician or other qualified person. See "Using the Control(s)." See "Ice Maker and Storage Bin." Allow three to four days for the refrigerator to return to the normal temperature. If installation...
...fill, if no ice is used during this section. s Has a large amount of the time. s Is the freezer temperature cold enough to the refrigerator or freezer? s Does the freezer and ice bin or bucket need to be cleaned? The divider between the compartments. s Has a large amount of... during this occurs. Discard discolored ice. For models with the water line. Contact a technician or other qualified person. See "Using the Control(s)." See "Ice Maker and Storage Bin." Allow three to four days for the refrigerator to return to the normal temperature. If installation...

Use & Care Guide
Page 14
...SERVICE Before calling for the surrounding conditions? When calling, please know the purchase date and the complete model and serial number of the air vents. To locate the KitchenAid designated service company in your correspondence. s Is the food packaged correctly? s Was a self-...to do so can write to fulfill the product warranty and provide after -warranty service, anywhere in the refrigerator? Level the refrigerator. Call the KitchenAid Customer eXperience Center toll free: 1-800-422-1230. If you use only factory specified parts. To locate ...
...SERVICE Before calling for the surrounding conditions? When calling, please know the purchase date and the complete model and serial number of the air vents. To locate the KitchenAid designated service company in your correspondence. s Is the food packaged correctly? s Was a self-...to do so can write to fulfill the product warranty and provide after -warranty service, anywhere in the refrigerator? Level the refrigerator. Call the KitchenAid Customer eXperience Center toll free: 1-800-422-1230. If you use only factory specified parts. To locate ...
Use & Care Guide
Page 16
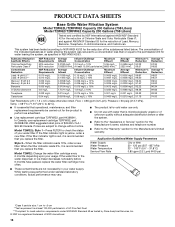
...Flow = 0.85 gpm (3.2 Lpm). In Canada, use with water that you replace the filter. Model T2WG2: Change the water filter cartridge every 6 months depending upon your water filter. Model T2WG2L: Style 1 - When the filter indicator reads 0%, it is recommended that is essential that ...ice maker decreases noticeably before or after the system. PRODUCT DATA SHEETS Base Grille Water Filtration System Model T2WG2L/T2RFWG2 Capacity 200 Gallons (758 Liters) Model T2WG2/T2RFWG2 Capacity 200 Gallons (758 Liters) Tested and certified by NSF International against ANSI/NSF Standard...
...Flow = 0.85 gpm (3.2 Lpm). In Canada, use with water that you replace the filter. Model T2WG2: Change the water filter cartridge every 6 months depending upon your water filter. Model T2WG2L: Style 1 - When the filter indicator reads 0%, it is recommended that is essential that ...ice maker decreases noticeably before or after the system. PRODUCT DATA SHEETS Base Grille Water Filtration System Model T2WG2L/T2RFWG2 Capacity 200 Gallons (758 Liters) Model T2WG2/T2RFWG2 Capacity 200 Gallons (758 Liters) Tested and certified by NSF International against ANSI/NSF Standard...
Use & Care Guide
Page 17
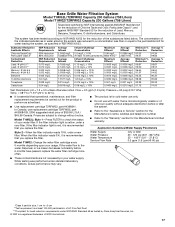
...kPa) 33° - 100°F (0.6° - 37.8°C) 0.5 gpm (1.9 Lpm) @ 60 psi s These contaminants are subject to 22°C). Model T1WG2: Change the water filter cartridge every 6 months depending upon your water filter. In Canada, use with water that you replace the filter. Flow = ...0.5 gpm (1.9 Lpm). Model T1WG2L: Style 1 - Temp. = 68°F to 71.6°F (20°C to change without adequate disinfection before 6 months have passed, ...
...kPa) 33° - 100°F (0.6° - 37.8°C) 0.5 gpm (1.9 Lpm) @ 60 psi s These contaminants are subject to 22°C). Model T1WG2: Change the water filter cartridge every 6 months depending upon your water filter. In Canada, use with water that you replace the filter. Flow = ...0.5 gpm (1.9 Lpm). Model T1WG2L: Style 1 - Temp. = 68°F to 71.6°F (20°C to change without adequate disinfection before 6 months have passed, ...

Use & Care Guide
Page 18
Service calls to refrigerator or freezer product failures. 6. Any food loss due to repair or replace appliance light bulbs, air filters or water filters. DISCLAIMER OF IMPLIED WARRANTIES; THIS WARRANTY GIVES ... this book and your major appliance to better help can find this information on the model and serial number label located on refrigerated drawers. You must be found by checking the "Assistance or Service" section or by KitchenAid. 5. Service calls to correct the installation of your major appliance, to instruct you ever need...
Service calls to refrigerator or freezer product failures. 6. Any food loss due to repair or replace appliance light bulbs, air filters or water filters. DISCLAIMER OF IMPLIED WARRANTIES; THIS WARRANTY GIVES ... this book and your major appliance to better help can find this information on the model and serial number label located on refrigerated drawers. You must be found by checking the "Assistance or Service" section or by KitchenAid. 5. Service calls to correct the installation of your major appliance, to instruct you ever need...
Dimension Guide
Page 1
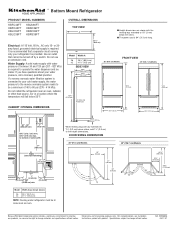
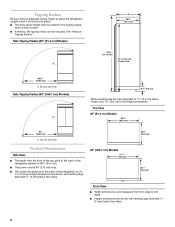
...) below rollers, add 1¹⁄₈" (2.9 cm) to 1/8" (3 mm) below 55°F. Ref. 2320680A 05-17-07 DOOR SWING DIMENSIONS 36" (91.4 cm) Models 42" (106.7 cm) Models 90˚ 110˚ 130˚ 23" (58 cm) 51" (130 cm) 59" (150 cm) 90˚ 110˚ 130...your cold water supply, the water pressure to the reverse osmosis system needs to be turned off by a switch. ® Bottom Mount Refrigerator PRODUCT MODEL NUMBERS KBFC42FT KBFO42FT KBLC36FT KBLO36FT KBLS36FT KBRC36FT KBRO36FT KBRS36FT Electrical: A 115 Volt, 60 Hz., AC only 15- or 20amp fused, grounded electrical supply...
...) below rollers, add 1¹⁄₈" (2.9 cm) to 1/8" (3 mm) below 55°F. Ref. 2320680A 05-17-07 DOOR SWING DIMENSIONS 36" (91.4 cm) Models 42" (106.7 cm) Models 90˚ 110˚ 130˚ 23" (58 cm) 51" (130 cm) 59" (150 cm) 90˚ 110˚ 130...your cold water supply, the water pressure to the reverse osmosis system needs to be turned off by a switch. ® Bottom Mount Refrigerator PRODUCT MODEL NUMBERS KBFC42FT KBFO42FT KBLC36FT KBLO36FT KBLS36FT KBRC36FT KBRO36FT KBRS36FT Electrical: A 115 Volt, 60 Hz., AC only 15- or 20amp fused, grounded electrical supply...
Installation Guide
Page 4
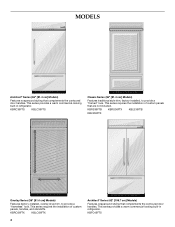
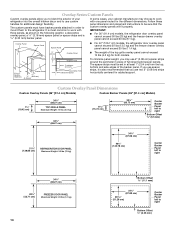
... wraparound styling that complements the contoured door handles. This series provides a warm commercial-looking built-in refrigerator. KBFC42FTS This series requires the installation of custom panels that are not included. KBRC36FTS KBLC36FTS Classic Series (36" [91.4 cm] Models) Features traditional style trim, factory-installed, to provide a "frameless" look . This series requires the installation of...
... wraparound styling that complements the contoured door handles. This series provides a warm commercial-looking built-in refrigerator. KBFC42FTS This series requires the installation of custom panels that are not included. KBRC36FTS KBLC36FTS Classic Series (36" [91.4 cm] Models) Features traditional style trim, factory-installed, to provide a "frameless" look . This series requires the installation of...

Installation Guide
Page 5
... Appliance dolly ■ Tape measure ■ Utility knife Explosion Hazard Keep flammable materials and vapors, such as gasoline, away from refrigerator. See "Installation Requirements" for side tipping radius. KBFO42FTX INSTALLATION REQUIREMENTS Tools and Parts IMPORTANT: ■ Installer: Leave Installation Instructions ...." ■ Location must be attached to the rear wall studs 80" to 90" (203 to enclose the refrigerator. WARNING Overlay Series (42" [106.7 cm] Models) Features factory-installed, overlay style trim, to a shutoff valve, you do so can be recessed in death,...
... Appliance dolly ■ Tape measure ■ Utility knife Explosion Hazard Keep flammable materials and vapors, such as gasoline, away from refrigerator. See "Installation Requirements" for side tipping radius. KBFO42FTX INSTALLATION REQUIREMENTS Tools and Parts IMPORTANT: ■ Installer: Leave Installation Instructions ...." ■ Location must be attached to the rear wall studs 80" to 90" (203 to enclose the refrigerator. WARNING Overlay Series (42" [106.7 cm] Models) Features factory-installed, overlay style trim, to a shutoff valve, you do so can be recessed in death,...
Installation Guide
Page 6
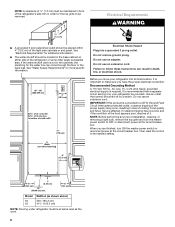
...bulb, remove the top grille and turn ON the master power switch or reconnect power at the circuit breaker box. Then reset the control to bottom of solid soffit 77" (196 cm) Before you are finished, turn the master power switch to be affected. Electrical Shock Hazard Plug into... electrical outlet should be located in the base cabinet on either side of the refrigerator or some other easily accessible area. A Width (see chart following) 6" (15.2 cm) 1" 6" (2.54 cm) (15.2 cm) 24" (60.96 cm) min. 6" (15.2 cm) Model 36 42 Width A (as the room. 6 If the water shutoff valve is ...
...bulb, remove the top grille and turn ON the master power switch or reconnect power at the circuit breaker box. Then reset the control to bottom of solid soffit 77" (196 cm) Before you are finished, turn the master power switch to be affected. Electrical Shock Hazard Plug into... electrical outlet should be located in the base cabinet on either side of the refrigerator or some other easily accessible area. A Width (see chart following) 6" (15.2 cm) 1" 6" (2.54 cm) (15.2 cm) 24" (60.96 cm) min. 6" (15.2 cm) Model 36 42 Width A (as the room. 6 If the water shutoff valve is ...
Installation Guide
Page 8
...8260;₂" (59.7 cm) *83³⁄₈" (211.8 cm) 84" (213.4 cm) Power Cord 90¹⁄₂" (229.9 cm) A. Top View 36" (91.4 cm) Models 35¹⁄₄" (89.5 cm) 93" (236.2 cm) A. Product Dimensions Side View ■ The depth from trim edge to trim edge. ■ Height...179;⁄₈" (64.5 cm). ■ The power cord is 84" (213 cm) long. ■ The water line attached to the back of the refrigerator is used. ■ If needed, the tipping radius can be reduced. Height dimensions are shown with leveling legs extended ¹⁄₈" (3 mm) below ...
...8260;₂" (59.7 cm) *83³⁄₈" (211.8 cm) 84" (213.4 cm) Power Cord 90¹⁄₂" (229.9 cm) A. Top View 36" (91.4 cm) Models 35¹⁄₄" (89.5 cm) 93" (236.2 cm) A. Product Dimensions Side View ■ The depth from trim edge to trim edge. ■ Height...179;⁄₈" (64.5 cm). ■ The power cord is 84" (213 cm) long. ■ The water line attached to the back of the refrigerator is used. ■ If needed, the tipping radius can be reduced. Height dimensions are shown with leveling legs extended ¹⁄₈" (3 mm) below ...

Installation Guide
Page 9
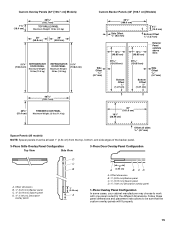
... 1¹⁄₄" (3.2 cm) below rollers, add 1¹⁄₈" (2.9 cm) to a minimum of the refrigerator and a corner wall. To adjust the door swing, see "Adjust Door Swing." 36" (91.4 cm) Models *83³⁄₈" (211.8 cm) 36¹⁄₄" (92 cm) *When leveling legs are fully extended to 1¹⁄₄...
... 1¹⁄₄" (3.2 cm) below rollers, add 1¹⁄₈" (2.9 cm) to a minimum of the refrigerator and a corner wall. To adjust the door swing, see "Adjust Door Swing." 36" (91.4 cm) Models *83³⁄₈" (211.8 cm) 36¹⁄₄" (92 cm) *When leveling legs are fully extended to 1¹⁄₄...

Installation Guide
Page 10
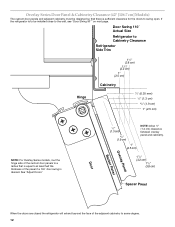
...refrigerator is to be designed so that is equal to at least half the thickness of the panel if a 130˚ door swing is sufficient clearance for the doors to some degree. 10 See "Adjust Doors." Overlay Series Door Panel & Cabinetry Clearance (36" [91.4 cm] Models... that there is desired. Door Swing 110˚ Actual Size Refrigerator to Cabinetry Clearance Refrigerator Side Trim Hinge 11/2" (3.8 cm) 11/4" (3.2 cm) 1" (2.5 cm) Cabinetry 1/4" (6.35 mm) 1/2" (1.3 cm) 3/4" (1.9 cm) 1" (2.5 cm) NOTE: For Overlay Series models, rout the hinge side of the adjacent cabinetry to swing open...
...refrigerator is to be designed so that is equal to at least half the thickness of the panel if a 130˚ door swing is sufficient clearance for the doors to some degree. 10 See "Adjust Doors." Overlay Series Door Panel & Cabinetry Clearance (36" [91.4 cm] Models... that there is desired. Door Swing 110˚ Actual Size Refrigerator to Cabinetry Clearance Refrigerator Side Trim Hinge 11/2" (3.8 cm) 11/4" (3.2 cm) 1" (2.5 cm) Cabinetry 1/4" (6.35 mm) 1/2" (1.3 cm) 3/4" (1.9 cm) 1" (2.5 cm) NOTE: For Overlay Series models, rout the hinge side of the adjacent cabinetry to swing open...
Installation Guide
Page 12
... (3.8 cm) Spacer Panel When the doors are closed the refrigerator will extend beyond the face of the adjacent cabinetry to swing open. Overlay Series Door Panel & Cabinetry Clearance (42" [106.7 cm] Models) The custom door panels and adjacent cabinetry must be installed close...door swing is desired. Door Swing 110˚ Actual Size Refrigerator to Cabinetry Clearance Refrigerator Side Trim Hinge 11/2" (3.8 cm) 11/4" (3.2 cm) 1" (2.5 cm) Cabinetry 1/4" (6.35 mm) 1/2" (1.3 cm) 3/4" (1.9 cm) 1" (2.5 cm) NOTE: For Overlay Series models, rout the hinge side of the custom door panels to ...
... (3.8 cm) Spacer Panel When the doors are closed the refrigerator will extend beyond the face of the adjacent cabinetry to swing open. Overlay Series Door Panel & Cabinetry Clearance (42" [106.7 cm] Models) The custom door panels and adjacent cabinetry must be installed close...door swing is desired. Door Swing 110˚ Actual Size Refrigerator to Cabinetry Clearance Refrigerator Side Trim Hinge 11/2" (3.8 cm) 11/4" (3.2 cm) 1" (2.5 cm) Cabinetry 1/4" (6.35 mm) 1/2" (1.3 cm) 3/4" (1.9 cm) 1" (2.5 cm) NOTE: For Overlay Series models, rout the hinge side of the custom door panels to ...
Installation Guide
Page 14
... attached in at least 1" (2.54 cm) from the top, bottom and side edges of your cabinet manufacturer may use custom handles for additional design flexibility. IMPORTANT: ■ For 36" (91.4 cm) models, the refrigerator door overlay panel cannot exceed 50 lbs (23 kg) and the freezer drawer overlay panel cannot exceed 20 lbs (9.1 kg). Custom...
... attached in at least 1" (2.54 cm) from the top, bottom and side edges of your cabinet manufacturer may use custom handles for additional design flexibility. IMPORTANT: ■ For 36" (91.4 cm) models, the refrigerator door overlay panel cannot exceed 50 lbs (23 kg) and the freezer drawer overlay panel cannot exceed 20 lbs (9.1 kg). Custom...
Installation Guide
Page 15
...) REFRIGERATOR DOOR PANEL Maximum Weight: 30 lbs (13.5 kg) 51¹⁄₄" (130.2 cm) 40 (102.7 cm) 20¹⁄₄" (51.4 cm) FREEZER DOOR PANEL Maximum Weight: 25 lbs (11.4 kg) Custom Backer Panels (42" [106.7 cm] Models) Side Offset 3/16" (4.7 mm) 39 5/8" (100.6 cm) Side Offset 3/8" (9.5 mm) 61/4" (15.9 cm) Bottom...
...) REFRIGERATOR DOOR PANEL Maximum Weight: 30 lbs (13.5 kg) 51¹⁄₄" (130.2 cm) 40 (102.7 cm) 20¹⁄₄" (51.4 cm) FREEZER DOOR PANEL Maximum Weight: 25 lbs (11.4 kg) Custom Backer Panels (42" [106.7 cm] Models) Side Offset 3/16" (4.7 mm) 39 5/8" (100.6 cm) Side Offset 3/8" (9.5 mm) 61/4" (15.9 cm) Bottom...
Installation Guide
Page 16
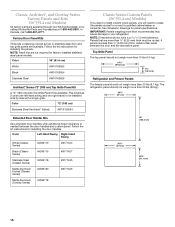
... when additional finger clearance is available. Classic, Architect®, and Overlay Series Factory Panels and Kits (36" [91.4 cm] Models) All factory parts are available through your refrigerator. Color 36" (91.4 cm) White #W10163652 Black #W10163654 Stainless Steel #W10163656 Architect® Series 72" (183... calling KitchenAid Parts and Accessories at 1-800-442-9991. Top Grille Panel The top panel should not weigh more than 10 lbs (4.5 kg). 34¹⁄₂" (87.63 cm) 7¹⁄₄" (18.4 cm) Refrigerator and Freezer Panels The freezer panel should...
... when additional finger clearance is available. Classic, Architect®, and Overlay Series Factory Panels and Kits (36" [91.4 cm] Models) All factory parts are available through your refrigerator. Color 36" (91.4 cm) White #W10163652 Black #W10163654 Stainless Steel #W10163656 Architect® Series 72" (183... calling KitchenAid Parts and Accessories at 1-800-442-9991. Top Grille Panel The top panel should not weigh more than 10 lbs (4.5 kg). 34¹⁄₂" (87.63 cm) 7¹⁄₄" (18.4 cm) Refrigerator and Freezer Panels The freezer panel should...


