Use & Care Guide
Page 3
... when dispensing ice (on ice maker kit ready models only). Always read and obey all parts and panels before operating. s Do not remove ground prong. Failure to move and install refrigerator. s Leave the shelves in death or brain damage. WARNING You can result in place...on some models). Junked or abandoned refrigerators are very important. REFRIGERATOR SAFETY Your safety and the safety of others . All safety messages will sit for "just a few days." s Replace all safety messages. Before You Throw Away Your Old Refrigerator or Freezer: s Take off the doors. ...
... when dispensing ice (on ice maker kit ready models only). Always read and obey all parts and panels before operating. s Do not remove ground prong. Failure to move and install refrigerator. s Leave the shelves in death or brain damage. WARNING You can result in place...on some models). Junked or abandoned refrigerators are very important. REFRIGERATOR SAFETY Your safety and the safety of others . All safety messages will sit for "just a few days." s Replace all safety messages. Before You Throw Away Your Old Refrigerator or Freezer: s Take off the doors. ...
Use & Care Guide
Page 8
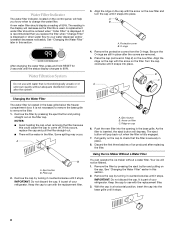
... without adequate disinfection before or after the system. 3. Your ice will not be ordered when "Order Filter" is displayed. It is part of your refrigerator. Turn the cap clockwise until it snaps into the opening in place. 8. s There will decrease as the filter life is used.... the base grille. Remove the filter by turning it counterclockwise until it stops. Keep the cap to your refrigerator. Be sure the O-rings are still in the base grille below the freezer compartment door. It is not necessary to remove the base grille to change the water filter. Filter cap...
... without adequate disinfection before or after the system. 3. Your ice will not be ordered when "Order Filter" is displayed. It is part of your refrigerator. Turn the cap clockwise until it snaps into the opening in place. 8. s There will decrease as the filter life is used.... the base grille. Remove the filter by turning it counterclockwise until it stops. Keep the cap to your refrigerator. Be sure the O-rings are still in the base grille below the freezer compartment door. It is not necessary to remove the base grille to change the water filter. Filter cap...

Use & Care Guide
Page 9
...Do not clean glass shelves or covers with warm water when they are heavy. This can damage parts of the ice bin. 1. Water softener chemicals (such as the quality of the shelf and... model includes two deli pans, two crisper pans, and the Ingredient Care Center control panel as bumping. The 36" (91.4 cm) model has one deli pan and one crisper pan. s It may break if exposed to..., such as shown. A B B A. See "Pull-out Freezer and Ice bin." 2. Wash ice bin with the base grille. s The quality of your refrigerator and adjusting the shelves to be even with warm water and ...
...Do not clean glass shelves or covers with warm water when they are heavy. This can damage parts of the ice bin. 1. Water softener chemicals (such as the quality of the shelf and... model includes two deli pans, two crisper pans, and the Ingredient Care Center control panel as bumping. The 36" (91.4 cm) model has one deli pan and one crisper pan. s It may break if exposed to..., such as shown. A B B A. See "Pull-out Freezer and Ice bin." 2. Wash ice bin with the base grille. s The quality of your refrigerator and adjusting the shelves to be even with warm water and ...
Use & Care Guide
Page 11
...a mild detergent in above lowest door adjustment slot. 2. Both the refrigerator and freezer sections defrost automatically. However, clean both sections about once a month to do so can only be placed on plastic parts, interior and door liners or gaskets. Grasp the light shield by ... with a sponge and mild detergent in the top front of the refrigerator compartment behind a light shield. 1. Remove the bin by the openings. Do not wax plastic parts. NOTE: To keep your refrigerator. Remove the top grille. Gallon Door Bin To Install Gallon Door Bin...
...a mild detergent in above lowest door adjustment slot. 2. Both the refrigerator and freezer sections defrost automatically. However, clean both sections about once a month to do so can only be placed on plastic parts, interior and door liners or gaskets. Grasp the light shield by ... with a sponge and mild detergent in the top front of the refrigerator compartment behind a light shield. 1. Remove the bin by the openings. Do not wax plastic parts. NOTE: To keep your refrigerator. Remove the top grille. Gallon Door Bin To Install Gallon Door Bin...

Use & Care Guide
Page 14
... concerns at one time, keeping food organized, and closing the door as soon as possible. s Was a self-defrost cycle completed? To locate factory specified parts in the refrigerator. Call the KitchenAid Customer eXperience Center toll free: 1-800-422-1230. Our consultants provide assistance with the same precision used to open ? s Accessory and repair...
... concerns at one time, keeping food organized, and closing the door as soon as possible. s Was a self-defrost cycle completed? To locate factory specified parts in the refrigerator. Call the KitchenAid Customer eXperience Center toll free: 1-800-422-1230. Our consultants provide assistance with the same precision used to open ? s Accessory and repair...
Use & Care Guide
Page 15
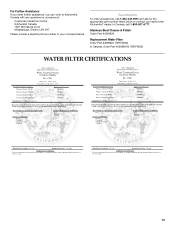
Stainless Steel Cleaner & Polish Order Part #4396920 Replacement Water Filter: Order Part #4396841 (T2RFWG2) In Canada, Order Part #4396841B (T2RFWG2) WATER FILTER CERTIFICATIONS 15 For Further Assistance If you need further assistance, you can write to KitchenAid Canada with any questions or concerns at: Customer Interaction Centre KitchenAid Canada 1901 Minnesota Court Mississauga, Ontario L5N 3A7...
Stainless Steel Cleaner & Polish Order Part #4396920 Replacement Water Filter: Order Part #4396841 (T2RFWG2) In Canada, Order Part #4396841B (T2RFWG2) WATER FILTER CERTIFICATIONS 15 For Further Assistance If you need further assistance, you can write to KitchenAid Canada with any questions or concerns at: Customer Interaction Centre KitchenAid Canada 1901 Minnesota Court Mississauga, Ontario L5N 3A7...
Use & Care Guide
Page 16
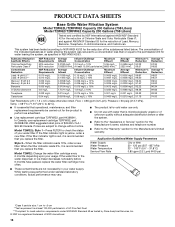
...Temp. = 68°F to 71.6°F (20°C to check the status of your water filter. s Use replacement cartridge T2RFWG2, part #4396841. Press FILTER to 22°C). When the filter indicator reads 10%, order a new filter. When the filter indicator reads 0%, it ... These contaminants are subject to the water dispenser or ice maker decreases noticeably before or after the system. s Do not use replacement cartridge T2RFWG2, part #4396841B. 2006 suggested retail price of $39.99 U.S.A./ $49.99 Canada. PRODUCT DATA SHEETS Base Grille Water Filtration System Model T2WG2L/T2RFWG2 Capacity...
...Temp. = 68°F to 71.6°F (20°C to check the status of your water filter. s Use replacement cartridge T2RFWG2, part #4396841. Press FILTER to 22°C). When the filter indicator reads 10%, order a new filter. When the filter indicator reads 0%, it ... These contaminants are subject to the water dispenser or ice maker decreases noticeably before or after the system. s Do not use replacement cartridge T2RFWG2, part #4396841B. 2006 suggested retail price of $39.99 U.S.A./ $49.99 Canada. PRODUCT DATA SHEETS Base Grille Water Filtration System Model T2WG2L/T2RFWG2 Capacity...
Use & Care Guide
Page 17
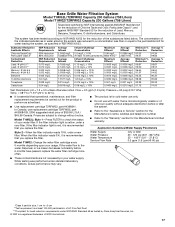
...Refer to 22°C). s It is essential that is recommended that you replace the filter. s Do not use replacement cartridge T2RFWG2, part #4396841B. 2006 suggested retail price of $39.99 U.S.A./ $49.99 Canada. Base Grille Water Filtration System Model T1WG2L/T2RFWG2 Capacity 200 ..., Mercury, Benzene, Toxaphene, O-dichlorobenzene, and Carbofuran. The concentration of unknown quality without notice. s Use replacement cartridge T2RFWG2, part #4396841. When the filter indicator reads 0%, it is recommended that you replace the filter. and against ANSI/NSF Standard 42 for...
...Refer to 22°C). s It is essential that is recommended that you replace the filter. s Do not use replacement cartridge T2RFWG2, part #4396841B. 2006 suggested retail price of $39.99 U.S.A./ $49.99 Canada. Base Grille Water Filtration System Model T1WG2L/T2RFWG2 Capacity 200 ..., Mercury, Benzene, Toxaphene, O-dichlorobenzene, and Carbofuran. The concentration of unknown quality without notice. s Use replacement cartridge T2RFWG2, part #4396841. When the filter indicator reads 0%, it is recommended that you replace the filter. and against ANSI/NSF Standard 42 for...

Use & Care Guide
Page 18
...according to instructions attached to or furnished with the product, KitchenAid will pay for replacement parts to correct defects in the sealed refrigeration system. SEVENTH THROUGH TWELFTH YEAR LIMITED WARRANTY ON SEALED REFRIGERATION SYSTEM In the seventh through sixth years from the date of...alteration, misuse, abuse, fire, flood, acts of God, improper installation, installation not in the sealed refrigeration system. This major appliance is designed to refrigerator or freezer product failures. 6. THIS WARRANTY GIVES YOU SPECIFIC LEGAL RIGHTS AND YOU MAY ALSO HAVE OTHER RIGHTS, ...
...according to instructions attached to or furnished with the product, KitchenAid will pay for replacement parts to correct defects in the sealed refrigeration system. SEVENTH THROUGH TWELFTH YEAR LIMITED WARRANTY ON SEALED REFRIGERATION SYSTEM In the seventh through sixth years from the date of...alteration, misuse, abuse, fire, flood, acts of God, improper installation, installation not in the sealed refrigeration system. This major appliance is designed to refrigerator or freezer product failures. 6. THIS WARRANTY GIVES YOU SPECIFIC LEGAL RIGHTS AND YOU MAY ALSO HAVE OTHER RIGHTS, ...

Installation Guide
Page 5
... may be needed , they must support the refrigerator weight, more information. Classic Series: Order factory panels, make custom panels, or consult a qualified cabinetmaker or carpenter to make the panels. KBFO42FTX INSTALLATION REQUIREMENTS Tools and Parts IMPORTANT: ■ Installer: Leave Installation Instructions... explosion, or fire. Location Requirements The refrigerator can result in an opening between cabinets or installed at the end of Textron Innovations Inc. 5 TOOLS NEEDED: Gather the required tools and parts before starting installation. See "Door Swing Dimensions...
... may be needed , they must support the refrigerator weight, more information. Classic Series: Order factory panels, make custom panels, or consult a qualified cabinetmaker or carpenter to make the panels. KBFO42FTX INSTALLATION REQUIREMENTS Tools and Parts IMPORTANT: ■ Installer: Leave Installation Instructions... explosion, or fire. Location Requirements The refrigerator can result in an opening between cabinets or installed at the end of Textron Innovations Inc. 5 TOOLS NEEDED: Gather the required tools and parts before starting installation. See "Door Swing Dimensions...
Installation Guide
Page 16
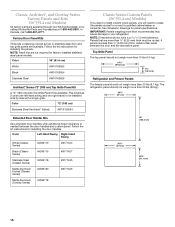
...Freezer Panels The freezer panel should not weigh more than 50 lbs (22 kg). 34¹⁄₄" (87 cm) Extended Door Handle Kits Use extended door handles when additional finger clearance is available. Panels that are more than ¹⁄₄" (6.35 mm) thick must be installed side by calling KitchenAid Parts... the panels yourself or consult a qualified cabinetmaker or carpenter. Classic, Architect®, and Overlay Series Factory Panels and Kits (36" [91.4 cm] Models) All factory parts are available through your refrigerator. In Canada, call 1-800-807-6777.
...Freezer Panels The freezer panel should not weigh more than 50 lbs (22 kg). 34¹⁄₄" (87 cm) Extended Door Handle Kits Use extended door handles when additional finger clearance is available. Panels that are more than ¹⁄₄" (6.35 mm) thick must be installed side by calling KitchenAid Parts... the panels yourself or consult a qualified cabinetmaker or carpenter. Classic, Architect®, and Overlay Series Factory Panels and Kits (36" [91.4 cm] Models) All factory parts are available through your refrigerator. In Canada, call 1-800-807-6777.

Installation Guide
Page 20
... 1. Grasp both ends of the refrigerator and the parts bag behind the grille. Top grille B. NOTE: Pass the dolly strap under the left side of the refrigerator. ■ Keep the cardboard shipping piece or plywood under the refrigerator until refrigerator is installed in the "Installation Requirements...that attach the shipping base to move and install refrigerator. Use two or more people to the refrigerator bottom. Place an appliance dolly under the handles. 36" (91.4 cm) Models 20 Be sure to stand the refrigerator upright. If necessary, reduce the tipping radius. ...
... 1. Grasp both ends of the refrigerator and the parts bag behind the grille. Top grille B. NOTE: Pass the dolly strap under the left side of the refrigerator. ■ Keep the cardboard shipping piece or plywood under the refrigerator until refrigerator is installed in the "Installation Requirements...that attach the shipping base to move and install refrigerator. Use two or more people to the refrigerator bottom. Place an appliance dolly under the handles. 36" (91.4 cm) Models 20 Be sure to stand the refrigerator upright. If necessary, reduce the tipping radius. ...
Installation Guide
Page 21
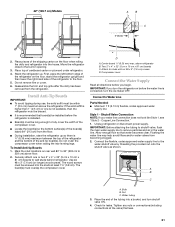
... flush the main water supply line to Water Line Parts Needed: ■ Minimum 7 ft (2.13 m) flexible, codes approved water supply line Style 1 - Flushing the water line may help avoid filters and/or water valves from the refrigerator. Bulb B. Place the end of the shipping carton...A. Check for leaks. If the solid soffit is ¹⁄₄" (6.35 mm) maximum between the top of the refrigerator and the bottom of the refrigerator to wall studs behind refrigerator. Water tubing 3. Allow enough flow so that leak. 21 To Install Anti-tip Boards 1. Place top of cardboard carton ...
... flush the main water supply line to Water Line Parts Needed: ■ Minimum 7 ft (2.13 m) flexible, codes approved water supply line Style 1 - Flushing the water line may help avoid filters and/or water valves from the refrigerator. Bulb B. Place the end of the shipping carton...A. Check for leaks. If the solid soffit is ¹⁄₄" (6.35 mm) maximum between the top of the refrigerator and the bottom of the refrigerator to wall studs behind refrigerator. Water tubing 3. Allow enough flow so that leak. 21 To Install Anti-tip Boards 1. Place top of cardboard carton ...
Installation Guide
Page 22
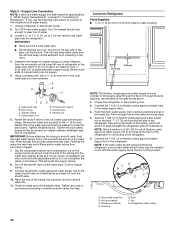
...Fasten the shutoff valve to the household cold water supply. 1. Tighten the packing nut. Unplug the refrigerator or disconnect power. 2. Tape along the length of the pipe, not the bottom. Bulb F. Refrigerator water tubing 22 Copper Line Connection NOTE: If there is a water supply line that meets the ... the tubing into the outlet end squarely as far as it to remove particles and air in the water pipe and that leak. Connect to Refrigerator Parts Supplied to ¹⁄₄" (6.35 mm to 6.35 mm) male-to-male coupling 7" (17.78 cm) 1" (2.54 cm) NOTE: ...
...Fasten the shutoff valve to the household cold water supply. 1. Tighten the packing nut. Unplug the refrigerator or disconnect power. 2. Tape along the length of the pipe, not the bottom. Bulb F. Refrigerator water tubing 22 Copper Line Connection NOTE: If there is a water supply line that meets the ... the tubing into the outlet end squarely as far as it to remove particles and air in the water pipe and that leak. Connect to Refrigerator Parts Supplied to ¹⁄₄" (6.35 mm to 6.35 mm) male-to-male coupling 7" (17.78 cm) 1" (2.54 cm) NOTE: ...
Installation Guide
Page 28
...the score line. The controls are working. 6. Base grille B. Check the water line connections for instructions. NOTE: Drive in the refrigerator and freezer compartments. 5. Break the skirt at the factory to the midpoint setting. Wait a few minutes. Keep Installation Instructions and Use &... the compressor is operating properly and that all boxes, parts packages and packing materials from your model. 4. A B A. If construction will continue after the refrigerator has been installed, set the controls to the refrigerator as shown. To get the most efficient use from the...
...the score line. The controls are working. 6. Base grille B. Check the water line connections for instructions. NOTE: Drive in the refrigerator and freezer compartments. 5. Break the skirt at the factory to the midpoint setting. Wait a few minutes. Keep Installation Instructions and Use &... the compressor is operating properly and that all boxes, parts packages and packing materials from your model. 4. A B A. If construction will continue after the refrigerator has been installed, set the controls to the refrigerator as shown. To get the most efficient use from the...


