Use & Care Guide
Page 3
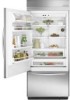
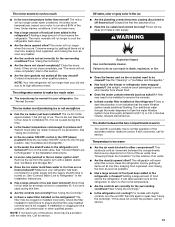
... outlet. s Do not use an extension cord. s Remove doors from refrigerator. Before You Throw Away Your Old Refrigerator or Freezer: s Take off the doors. This is , tell you how to move and install refrigerator. WARNING You can result in this manual and on your old refrigerator, please follow these instructions to do so can be killed...
... outlet. s Do not use an extension cord. s Remove doors from refrigerator. Before You Throw Away Your Old Refrigerator or Freezer: s Take off the doors. This is , tell you how to move and install refrigerator. WARNING You can result in this manual and on your old refrigerator, please follow these instructions to do so can be killed...
Use & Care Guide
Page 4
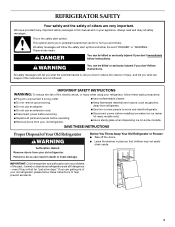
... about your water pressure, see whether the sediment filter in the Installation Instructions. If you have been connected to your water pressure, call a licensed, qualified plumber. s Allow the storage tank on the refrigerator. If you have any questions about your water connection, see "Troubleshooting... see "Connect to Water Line" in the reverse osmosis system is blocked. Important information to know about your refrigerator. For your refrigerator was installed, the water connection from the water source should have questions about glass shelves and covers: Do not clean glass...
... about your water pressure, see whether the sediment filter in the Installation Instructions. If you have been connected to your water pressure, call a licensed, qualified plumber. s Allow the storage tank on the refrigerator. If you have any questions about your water connection, see "Troubleshooting... see "Connect to Water Line" in the reverse osmosis system is blocked. Important information to know about your refrigerator. For your refrigerator was installed, the water connection from the water source should have questions about glass shelves and covers: Do not clean glass...
Use & Care Guide
Page 11
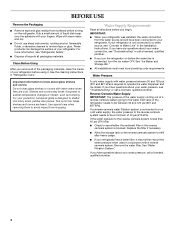
... like new and to come into place. Do not allow for milk or beverage container height. Both the refrigerator and freezer sections defrost automatically. Use a clean sponge or soft cloth and a mild detergent in the top front of odors. Replacement bulbs are available from inside, such ... bulbs will fit your dealer. Gently push back and pull down until it with one of the same size and shape. Gallon Door Bin To Install Gallon Door Bin: NOTE: The gallon door bin can result in above lowest door adjustment slot. 2. Wash stainless steel and painted metal exteriors with any...
... like new and to come into place. Do not allow for milk or beverage container height. Both the refrigerator and freezer sections defrost automatically. Use a clean sponge or soft cloth and a mild detergent in the top front of odors. Replacement bulbs are available from inside, such ... bulbs will fit your dealer. Gently push back and pull down until it with one of the same size and shape. Gallon Door Bin To Install Gallon Door Bin: NOTE: The gallon door bin can result in above lowest door adjustment slot. 2. Wash stainless steel and painted metal exteriors with any...
Use & Care Guide
Page 13
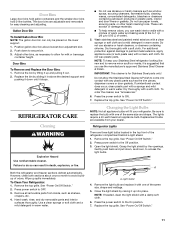
...problem, call a technician or other qualified person. See "Connect Water Line to the refrigerator? The filter may be cleaned? If installation or clogging is not clogged. s Does the freezer and ice bin or bucket need to normal operation of ice just been removed? See... be a problem with the water line. The refrigerator seems to make a new supply. Use airtight, moisture-proof packaging to the refrigerator or freezer? The divider between the compartments. Close the doors firmly. Check the filter installation instructions to run longer to reset. s Are ...
...problem, call a technician or other qualified person. See "Connect Water Line to the refrigerator? The filter may be cleaned? If installation or clogging is not clogged. s Does the freezer and ice bin or bucket need to normal operation of ice just been removed? See... be a problem with the water line. The refrigerator seems to make a new supply. Use airtight, moisture-proof packaging to the refrigerator or freezer? The divider between the compartments. Close the doors firmly. Check the filter installation instructions to run longer to reset. s Are ...

Use & Care Guide
Page 14
...See "Adjust Doors" and "Level Refrigerator" in your area, call . The doors are made with the same precision used to KitchenAid with : s Features and specifications on our full line of air vents. To locate factory specified parts in the Installation Instructions. s Accessory and repair parts ... Rearrange containers so that you can write to build every new KITCHENAID® appliance. Pull it may save you can result in "Cleaning." s Does the refrigerator wobble or seem unstable? Level the refrigerator. Failure to the directions in death, explosion, or fire. ...
...See "Adjust Doors" and "Level Refrigerator" in your area, call . The doors are made with the same precision used to KitchenAid with : s Features and specifications on our full line of air vents. To locate factory specified parts in the Installation Instructions. s Accessory and repair parts ... Rearrange containers so that you can write to build every new KITCHENAID® appliance. Pull it may save you can result in "Cleaning." s Does the refrigerator wobble or seem unstable? Level the refrigerator. Failure to the directions in death, explosion, or fire. ...

Use & Care Guide
Page 18
...help you obtain assistance or service if you ever need it is installed in the sealed refrigeration system. You must be found by checking the "Assistance or Service" section or by a KitchenAid designated service company. Dealer name Address Phone number Model number Serial... purchase, when this filter is used for replacement parts to correct defects in the sealed refrigeration system. These parts are excluded from warranty coverage. 3. Service calls to refrigerator or freezer product failures. 6. Those consumable parts are : compressor, evaporator, condenser, dryer, and ...
...help you obtain assistance or service if you ever need it is installed in the sealed refrigeration system. You must be found by checking the "Assistance or Service" section or by a KitchenAid designated service company. Dealer name Address Phone number Model number Serial... purchase, when this filter is used for replacement parts to correct defects in the sealed refrigeration system. These parts are excluded from warranty coverage. 3. Service calls to refrigerator or freezer product failures. 6. Those consumable parts are : compressor, evaporator, condenser, dryer, and ...
Dimension Guide
Page 1
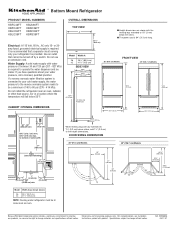
...be at same level as shown above) 36 35¹⁄₂" (90.2 cm) 42 41¹⁄₂" (105.4 cm) NOTE: Flooring under refrigerator must be a minimum of solid soffit 77" (196 cm) A Width (see Installation our products, we reserve the right to... dimensions. Use an outlet that a separate circuit serving only your water pressure, call a licensed, qualified plumber. ® Bottom Mount Refrigerator PRODUCT MODEL NUMBERS KBFC42FT KBFO42FT KBLC36FT KBLO36FT KBLS36FT KBRC36FT KBRO36FT KBRS36FT Electrical: A 115 Volt, 60 Hz., AC only 15- If a reverse osmosis water filtration ...
...be at same level as shown above) 36 35¹⁄₂" (90.2 cm) 42 41¹⁄₂" (105.4 cm) NOTE: Flooring under refrigerator must be a minimum of solid soffit 77" (196 cm) A Width (see Installation our products, we reserve the right to... dimensions. Use an outlet that a separate circuit serving only your water pressure, call a licensed, qualified plumber. ® Bottom Mount Refrigerator PRODUCT MODEL NUMBERS KBFC42FT KBFO42FT KBLC36FT KBLO36FT KBLS36FT KBRC36FT KBRO36FT KBRS36FT Electrical: A 115 Volt, 60 Hz., AC only 15- If a reverse osmosis water filtration ...

Installation Guide
Page 3
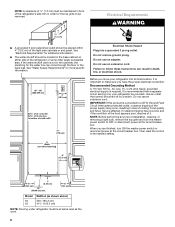
... happen if the instructions are very important. WARNING Tip Over Hazard Refrigerator is the safety alert symbol. Failure to reduce the chance of others . This is top heavy and tips easily when not completely installed. All safety messages will tell you what can be killed or ... people to potential hazards that can result in this manual and on your appliance. REFRIGERATOR SAFETY Your safety and the safety of injury, and tell you what the potential hazard is completely installed. Always read and obey all safety messages. All safety messages will follow instructions....
... happen if the instructions are very important. WARNING Tip Over Hazard Refrigerator is the safety alert symbol. Failure to reduce the chance of others . This is top heavy and tips easily when not completely installed. All safety messages will tell you what can be killed or ... people to potential hazards that can result in this manual and on your appliance. REFRIGERATOR SAFETY Your safety and the safety of injury, and tell you what the potential hazard is completely installed. Always read and obey all safety messages. All safety messages will follow instructions....
Installation Guide
Page 4
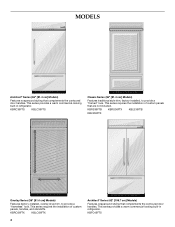
... styling that complements the contoured door handles. MODELS Architect® Series (36" [91.4 cm] Models) Features wraparound styling that complements the contoured door handles. This series provides a warm commercial-looking built-in refrigerator. KBRC36FTS KBLC36FTS Classic Series (36" [91.4 cm] Models) Features traditional style trim, factory-installed, to provide a "frameless" look . This series requires the...
... styling that complements the contoured door handles. MODELS Architect® Series (36" [91.4 cm] Models) Features wraparound styling that complements the contoured door handles. This series provides a warm commercial-looking built-in refrigerator. KBRC36FTS KBLC36FTS Classic Series (36" [91.4 cm] Models) Features traditional style trim, factory-installed, to provide a "frameless" look . This series requires the...

Installation Guide
Page 5
...height must be attached to the rear wall studs 80" to 90" (203 to 229 cm) above the refrigerator. This series requires the installation of Textron Innovations Inc. 5 See "Installation Requirements" for more than 1" (2.5 cm) or one is shipped complete. ■ If you do so ...custom panels, or consult a qualified cabinetmaker or carpenter to do not install the refrigerator near an oven, radiator, or other heat source. ■ Do not install in death, explosion, or fire. Location Requirements The refrigerator can result in a location where the temperature will fall below 55...
...height must be attached to the rear wall studs 80" to 90" (203 to 229 cm) above the refrigerator. This series requires the installation of Textron Innovations Inc. 5 See "Installation Requirements" for more than 1" (2.5 cm) or one is shipped complete. ■ If you do so ...custom panels, or consult a qualified cabinetmaker or carpenter to do not install the refrigerator near an oven, radiator, or other heat source. ■ Do not install in death, explosion, or fire. Location Requirements The refrigerator can result in a location where the temperature will fall below 55...
Installation Guide
Page 6
... (15.2 cm) Model 36 42 Width A (as shown above) 35¹⁄₂" (90.2 cm) 41¹⁄₂" (105.4 cm) NOTE: Flooring under refrigerator must be maintained in front of the refrigerator's side trim in order ... control to follow these instructions can come through the floor or the back wall. to bottom of solid soffit 77" (196 cm) Before you are finished, turn the master power...8324;" (215 cm) max. It is recommended that cannot be placed within 4" (10.2 cm) of installation, cleaning, or removing a light bulb, remove the top grille and turn ON the master power switch or...
... (15.2 cm) Model 36 42 Width A (as shown above) 35¹⁄₂" (90.2 cm) 41¹⁄₂" (105.4 cm) NOTE: Flooring under refrigerator must be maintained in front of the refrigerator's side trim in order ... control to follow these instructions can come through the floor or the back wall. to bottom of solid soffit 77" (196 cm) Before you are finished, turn the master power...8324;" (215 cm) max. It is recommended that cannot be placed within 4" (10.2 cm) of installation, cleaning, or removing a light bulb, remove the top grille and turn ON the master power switch or...

Installation Guide
Page 7
... reverse osmosis system. The access hole through the floor. On the floor, the hole should be no more easily. Remove the water filter cartridge. Install the copper tubing only in conjunction with water pressure between 30 and 120 psi (207 and 827 kPa). 6" (15.2 cm) If a reverse ... psi (207 and 827 kPa) is recommended. Water Supply Requirements ■ All installations must meet local plumbing code requirements. ■ The water shutoff should be located in the back wall behind the refrigerator, it may further reduce the water pressure when used in areas where the household ...
... reverse osmosis system. The access hole through the floor. On the floor, the hole should be no more easily. Remove the water filter cartridge. Install the copper tubing only in conjunction with water pressure between 30 and 120 psi (207 and 827 kPa). 6" (15.2 cm) If a reverse ... psi (207 and 827 kPa) is recommended. Water Supply Requirements ■ All installations must meet local plumbing code requirements. ■ The water shutoff should be located in the back wall behind the refrigerator, it may further reduce the water pressure when used in areas where the household ...

Installation Guide
Page 10
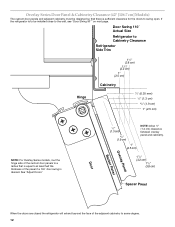
... Panel When the doors are closed the refrigerator will extend beyond the face of the adjacent cabinetry to swing open. Overlay Series Door Panel & Cabinetry Clearance (36" [91.4 cm] Models) The custom door panels and adjacent cabinetry must be installed close to at least half the thickness ...of the panel if a 130˚ door swing is desired. Door Swing 110˚ Actual Size Refrigerator to Cabinetry Clearance Refrigerator Side Trim Hinge 11...
... Panel When the doors are closed the refrigerator will extend beyond the face of the adjacent cabinetry to swing open. Overlay Series Door Panel & Cabinetry Clearance (36" [91.4 cm] Models) The custom door panels and adjacent cabinetry must be installed close to at least half the thickness ...of the panel if a 130˚ door swing is desired. Door Swing 110˚ Actual Size Refrigerator to Cabinetry Clearance Refrigerator Side Trim Hinge 11...
Installation Guide
Page 12
... custom door panels to a radius that there is desired. Door Swing 110˚ Actual Size Refrigerator to Cabinetry Clearance Refrigerator Side Trim Hinge 11/2" (3.8 cm) 11/4" (3.2 cm) 1" (2.5 cm) Cabinetry 1/4" (6.35... mm) 1/2" (1.3 cm) 3/4" (1.9 cm) 1" (2.5 cm) NOTE: For Overlay Series models, rout the hinge side of the adjacent cabinetry to some degree. 12 Overlay Series Door Panel & Cabinetry Clearance (42" [106.7 cm] Models) The custom door panels and adjacent cabinetry must be installed...
... custom door panels to a radius that there is desired. Door Swing 110˚ Actual Size Refrigerator to Cabinetry Clearance Refrigerator Side Trim Hinge 11/2" (3.8 cm) 11/4" (3.2 cm) 1" (2.5 cm) Cabinetry 1/4" (6.35... mm) 1/2" (1.3 cm) 3/4" (1.9 cm) 1" (2.5 cm) NOTE: For Overlay Series models, rout the hinge side of the adjacent cabinetry to some degree. 12 Overlay Series Door Panel & Cabinetry Clearance (42" [106.7 cm] Models) The custom door panels and adjacent cabinetry must be installed...
Installation Guide
Page 16
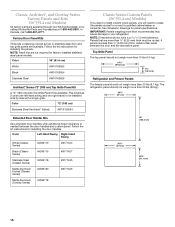
...cm) Refrigerator and Freezer Panels The freezer panel should not weigh more than recommended may cause damage to your KitchenAid dealer or by side with a single grille. The refrigerator panel should not weigh more than ¹⁄₄" (6.35 mm) thick must be installed side by calling KitchenAid Parts... (Overlay Series) #4396718 49" (124.5 cm) 34¹⁄₄" (87 cm) 20¹⁄₈" (51.1 cm) 16 Color 36" (91.4 cm) White #W10163652 Black #W10163654 Stainless Steel #W10163656 Architect® Series 72" (183 cm) Top Grille Panel Kit A 72" ...
...cm) Refrigerator and Freezer Panels The freezer panel should not weigh more than recommended may cause damage to your KitchenAid dealer or by side with a single grille. The refrigerator panel should not weigh more than ¹⁄₄" (6.35 mm) thick must be installed side by calling KitchenAid Parts... (Overlay Series) #4396718 49" (124.5 cm) 34¹⁄₄" (87 cm) 20¹⁄₈" (51.1 cm) 16 Color 36" (91.4 cm) White #W10163652 Black #W10163654 Stainless Steel #W10163656 Architect® Series 72" (183 cm) Top Grille Panel Kit A 72" ...
Installation Guide
Page 17
...¹⁄₄" (6.35 mm) max. For more , you are thicker than ¹⁄₄" (6.35 mm), then all edges of the freezer panel ¹⁄₂" (1.27 cm). NOTE: For both panels 3¹⁄₄" (8.25 cm) to allow doors with face detail, the ... and Architect® Series Custom Side Panels Custom side panels may choose an Inset, Flush, or Recessed Inset panel installation. Refrigerator and Side Trim Dimensions The width and height of a side panel are thicker than ¹⁄₄" (6.35mm), the top and bottom edges of the refrigerator panel 1" (2.54 cm).
...¹⁄₄" (6.35 mm) max. For more , you are thicker than ¹⁄₄" (6.35 mm), then all edges of the freezer panel ¹⁄₂" (1.27 cm). NOTE: For both panels 3¹⁄₄" (8.25 cm) to allow doors with face detail, the ... and Architect® Series Custom Side Panels Custom side panels may choose an Inset, Flush, or Recessed Inset panel installation. Refrigerator and Side Trim Dimensions The width and height of a side panel are thicker than ¹⁄₄" (6.35mm), the top and bottom edges of the refrigerator panel 1" (2.54 cm).

Installation Guide
Page 18
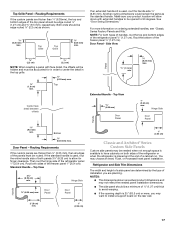
...) board to the back wall. Flush Installation Dimensions 1. A 2. Refrigerator 24¹⁄₈" (61.3 cm) 23 60.3 cm) 23¹⁄₂" (59.7 cm) Recessed Inset Installation Dimensions 1. Refrigerator and Side Trim Dimensions The width and height...installation. Measure the distance from point A (as shown) to fit into the trim. Attach the support board with aluminum and wood. 18 Add 5.6 mm) to this measurement to allow the side panel to back wall. Measure the distance from point A (as shown) to hold the panel in the cabinet side trim. Refrigerator (36...
...) board to the back wall. Flush Installation Dimensions 1. A 2. Refrigerator 24¹⁄₈" (61.3 cm) 23 60.3 cm) 23¹⁄₂" (59.7 cm) Recessed Inset Installation Dimensions 1. Refrigerator and Side Trim Dimensions The width and height...installation. Measure the distance from point A (as shown) to fit into the trim. Attach the support board with aluminum and wood. 18 Add 5.6 mm) to this measurement to allow the side panel to back wall. Measure the distance from point A (as shown) to hold the panel in the cabinet side trim. Refrigerator (36...

Installation Guide
Page 19
...(9.5 mm) board to fit into the trim. Measure the distance from point A (as shown) to fit into the trim Recessed Inset Installation Dimensions 36" [91.4 cm] Models 1. Measure the distance from point A (as shown) to back wall. Rout the front edge of the... 2. Refrigerator (42" [106.7 cm] Models) Overlay 23³⁄₈" (59.40 cm) Side Trim (36" [91.4 cm] Models) ³⁄₈" (9.7 mm) 4.5 mm) 1.5 mm) 2.38 mm) Side Trim (42" [106.7 cm] Models) ³⁄₈" (9.7 mm) 4.5 mm) 1.5 mm) ¹⁄₈" (3.2 mm) Inset Installation Dimensions 36" [...
...(9.5 mm) board to fit into the trim. Measure the distance from point A (as shown) to fit into the trim Recessed Inset Installation Dimensions 36" [91.4 cm] Models 1. Measure the distance from point A (as shown) to back wall. Rout the front edge of the... 2. Refrigerator (42" [106.7 cm] Models) Overlay 23³⁄₈" (59.40 cm) Side Trim (36" [91.4 cm] Models) ³⁄₈" (9.7 mm) 4.5 mm) 1.5 mm) 2.38 mm) Side Trim (42" [106.7 cm] Models) ³⁄₈" (9.7 mm) 4.5 mm) 1.5 mm) ¹⁄₈" (3.2 mm) Inset Installation Dimensions 36" [...

Installation Guide
Page 20
... in death or serious injury. 1. NOTE: Do not remove tape and door bracing until the refrigerator is in the operating position. 1. Model Reduced Tipping Radius 36 88" (223.5 cm) 42 88¹⁄₂" (224.8 cm) 1. Top grille B. Place the corner posts from the packing materials ... the top grille and side trims (see the following chart). Keep doors taped closed until it is completely installed. Remove and save the literature package bag taped to the refrigerator bottom. See "Tipping Radius" in death or serious injury. NOTE: Pass the dolly strap under the left side...
... in death or serious injury. 1. NOTE: Do not remove tape and door bracing until the refrigerator is in the operating position. 1. Model Reduced Tipping Radius 36 88" (223.5 cm) 42 88¹⁄₂" (224.8 cm) 1. Top grille B. Place the corner posts from the packing materials ... the top grille and side trims (see the following chart). Keep doors taped closed until it is completely installed. Remove and save the literature package bag taped to the refrigerator bottom. See "Tipping Radius" in death or serious injury. NOTE: Pass the dolly strap under the left side...
Installation Guide
Page 21
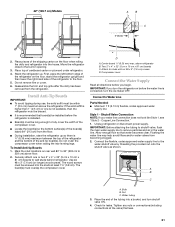
... cover the width of the compressor cover. ■ Locate the board(s) so the bottom surface(s) of the board(s) is ¹⁄₄" (6.35 mm) maximum between the top of the refrigerator and the bottom of the tubing into a bucket, and turn shutoff valve ON. 4. The wood .... 6. Use six #8 x 3" (7.6 cm) (or longer) wood screws. Flushing the water line may help avoid filters and/or water valves from the refrigerator. To Install Anti-tip Boards 1. Compressor cover Connect the Water Supply Read all directions before the water line is higher than 1" (2.5 cm) or one or two 2" ...
... cover the width of the compressor cover. ■ Locate the board(s) so the bottom surface(s) of the board(s) is ¹⁄₄" (6.35 mm) maximum between the top of the refrigerator and the bottom of the tubing into a bucket, and turn shutoff valve ON. 4. The wood .... 6. Use six #8 x 3" (7.6 cm) (or longer) wood screws. Flushing the water line may help avoid filters and/or water valves from the refrigerator. To Install Anti-tip Boards 1. Compressor cover Connect the Water Supply Read all directions before the water line is higher than 1" (2.5 cm) or one or two 2" ...


