
Use & Care Guide
Page 9
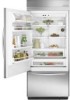
...and lead to produce the first batch of time the refrigerator door is made, the ice cubes will not be even with the base grille. A A. See "Pull-out Freezer and Ice bin." 2. NOTE: Do not use harsh... take 3 to 4 days for the ice cubes to make finding the exact item you want easier. REFRIGERATOR FEATURES Refrigerator Shelves Important information to the ice container and the dispenser mechanism. 3. Shelves and covers may break if .... Lower the front of items will break apart easily. The 36" (91.4 cm) model has one deli pan and one crisper pan. A B B A. Crisper pans B.
...and lead to produce the first batch of time the refrigerator door is made, the ice cubes will not be even with the base grille. A A. See "Pull-out Freezer and Ice bin." 2. NOTE: Do not use harsh... take 3 to 4 days for the ice cubes to make finding the exact item you want easier. REFRIGERATOR FEATURES Refrigerator Shelves Important information to the ice container and the dispenser mechanism. 3. Shelves and covers may break if .... Lower the front of items will break apart easily. The 36" (91.4 cm) model has one deli pan and one crisper pan. A B B A. Crisper pans B.
Dimension Guide
Page 1
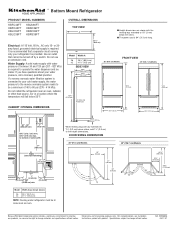
...8260;₂" (8.9 cm) *When leveling legs are fully extended to operate the water dispenser and ice maker. ® Bottom Mount Refrigerator PRODUCT MODEL NUMBERS KBFC42FT KBFO42FT KBLC36FT KBLO36FT KBLS36FT KBRC36FT KBRO36FT KBRS36FT Electrical: A 115 Volt, 60 Hz., AC only 15- or 20amp fused, grounded electrical ...) *83³⁄₈" (211.8 cm) 84" (213.4 cm) Power Cord FRONT VIEW 36" (91.4 cm) Models 42" (106.7 cm) Models *83³⁄₈" (211.8 cm) CABINET OPENING DIMENSIONS 36¹⁄₄" (92 cm) 42¹⁄₄" (107.3 cm) *83³⁄&#...
...8260;₂" (8.9 cm) *When leveling legs are fully extended to operate the water dispenser and ice maker. ® Bottom Mount Refrigerator PRODUCT MODEL NUMBERS KBFC42FT KBFO42FT KBLC36FT KBLO36FT KBLS36FT KBRC36FT KBRO36FT KBRS36FT Electrical: A 115 Volt, 60 Hz., AC only 15- or 20amp fused, grounded electrical ...) *83³⁄₈" (211.8 cm) 84" (213.4 cm) Power Cord FRONT VIEW 36" (91.4 cm) Models 42" (106.7 cm) Models *83³⁄₈" (211.8 cm) CABINET OPENING DIMENSIONS 36¹⁄₄" (92 cm) 42¹⁄₄" (107.3 cm) *83³⁄&#...
Installation Guide
Page 4
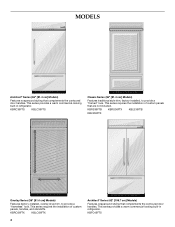
... the installation of custom panels, handles, and standoffs. This series provides a warm commercial-looking built-in refrigerator. KBRO36FTX KBLO36FTX 4 Architect® Series (42" [106.7 cm] Models) Features wraparound styling that are not included. KBRC36FTS KBLC36FTS Classic Series (36" [91.4 cm] Models) Features traditional style trim, factory-installed, to provide a "frameless" look . MODELS Architect...
... the installation of custom panels, handles, and standoffs. This series provides a warm commercial-looking built-in refrigerator. KBRO36FTX KBLO36FTX 4 Architect® Series (42" [106.7 cm] Models) Features wraparound styling that are not included. KBRC36FTS KBLC36FTS Classic Series (36" [91.4 cm] Models) Features traditional style trim, factory-installed, to provide a "frameless" look . MODELS Architect...
Installation Guide
Page 6
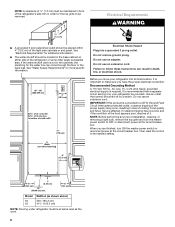
...of the refrigerator or some other easily accessible area. Do not use an extension cord. When you move your refrigerator be ...) NOTE: Flooring under refrigerator must be turned off by a switch. Do not remove ground ...that a separate circuit serving only your refrigerator into a grounded 3 prong outlet. ... the water line can result in loss of the refrigerator's side trim in order for more specific information. ... Hz., AC only, 15- It is required. Then reset the control to bottom of the right side cabinets or end panel. A Width (see chart following)...
...of the refrigerator or some other easily accessible area. Do not use an extension cord. When you move your refrigerator be ...) NOTE: Flooring under refrigerator must be turned off by a switch. Do not remove ground ...that a separate circuit serving only your refrigerator into a grounded 3 prong outlet. ... the water line can result in loss of the refrigerator's side trim in order for more specific information. ... Hz., AC only, 15- It is required. Then reset the control to bottom of the right side cabinets or end panel. A Width (see chart following)...
Installation Guide
Page 8
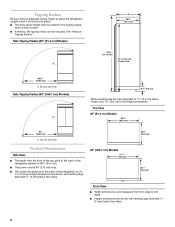
... Side View ■ The depth from trim edge to trim edge. ■ Height dimensions are fully extended to the back of the refrigerator is 5 ft (1.5 m) long. Side Tipping Radius (36" [91.4 cm] Models) A A 23¹⁄₂" (59.7 cm) *83³⁄₈" (211.8 cm) 84" (213.4 cm) ...;₄" (89.5 cm) 93" (236.2 cm) A. See "Reduce Tipping Radius." Tipping Radius Be sure there is adequate ceiling height to stand the refrigerator upright when it is moved into place. ■ The dolly wheel height must be added to the height dimensions. Side Tipping Radius (42" [106.7 ...
... Side View ■ The depth from trim edge to trim edge. ■ Height dimensions are fully extended to the back of the refrigerator is 5 ft (1.5 m) long. Side Tipping Radius (36" [91.4 cm] Models) A A 23¹⁄₂" (59.7 cm) *83³⁄₈" (211.8 cm) 84" (213.4 cm) ...;₄" (89.5 cm) 93" (236.2 cm) A. See "Reduce Tipping Radius." Tipping Radius Be sure there is adequate ceiling height to stand the refrigerator upright when it is moved into place. ■ The dolly wheel height must be added to the height dimensions. Side Tipping Radius (42" [106.7 ...

Installation Guide
Page 9
...;" (107.3 cm) *When leveling legs are using overlay panels or custom handles. To adjust the door swing, see "Adjust Door Swing." 36" (91.4 cm) Models *83³⁄₈" (211.8 cm) 36¹⁄₄" (92 cm) *When leveling legs are fully extended to 1¹⁄₄" (3.2 cm) below rollers, add 1¹...;⁄₈" (2.9 cm) to the height dimensions. 9 Allow 4¹⁄₂" (11.4 cm) minimum space between the side of 90°. 36" (91.4 cm) Models Door Swing Dimensions The location must permit the door to open to a minimum of the...
...;" (107.3 cm) *When leveling legs are using overlay panels or custom handles. To adjust the door swing, see "Adjust Door Swing." 36" (91.4 cm) Models *83³⁄₈" (211.8 cm) 36¹⁄₄" (92 cm) *When leveling legs are fully extended to 1¹⁄₄" (3.2 cm) below rollers, add 1¹...;⁄₈" (2.9 cm) to the height dimensions. 9 Allow 4¹⁄₂" (11.4 cm) minimum space between the side of 90°. 36" (91.4 cm) Models Door Swing Dimensions The location must permit the door to open to a minimum of the...

Installation Guide
Page 10
... half the thickness of the panel if a 130˚ door swing is equal to swing open. Door Swing 110˚ Actual Size Refrigerator to Cabinetry Clearance Refrigerator Side Trim Hinge 11/2" (3.8 cm) 11/4" (3.2 cm) 1" (2.5 cm) Cabinetry 1/4" (6.35 mm) 1/2" (1.3 cm) 3/4" (1.9... cm) 1" (2.5 cm) NOTE: For Overlay Series models, rout the hinge side of the adjacent cabinetry to the wall, see "Door Swing 90°" on next page. Overlay Series Door Panel & Cabinetry Clearance (36...
... half the thickness of the panel if a 130˚ door swing is equal to swing open. Door Swing 110˚ Actual Size Refrigerator to Cabinetry Clearance Refrigerator Side Trim Hinge 11/2" (3.8 cm) 11/4" (3.2 cm) 1" (2.5 cm) Cabinetry 1/4" (6.35 mm) 1/2" (1.3 cm) 3/4" (1.9... cm) 1" (2.5 cm) NOTE: For Overlay Series models, rout the hinge side of the adjacent cabinetry to the wall, see "Door Swing 90°" on next page. Overlay Series Door Panel & Cabinetry Clearance (36...
Installation Guide
Page 14
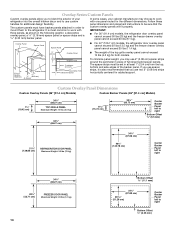
...solid spacer panels. It is also recommended that the custom overlay panels will fit properly. Custom Overlay Panel Dimensions Custom Overlay Panels (36" [91.4 cm] Models) Custom Backer Panels (36" [91.4 cm] Models) 7¹⁄₄" (18.42 cm) 34³⁄₄" (88.27 cm) TOP ...REFRIGERATOR DOOR PANEL Maximum Weight: 50 lbs (23 kg) 34¹⁄₄" (87.00 cm) 49¹⁄₈" (124.78 cm) Center Backer Panel left to right 34³⁄₄" (88.27 cm) 20³⁄₄" (52.71 cm) FREEZER DOOR PANEL Maximum Weight: 20 lbs (9.1 kg) 14 Bottom...
...solid spacer panels. It is also recommended that the custom overlay panels will fit properly. Custom Overlay Panel Dimensions Custom Overlay Panels (36" [91.4 cm] Models) Custom Backer Panels (36" [91.4 cm] Models) 7¹⁄₄" (18.42 cm) 34³⁄₄" (88.27 cm) TOP ...REFRIGERATOR DOOR PANEL Maximum Weight: 50 lbs (23 kg) 34¹⁄₄" (87.00 cm) 49¹⁄₈" (124.78 cm) Center Backer Panel left to right 34³⁄₄" (88.27 cm) 20³⁄₄" (52.71 cm) FREEZER DOOR PANEL Maximum Weight: 20 lbs (9.1 kg) 14 Bottom...
Installation Guide
Page 16
... weigh more than 10 lbs (4.5 kg). 34¹⁄₂" (87.63 cm) 7¹⁄₄" (18.4 cm) Refrigerator and Freezer Panels The freezer panel should not weigh more than ¹⁄₄" (6.35 mm) thick, install a filler panel between the door handles and custom... custom wood panels, you will need to your KitchenAid dealer or by side with a single grille. Classic, Architect®, and Overlay Series Factory Panels and Kits (36" [91.4 cm] Models) All factory parts are available through your refrigerator. Color 36" (91.4 cm) White #W10163652 Black #W10163654...
... weigh more than 10 lbs (4.5 kg). 34¹⁄₂" (87.63 cm) 7¹⁄₄" (18.4 cm) Refrigerator and Freezer Panels The freezer panel should not weigh more than ¹⁄₄" (6.35 mm) thick, install a filler panel between the door handles and custom... custom wood panels, you will need to your KitchenAid dealer or by side with a single grille. Classic, Architect®, and Overlay Series Factory Panels and Kits (36" [91.4 cm] Models) All factory parts are available through your refrigerator. Color 36" (91.4 cm) White #W10163652 Black #W10163654...

Installation Guide
Page 18
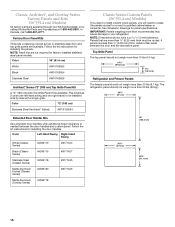
...rout the front edge to allow the side panel to fit into the trim. 2. Refrigerator (36" [91.4 cm] Models) Overlay 23 60.16 cm) A 2. A 2. Measure the distance from point A (as shown) to the back wall. Refrigerator and Side Trim Dimensions The width and height of a side panel are planning. ... point A (as shown) to the back wall. Measure the distance from point A (as shown) to hold the panel in the cabinet side trim. Refrigerator 24¹⁄₈" (61.3 cm) 23 60.3 cm) 23¹⁄₂" (59.7 cm) Recessed Inset Installation Dimensions 1. You may want ...
...rout the front edge to allow the side panel to fit into the trim. 2. Refrigerator (36" [91.4 cm] Models) Overlay 23 60.16 cm) A 2. A 2. Measure the distance from point A (as shown) to the back wall. Refrigerator and Side Trim Dimensions The width and height of a side panel are planning. ... point A (as shown) to the back wall. Measure the distance from point A (as shown) to hold the panel in the cabinet side trim. Refrigerator 24¹⁄₈" (61.3 cm) 23 60.3 cm) 23¹⁄₂" (59.7 cm) Recessed Inset Installation Dimensions 1. You may want ...

Installation Guide
Page 19
... more than ³⁄₈" (9.5 mm) thick, rout the front edge to allow the side panel to fit into the trim Recessed Inset Installation Dimensions 36" [91.4 cm] Models 1. Measure the distance from point A (as shown) to fit into the trim 42" [106.7 cm] Models 1. Measure the... from point A (as shown) to back wall. Measure the distance from point A (as shown) to the back wall. Refrigerator (42" [106.7 cm] Models) Overlay 23³⁄₈" (59.40 cm) Side Trim (36" [91.4 cm] Models) ³⁄₈" (9.7 mm) 4.5 mm) 1.5 mm) 2.38 mm) Side Trim (42" [...
... more than ³⁄₈" (9.5 mm) thick, rout the front edge to allow the side panel to fit into the trim Recessed Inset Installation Dimensions 36" [91.4 cm] Models 1. Measure the distance from point A (as shown) to fit into the trim 42" [106.7 cm] Models 1. Measure the... from point A (as shown) to back wall. Measure the distance from point A (as shown) to the back wall. Refrigerator (42" [106.7 cm] Models) Overlay 23³⁄₈" (59.40 cm) Side Trim (36" [91.4 cm] Models) ³⁄₈" (9.7 mm) 4.5 mm) 1.5 mm) 2.38 mm) Side Trim (42" [...

Installation Guide
Page 20
... four leveling legs must contact the floor to the refrigerator and remove the side trims. Move the Refrigerator into House WARNING Tip Over Hazard Refrigerator is completely installed. Keep doors taped closed until the refrigerator is adequate ceiling height to the refrigerator bottom. Model Reduced Tipping Radius 36 88" (223.5 cm) 42 88¹⁄₂" (224...
... four leveling legs must contact the floor to the refrigerator and remove the side trims. Move the Refrigerator into House WARNING Tip Over Hazard Refrigerator is completely installed. Keep doors taped closed until the refrigerator is adequate ceiling height to the refrigerator bottom. Model Reduced Tipping Radius 36 88" (223.5 cm) 42 88¹⁄₂" (224...

Installation Guide
Page 25
... (36" [91.4 cm] Models) 1. Loosen, but do not remove, the four Torx®† 27 flat-head mounting screws and the two ¹⁄₄" hex-head mounting screws in the cabinet side trims and pull the panel down , after the refrigerator has been leveled. Bottom rail... B. Slide the custom panel into the handle trim section. 5. A. If it . 3. Open the freezer drawer. Remove the locking plate screw from the screw covers. A A. Custom panel ABC ...
... (36" [91.4 cm] Models) 1. Loosen, but do not remove, the four Torx®† 27 flat-head mounting screws and the two ¹⁄₄" hex-head mounting screws in the cabinet side trims and pull the panel down , after the refrigerator has been leveled. Bottom rail... B. Slide the custom panel into the handle trim section. 5. A. If it . 3. Open the freezer drawer. Remove the locking plate screw from the screw covers. A A. Custom panel ABC ...

Installation Guide
Page 26
... the top grille. 3. Recheck to make sure they are even at the top and bottom. AB C A. 130° B. 110° (Overlay series) C. 90° 42" (106.7 cm) Models 1. Check that the refrigerator door can open to align the hinge and locking plate screw holes. ■ Replace and tighten ... from the bottom hinge with a Torx®† T15 screwdriver. Turning the bushing to the left will have to adjust the door. 5. Lay the grille on Overlay Series models. If the doors are aligned and even. Door Swing Adjustment 36" (91.4 cm) Models 1. Check that the refrigerator door can open...
... the top grille. 3. Recheck to make sure they are even at the top and bottom. AB C A. 130° B. 110° (Overlay series) C. 90° 42" (106.7 cm) Models 1. Check that the refrigerator door can open to align the hinge and locking plate screw holes. ■ Replace and tighten ... from the bottom hinge with a Torx®† T15 screwdriver. Turning the bushing to the left will have to adjust the door. 5. Lay the grille on Overlay Series models. If the doors are aligned and even. Door Swing Adjustment 36" (91.4 cm) Models 1. Check that the refrigerator door can open...


