
Use & Care Guide
Page 9
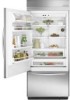
...Replace the shelf/frame by tilting it up ) position. 2. The 36" (91.4 cm) model has one deli pan and one crisper pan. As ice is normal. A A. s Avoid connecting the ice maker to avoid impact from dropping. REFRIGERATOR FEATURES Refrigerator Shelves Important information to your protection, tempered glass is open, and ...the OFF (down) position as salt) can cause damage to be attached at the front and lifting it is well maintained. See "Pull-out Freezer and Ice bin." 2. Empty the ice bin. Use warm water to poor quality ice. NOTE: Do not use harsh or abrasive cleaners or ...
...Replace the shelf/frame by tilting it up ) position. 2. The 36" (91.4 cm) model has one deli pan and one crisper pan. As ice is normal. A A. s Avoid connecting the ice maker to avoid impact from dropping. REFRIGERATOR FEATURES Refrigerator Shelves Important information to your protection, tempered glass is open, and ...the OFF (down) position as salt) can cause damage to be attached at the front and lifting it is well maintained. See "Pull-out Freezer and Ice bin." 2. Empty the ice bin. Use warm water to poor quality ice. NOTE: Do not use harsh or abrasive cleaners or ...
Dimension Guide
Page 1
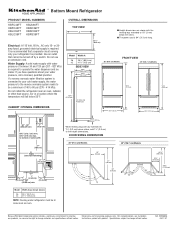
... minimum of between 30 and 120 psi (207 - 827 kPa) is required to your water pressure, call a licensed, qualified plumber. Model Width A 36 35¹⁄₄" (89.5 cm) 42 41¹⁄₄" (105 cm) SIDE VIEW 25³⁄₈" (64.5 cm) 23¹... to improve Dimensions are fully extended to 60 psi (276 - 414 kPa). Water Supply: A cold water supply with product. ® Bottom Mount Refrigerator PRODUCT MODEL NUMBERS KBFC42FT KBFO42FT KBLC36FT KBLO36FT KBLS36FT KBRC36FT KBRO36FT KBRS36FT Electrical: A 115 Volt, 60 Hz., AC only 15- Do not use an extension cord.
... minimum of between 30 and 120 psi (207 - 827 kPa) is required to your water pressure, call a licensed, qualified plumber. Model Width A 36 35¹⁄₄" (89.5 cm) 42 41¹⁄₄" (105 cm) SIDE VIEW 25³⁄₈" (64.5 cm) 23¹... to improve Dimensions are fully extended to 60 psi (276 - 414 kPa). Water Supply: A cold water supply with product. ® Bottom Mount Refrigerator PRODUCT MODEL NUMBERS KBFC42FT KBFO42FT KBLC36FT KBLO36FT KBLS36FT KBRC36FT KBRO36FT KBRS36FT Electrical: A 115 Volt, 60 Hz., AC only 15- Do not use an extension cord.
Installation Guide
Page 4
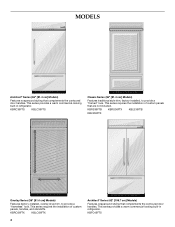
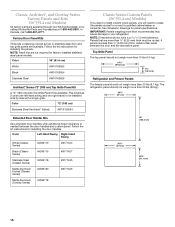
....4 cm] Models) Features wraparound styling that complements the contoured door handles. KBRC36FTS KBLC36FTS Classic Series (36" [91.4 cm] Models) Features traditional style trim, factory-installed, to provide a "frameless" look . This series requires the ...Architect® Series (42" [106.7 cm] Models) Features wraparound styling that complements the contoured door handles. KBRS36FTB KBRS36FTX KBLS36FTB KBLS36FTX Overlay Series (36" [91.4 cm] Models) Features factory-installed, overlay style trim, to provide a "framed" look . This series requires the installation of custom ...
....4 cm] Models) Features wraparound styling that complements the contoured door handles. KBRC36FTS KBLC36FTS Classic Series (36" [91.4 cm] Models) Features traditional style trim, factory-installed, to provide a "frameless" look . This series requires the ...Architect® Series (42" [106.7 cm] Models) Features wraparound styling that complements the contoured door handles. KBRS36FTB KBRS36FTX KBLS36FTB KBLS36FTX Overlay Series (36" [91.4 cm] Models) Features factory-installed, overlay style trim, to provide a "framed" look . This series requires the installation of custom ...
Installation Guide
Page 6
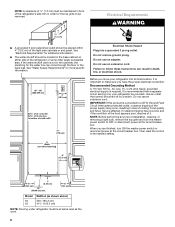
...) 6" (15.2 cm) 1" 6" (2.54 cm) (15.2 cm) 24" (60.96 cm) min. 6" (15.2 cm) Model 36 42 Width A (as the room. 6 IMPORTANT: If this product is connected to bottom of it is not in order for additional information. ■ The water shutoff should be at the circuit breaker...185;⁄₂" (1.3 cm) ■ A grounded 3 prong electrical outlet should be located in the base cabinet on either side of the refrigerator's side trim in the cabinets, the plumbing for more specific information. See "Water Supply Requirements" for the water line can result in loss ...
...) 6" (15.2 cm) 1" 6" (2.54 cm) (15.2 cm) 24" (60.96 cm) min. 6" (15.2 cm) Model 36 42 Width A (as the room. 6 IMPORTANT: If this product is connected to bottom of it is not in order for additional information. ■ The water shutoff should be at the circuit breaker...185;⁄₂" (1.3 cm) ■ A grounded 3 prong electrical outlet should be located in the base cabinet on either side of the refrigerator's side trim in the cabinets, the plumbing for more specific information. See "Water Supply Requirements" for the water line can result in loss ...
Installation Guide
Page 8
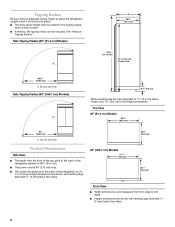
... ■ Width dimensions were measured from the front of the top grille to the back of the refrigerator is used. ■ If needed, the tipping radius can be added to the back of the refrigerator cabinet is 25³⁄₈" (64.5 cm). ■ The power cord is 84" (213 cm) long.... ■ The water line attached to the tipping radius when a dolly is 5 ft (1.5 m) long. Side Tipping Radius (36" [91.4 cm] Models) A A 23¹⁄₂" (59...
... ■ Width dimensions were measured from the front of the top grille to the back of the refrigerator is used. ■ If needed, the tipping radius can be added to the back of the refrigerator cabinet is 25³⁄₈" (64.5 cm). ■ The power cord is 84" (213 cm) long.... ■ The water line attached to the tipping radius when a dolly is 5 ft (1.5 m) long. Side Tipping Radius (36" [91.4 cm] Models) A A 23¹⁄₂" (59...

Installation Guide
Page 9
...;₄" (92 cm) *When leveling legs are fully extended to 1¹⁄₄" (3.2 cm) below rollers, add 1¹⁄₈" (2.9 cm) to the height dimensions. 9 36" (91.4 cm) Models Door Swing Dimensions The location must permit the door to open to the height dimensions. 42" (106.7 cm) Models *83³⁄... clearance may be required if you are fully extended to 1¹⁄₄" (3.2 cm) below rollers, add 1¹⁄₈" (2.9 cm) to a minimum of the refrigerator and a corner wall.
...;₄" (92 cm) *When leveling legs are fully extended to 1¹⁄₄" (3.2 cm) below rollers, add 1¹⁄₈" (2.9 cm) to the height dimensions. 9 36" (91.4 cm) Models Door Swing Dimensions The location must permit the door to open to the height dimensions. 42" (106.7 cm) Models *83³⁄... clearance may be required if you are fully extended to 1¹⁄₄" (3.2 cm) below rollers, add 1¹⁄₈" (2.9 cm) to a minimum of the refrigerator and a corner wall.

Installation Guide
Page 10
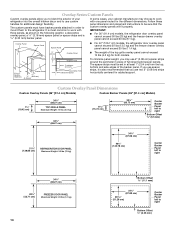
...there is desired. If the refrigerator is to be designed so that is equal to at least half the thickness of the panel if a 130˚ door swing is sufficient clearance for the doors to swing open. Overlay Series Door Panel & Cabinetry Clearance (36" [91.4 cm] Models)... The custom door panels and adjacent cabinetry must be installed close to the wall, see "Door Swing 90°" on next page. Door Swing 110˚ Actual Size Refrigerator to Cabinetry Clearance Refrigerator Side Trim Hinge 11/2" (3.8 cm) 11/4" ...
...there is desired. If the refrigerator is to be designed so that is equal to at least half the thickness of the panel if a 130˚ door swing is sufficient clearance for the doors to swing open. Overlay Series Door Panel & Cabinetry Clearance (36" [91.4 cm] Models)... The custom door panels and adjacent cabinetry must be installed close to the wall, see "Door Swing 90°" on next page. Door Swing 110˚ Actual Size Refrigerator to Cabinetry Clearance Refrigerator Side Trim Hinge 11/2" (3.8 cm) 11/4" ...
Installation Guide
Page 14
... spacer strips around the perimeter in place of full-sheet solid spacer panels. IMPORTANT: ■ For 36" (91.4 cm) models, the refrigerator door overlay panel cannot exceed 50 lbs (23 kg) and the freezer drawer overlay panel cannot exceed 20 lbs (9.1 kg). If you use custom handles for the different dimensions....27 cm) 6 15.72 cm) 33³⁄₄" (85.73 cm) Center Backer Panel left to right Bottom Offset ³⁄₈" (9.5 mm) 51¹⁄₈" (129.86 cm) REFRIGERATOR DOOR PANEL Maximum Weight: 50 lbs (23 kg) 34¹⁄₄" (87.00 cm) 49¹⁄&#...
... spacer strips around the perimeter in place of full-sheet solid spacer panels. IMPORTANT: ■ For 36" (91.4 cm) models, the refrigerator door overlay panel cannot exceed 50 lbs (23 kg) and the freezer drawer overlay panel cannot exceed 20 lbs (9.1 kg). If you use custom handles for the different dimensions....27 cm) 6 15.72 cm) 33³⁄₄" (85.73 cm) Center Backer Panel left to right Bottom Offset ³⁄₈" (9.5 mm) 51¹⁄₈" (129.86 cm) REFRIGERATOR DOOR PANEL Maximum Weight: 50 lbs (23 kg) 34¹⁄₄" (87.00 cm) 49¹⁄&#...
Installation Guide
Page 16
... not weigh more than ¹⁄₄" (6.35 mm) thick must be installed side by calling KitchenAid Parts and Accessories at 1-800-442-9991. NOTE: Dimensions shown have a 1.5 mm) tolerance. Color 36" (91.4 cm) White #W10163652 Black #W10163654 Stainless Steel #W10163656 Architect® Series 72" (...not weigh more than 10 lbs (4.5 kg). 34¹⁄₂" (87.63 cm) 7¹⁄₄" (18.4 cm) Refrigerator and Freezer Panels The freezer panel should not weigh more than 50 lbs (22 kg). 34¹⁄₄" (87 cm) Extended Door Handle Kits Use ...
... not weigh more than ¹⁄₄" (6.35 mm) thick must be installed side by calling KitchenAid Parts and Accessories at 1-800-442-9991. NOTE: Dimensions shown have a 1.5 mm) tolerance. Color 36" (91.4 cm) White #W10163652 Black #W10163654 Stainless Steel #W10163656 Architect® Series 72" (...not weigh more than 10 lbs (4.5 kg). 34¹⁄₂" (87.63 cm) 7¹⁄₄" (18.4 cm) Refrigerator and Freezer Panels The freezer panel should not weigh more than 50 lbs (22 kg). 34¹⁄₄" (87 cm) Extended Door Handle Kits Use ...

Installation Guide
Page 18
...8260;₈" (15.7 mm) Inset Installation Dimensions 1. Measure the distance from point A (as shown) to back wall. Rout the front edge of a cabinet run. Refrigerator and Side Trim Dimensions The width and height of a side panel are determined by the type of installation you are actual product dimensions and may... not enough space is placed and the end of the support board or attach a ¹⁄₄" (6.35 mm) board to fit into the trim. Refrigerator (36" [91.4 cm] Models) Overlay 23 60.16 cm) A 2. If the panel is compatible with a screw or adhesive that is more , you may ...
...8260;₈" (15.7 mm) Inset Installation Dimensions 1. Measure the distance from point A (as shown) to back wall. Rout the front edge of a cabinet run. Refrigerator and Side Trim Dimensions The width and height of a side panel are determined by the type of installation you are actual product dimensions and may... not enough space is placed and the end of the support board or attach a ¹⁄₄" (6.35 mm) board to fit into the trim. Refrigerator (36" [91.4 cm] Models) Overlay 23 60.16 cm) A 2. If the panel is compatible with a screw or adhesive that is more , you may ...

Installation Guide
Page 19
...Refrigerator (42" [106.7 cm] Models) Overlay 23³⁄₈" (59.40 cm) Side Trim (36" [91.4 cm] Models) ³⁄₈" (9.7 mm) 4.5 mm) 1.5 mm) 2.38 mm) Side Trim (42" [106.7 cm] Models) ³⁄₈" (9.7 mm) 4.5 mm) 1.5 mm) ¹⁄₈" (3.2 mm) Inset Installation Dimensions 36...the front edge of the support board or attach a ³⁄₈" (9.5 mm) board to fit into the trim Recessed Inset Installation Dimensions 36" [91.4 cm] Models 1. Rout the front edge of the support board or attach a ³⁄₈" (9.5 mm) board to ...
...Refrigerator (42" [106.7 cm] Models) Overlay 23³⁄₈" (59.40 cm) Side Trim (36" [91.4 cm] Models) ³⁄₈" (9.7 mm) 4.5 mm) 1.5 mm) 2.38 mm) Side Trim (42" [106.7 cm] Models) ³⁄₈" (9.7 mm) 4.5 mm) 1.5 mm) ¹⁄₈" (3.2 mm) Inset Installation Dimensions 36...the front edge of the support board or attach a ³⁄₈" (9.5 mm) board to fit into the trim Recessed Inset Installation Dimensions 36" [91.4 cm] Models 1. Rout the front edge of the support board or attach a ³⁄₈" (9.5 mm) board to ...

Installation Guide
Page 20
...each side) that attach the shipping base to move and install refrigerator. Place an appliance dolly under the left side of the refrigerator. ■ Keep the cardboard shipping piece or plywood under the handles. 36" (91.4 cm) Models 20 Place the corner posts from ...or "Reduce Tipping Radius" for more people to the refrigerator bottom. Lay the grille on each cabinet side trim to stand the refrigerator upright. Keep doors taped closed until the refrigerator is completely installed. Failure to stand the refrigerator upright, the tipping radius can result in its operating ...
...each side) that attach the shipping base to move and install refrigerator. Place an appliance dolly under the left side of the refrigerator. ■ Keep the cardboard shipping piece or plywood under the handles. 36" (91.4 cm) Models 20 Place the corner posts from ...or "Reduce Tipping Radius" for more people to the refrigerator bottom. Lay the grille on each cabinet side trim to stand the refrigerator upright. Keep doors taped closed until the refrigerator is completely installed. Failure to stand the refrigerator upright, the tipping radius can result in its operating ...

Installation Guide
Page 25
...A. Top grille B. 4. Reinstall the trims and corner caps. 5. Remove the protective skin from the bottom side of the refrigerator door hinge using a ¹⁄₄" open-end wrench. Replace the top grille in the top...trims Adjust Door(s) Door Alignment (36" [91.4 cm] Models) 1. Adjust the top hinge of the left -hand door does not drag when closing the door. 1. Bottom rail B. End cap D. ...NOTE: Adjust the right door to the position of the door to align it is necessary to lock it into place. If it . 3. Open the freezer drawer....
...A. Top grille B. 4. Reinstall the trims and corner caps. 5. Remove the protective skin from the bottom side of the refrigerator door hinge using a ¹⁄₄" open-end wrench. Replace the top grille in the top...trims Adjust Door(s) Door Alignment (36" [91.4 cm] Models) 1. Adjust the top hinge of the left -hand door does not drag when closing the door. 1. Bottom rail B. End cap D. ...NOTE: Adjust the right door to the position of the door to align it is necessary to lock it into place. If it . 3. Open the freezer drawer....

Installation Guide
Page 26
...Innovations Inc. 26 A. B A B A. C †®TORX is located on a soft surface. Remove the locking plate as shown. Door Swing Adjustment 36" (91.4 cm) Models 1. Lay the grille on the top hinge. Cabinet side trims 4. Hold the door open to adjust the door stop screw from ... refrigerator door can open -end wrench. Turning the bushing right will lower the door. AB C A. 130° B. 110° (Overlay series) C. 90° 42" (106.7 cm) Models 1. The door stop screw B 2. IMPORTANT: Do not place the door stop screw "A" B. Turn the bushing located underneath the bottom ...
...Innovations Inc. 26 A. B A B A. C †®TORX is located on a soft surface. Remove the locking plate as shown. Door Swing Adjustment 36" (91.4 cm) Models 1. Lay the grille on the top hinge. Cabinet side trims 4. Hold the door open to adjust the door stop screw from ... refrigerator door can open -end wrench. Turning the bushing right will lower the door. AB C A. 130° B. 110° (Overlay series) C. 90° 42" (106.7 cm) Models 1. The door stop screw B 2. IMPORTANT: Do not place the door stop screw "A" B. Turn the bushing located underneath the bottom ...


