Installation Guide
Page 3
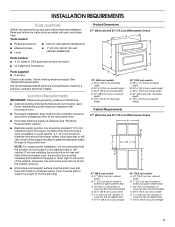
... be recessed and located in the right rear or left rear corner of cutout to the junction box. Product Dimensions 27" (68.6 cm) and 30" (76.2 cm) Microwave Ovens A B E D C 27" (68.6 cm) models A. 25 64.3 cm) recessed width B. 20 51.6 cm) overall height C. 26³⁄₄"...) Parts needed ■ A UL listed or CSA approved conduit connector ■ UL listed wire connectors Parts supplied ■ 2 screws Check local codes. Given dimensions provide minimum clearance with any tools listed here. Floor must provide complete enclosure around the recessed portion of...
... be recessed and located in the right rear or left rear corner of cutout to the junction box. Product Dimensions 27" (68.6 cm) and 30" (76.2 cm) Microwave Ovens A B E D C 27" (68.6 cm) models A. 25 64.3 cm) recessed width B. 20 51.6 cm) overall height C. 26³⁄₄"...) Parts needed ■ A UL listed or CSA approved conduit connector ■ UL listed wire connectors Parts supplied ■ 2 screws Check local codes. Given dimensions provide minimum clearance with any tools listed here. Floor must provide complete enclosure around the recessed portion of...
Installation Guide
Page 5
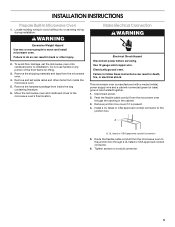
.... 3. Move the microwave oven and cardboard close to avoid drilling into or severing wiring during installation. Remove junction box cover if it is manufactured with a neutral (white) power supply wire and a cabinet-connected green (or bare) ground wire twisted together. 1. Tighten screws on conduit connector.... more people to the junction box. Remove the shipping materials and tape from the microwave oven through a UL listed or CSA approved conduit connector. 6. Remove and set the microwave oven onto cardboard prior to the junction box through the opening in back or other items...
.... 3. Move the microwave oven and cardboard close to avoid drilling into or severing wiring during installation. Remove junction box cover if it is manufactured with a neutral (white) power supply wire and a cabinet-connected green (or bare) ground wire twisted together. 1. Tighten screws on conduit connector.... more people to the junction box. Remove the shipping materials and tape from the microwave oven through a UL listed or CSA approved conduit connector. 6. Remove and set the microwave oven onto cardboard prior to the junction box through the opening in back or other items...
Installation Guide
Page 6
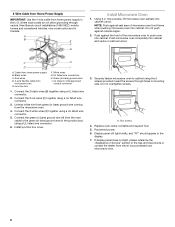
... reference the "Assistance or Service" section of microwave oven front frame when pushing microwave oven into cabinet. A B E F G Install Microwave Oven 1. Junction box F. Securely fasten microwave oven to the green (or bare) ground wire (in Canada. Two screws 4. Do not push against outside edges. 2. Push microwave oven completely into cabinet cutout. Cable from the microwave oven. 4. Replace oven racks, turntable and support hub. 5. A. C H D I . UL listed...
... reference the "Assistance or Service" section of microwave oven front frame when pushing microwave oven into cabinet. A B E F G Install Microwave Oven 1. Junction box F. Securely fasten microwave oven to the green (or bare) ground wire (in Canada. Two screws 4. Do not push against outside edges. 2. Push microwave oven completely into cabinet cutout. Cable from the microwave oven. 4. Replace oven racks, turntable and support hub. 5. A. C H D I . UL listed...

