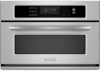
Use & Care Guide
Page 3
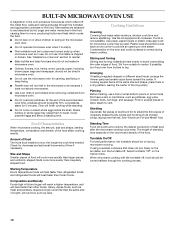
... the safety of others . All safety messages will tell you to maintain appropriate deep frying temperatures. s Install or locate the microwave oven only in the microwave oven. for examination, repair, or adjustment. Do not use . s Do not cover racks or any other than manufacturer's recommended ... any appliance, close supervision is difficult to potential hazards that can burn off the pad and touch electrical parts involving a risk of oven is operated in oven. Connect only to heat, cook, or dry food. See "GROUNDING INSTRUCTIONS" found in this manual. s Do not deep...
... the safety of others . All safety messages will tell you to maintain appropriate deep frying temperatures. s Install or locate the microwave oven only in the microwave oven. for examination, repair, or adjustment. Do not use . s Do not cover racks or any other than manufacturer's recommended ... any appliance, close supervision is difficult to potential hazards that can burn off the pad and touch electrical parts involving a risk of oven is operated in oven. Connect only to heat, cook, or dry food. See "GROUNDING INSTRUCTIONS" found in this manual. s Do not deep...
Use & Care Guide
Page 4
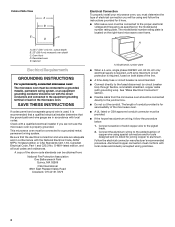
...food in the cavity when not in use this oven with Part 18 of fire in a wet basement, or near water - s Do not store the microwave oven outdoors. Remove wire twist-ties from the microwave oven is less than 120 volts, cooking times may be... Observe all governing codes and ordinances. Do not overheat the liquid. - GROUNDING INSTRUCTIONS For a permanently connected microwave oven: The microwave oven must be connected to accumulate on the microwave oven. After heating, allow soil or cleaner residue to a grounded, metallic, permanent wiring system, or an equipment...
...food in the cavity when not in use this oven with Part 18 of fire in a wet basement, or near water - s Do not store the microwave oven outdoors. Remove wire twist-ties from the microwave oven is less than 120 volts, cooking times may be... Observe all governing codes and ordinances. Do not overheat the liquid. - GROUNDING INSTRUCTIONS For a permanently connected microwave oven: The microwave oven must be connected to accumulate on the microwave oven. After heating, allow soil or cleaner residue to a grounded, metallic, permanent wiring system, or an equipment...
Use & Care Guide
Page 5
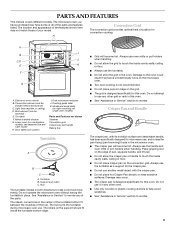
... holders when handling. The location and appearance of the features shown here may not match those of the parts and features listed. Turntable F. Cooking guide label K. Support and rollers C. Do not operate the microwave oven without having the turntable in ceiling) D. Damage to touch the inside cavity walls, ceiling or floor. s The grid...
... holders when handling. The location and appearance of the features shown here may not match those of the parts and features listed. Turntable F. Cooking guide label K. Support and rollers C. Do not operate the microwave oven without having the turntable in ceiling) D. Damage to touch the inside cavity walls, ceiling or floor. s The grid...
Use & Care Guide
Page 10
... Covering food helps retain moisture, shorten cook time and reduce spattering. Condensation on the microwave oven door. Arranging If heating irregularly shaped or different sized foods, arrange the thinner parts and smaller sized items toward the center. Heavy, dense foods, such as meat and... potatoes, require a longer cook time than frozen foods. Stir from microwave oven. Piercing Before heating, use the microwave oven for 5 minutes. Amount of ...
... Covering food helps retain moisture, shorten cook time and reduce spattering. Condensation on the microwave oven door. Arranging If heating irregularly shaped or different sized foods, arrange the thinner parts and smaller sized items toward the center. Heavy, dense foods, such as meat and... potatoes, require a longer cook time than frozen foods. Stir from microwave oven. Piercing Before heating, use the microwave oven for 5 minutes. Amount of ...
Use & Care Guide
Page 14
...To Manual Defrost: 1. Touch number key "6" OR Touch CUSTOM DEFROST repeatedly to scan to select the Poultry setting, Custom Defrost must be defrosted using 30% cook power. Touch COOK TIME. 5. Touch START. Touch number key "6" OR Touch CUSTOM REHEAT repeatedly to toggle through foods. Touch START. s ... 2. Custom Defrost The Custom Defrost feature can be used, or the microwave oven can be set up to defrost by using the Custom Defrost feature, but should be manually set a length of time to shield parts of the cycle for more even defrosting. If using other than 20 ...
...To Manual Defrost: 1. Touch number key "6" OR Touch CUSTOM DEFROST repeatedly to scan to select the Poultry setting, Custom Defrost must be defrosted using 30% cook power. Touch COOK TIME. 5. Touch START. Touch number key "6" OR Touch CUSTOM REHEAT repeatedly to toggle through foods. Touch START. s ... 2. Custom Defrost The Custom Defrost feature can be used, or the microwave oven can be set up to defrost by using the Custom Defrost feature, but should be manually set a length of time to shield parts of the cycle for more even defrosting. If using other than 20 ...
Use & Care Guide
Page 18
...direction of grain to select food category from those of grain to set a standard temperature. Cleaning Method: s KitchenAid® Stainless Steel Cleaner and Polish Part Number 4396920 (not included): See "Assistance or Service" section to clear the display and/or stop time is... key to avoid damaging. Time and temperature will sound every minute. 9. BUILT-IN MICROWAVE OVEN CARE General Cleaning IMPORTANT: Before cleaning, make sure all -purpose cleaner: s All-Purpose Appliance Cleaner Part Number 31662 (not included): See "Assistance or Service" section to soft cloth or ...
...direction of grain to select food category from those of grain to set a standard temperature. Cleaning Method: s KitchenAid® Stainless Steel Cleaner and Polish Part Number 4396920 (not included): See "Assistance or Service" section to clear the display and/or stop time is... key to avoid damaging. Time and temperature will sound every minute. 9. BUILT-IN MICROWAVE OVEN CARE General Cleaning IMPORTANT: Before cleaning, make sure all -purpose cleaner: s All-Purpose Appliance Cleaner Part Number 31662 (not included): See "Assistance or Service" section to soft cloth or ...
Use & Care Guide
Page 20
... large amounts of food need longer cooking times. Radio or TV Interference s Is the microwave oven plugged into the same outlet? s Is the electronic oven control set properly? See "Display(s)" section. Smoke is not operating s Is the Timer in "Parts and Features"? Sparking will not work during crisping s Some smoke is normal and occurs...
... large amounts of food need longer cooking times. Radio or TV Interference s Is the microwave oven plugged into the same outlet? s Is the electronic oven control set properly? See "Display(s)" section. Smoke is not operating s Is the Timer in "Parts and Features"? Sparking will not work during crisping s Some smoke is normal and occurs...
Use & Care Guide
Page 21
... Road Benton Harbor, MI 49022-2692 Replacement Parts and Accessories Glass Turntable Part Number 8304389 Turntable Support and Rollers Part Number 8304390 Turntable Hub Part Number 8304391 Crisper Pan Part Number 8304392 Baking Tray Part Number 8304408 Crisper Pan Handle Part Number 8304393 Steamer Part Number 8304394 Convection Grid Part Number 8304395 KitchenAid® Stainless Steel Cleaner and Polish (stainless...
... Road Benton Harbor, MI 49022-2692 Replacement Parts and Accessories Glass Turntable Part Number 8304389 Turntable Support and Rollers Part Number 8304390 Turntable Hub Part Number 8304391 Crisper Pan Part Number 8304392 Baking Tray Part Number 8304408 Crisper Pan Handle Part Number 8304393 Steamer Part Number 8304394 Convection Grid Part Number 8304395 KitchenAid® Stainless Steel Cleaner and Polish (stainless...
Use & Care Guide
Page 22
... your major appliance, unless such damage results from defects in materials or workmanship and is reported to KitchenAid within 30 days from warranty coverage. 3. Consumable parts are excluded from the date of purchase. 6. KITCHENAID® BUILT-IN OVEN & MICROWAVE WARRANTY LIMITED WARRANTY For one year from the date of purchase, when this major appliance is operated...
... your major appliance, unless such damage results from defects in materials or workmanship and is reported to KitchenAid within 30 days from warranty coverage. 3. Consumable parts are excluded from the date of purchase. 6. KITCHENAID® BUILT-IN OVEN & MICROWAVE WARRANTY LIMITED WARRANTY For one year from the date of purchase, when this major appliance is operated...
Installation Guide
Page 3
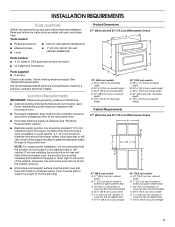
...parts before starting installation. Read and follow the instructions provided with bottom of 110 lbs (50.0 kg). If you are shown must be located 3" (7.6 cm) maximum below the support surface when the microwave oven is required. recessed depth E. 18³⁄₄" (47.6 cm) recessed height 30...) overall width D. 23" (58.3 cm) max. recessed depth E. 18³⁄₄" (47.6 cm) recessed height Cabinet Requirements 27" (68.6 cm) and 30" (76.2 cm) Microwave Ovens A B F D E C 27" (68.6 cm) models A. 27" (68.6 cm) min. cabinet width B. 1" (2.5 cm) top of cutout to floor ...
...parts before starting installation. Read and follow the instructions provided with bottom of 110 lbs (50.0 kg). If you are shown must be located 3" (7.6 cm) maximum below the support surface when the microwave oven is required. recessed depth E. 18³⁄₄" (47.6 cm) recessed height 30...) overall width D. 23" (58.3 cm) max. recessed depth E. 18³⁄₄" (47.6 cm) recessed height Cabinet Requirements 27" (68.6 cm) and 30" (76.2 cm) Microwave Ovens A B F D E C 27" (68.6 cm) models A. 27" (68.6 cm) min. cabinet width B. 1" (2.5 cm) top of cutout to floor ...
Installation Guide
Page 4
...to aluminum. A copy of the above code standards can be obtained from the microwave oven should be run with the National Electrical Code, ANSI/ NFPA 70-latest edition or CSA Standards C22.1-94, Canadian Electrical Code, Part 1 and C22.2 No. The model/serial number rating plate is used, ...it here. ■ Microwave oven must conform with a qualified electrical installer if you will be using special connectors and/or tools...
...to aluminum. A copy of the above code standards can be obtained from the microwave oven should be run with the National Electrical Code, ANSI/ NFPA 70-latest edition or CSA Standards C22.1-94, Canadian Electrical Code, Part 1 and C22.2 No. The model/serial number rating plate is used, ...it here. ■ Microwave oven must conform with a qualified electrical installer if you will be using special connectors and/or tools...
Installation Guide
Page 7
... Care Guide or contact the dealer from whom you have all of Microwave Oven 1. Check that all packaging materials. 4. Fill a microwave-safe container with 1 cup (250 mL) of /recycle all parts are now installed. When the display reads "1:00" minute, open the microwave oven door. or circuit breaker has not tripped. 3. Check Operation of your built...
... Care Guide or contact the dealer from whom you have all of Microwave Oven 1. Check that all packaging materials. 4. Fill a microwave-safe container with 1 cup (250 mL) of /recycle all parts are now installed. When the display reads "1:00" minute, open the microwave oven door. or circuit breaker has not tripped. 3. Check Operation of your built...

