Use & Care Guide
Page 3
... use. s Do not deep fry in accordance with metal foil. This will cause overheating of the oven with the provided Installation Instructions. IMPORTANT SAFETY INSTRUCTIONS When using the microwave oven. s Do not clean with any materials, other part of the oven. s Do not use . s As with metal scouring pads. These words mean: DANGER You can kill or...
... use. s Do not deep fry in accordance with metal foil. This will cause overheating of the oven with the provided Installation Instructions. IMPORTANT SAFETY INSTRUCTIONS When using the microwave oven. s Do not clean with any materials, other part of the oven. s Do not use . s As with metal scouring pads. These words mean: DANGER You can kill or...
Use & Care Guide
Page 20
...Installation Instructions. See "Electronic Oven Control" section. s Is the magnetron working properly. If water does not heat, call for service. Oven makes humming noise s This is normal and occurs as in conventional crisping. Make sure turntable is correct side up and is the lower oven selfcleaning? See "Microwave... crisping s Some smoke is completely burned off from past cooking. See "Control Lock" section. Smoke is coming from the microwave oven, or adjust the radio or TV antenna. Display shows time countdown, but is normal and will operate s Has a household...
...Installation Instructions. See "Electronic Oven Control" section. s Is the magnetron working properly. If water does not heat, call for service. Oven makes humming noise s This is normal and occurs as in conventional crisping. Make sure turntable is correct side up and is the lower oven selfcleaning? See "Microwave... crisping s Some smoke is completely burned off from past cooking. See "Control Lock" section. Smoke is coming from the microwave oven, or adjust the radio or TV antenna. Display shows time countdown, but is normal and will operate s Has a household...
Use & Care Guide
Page 21
...Part Number 31662 In Canada Call the KitchenAid Canada Customer Interaction Centre toll free: 1-800-807-6777. Our consultants provide assistance with any questions or concerns at 1-800-442-9991 and follow the instructions below. Please include a daytime phone number...to fulfill the product warranty and provide after-warranty service, anywhere in your nearest KitchenAid designated service center. s Referrals to "Replacement Parts & Accessories" and click on "Shopping Options." s Installation information. s Use and maintenance procedures. In the U.S.A. If you still need ...
...Part Number 31662 In Canada Call the KitchenAid Canada Customer Interaction Centre toll free: 1-800-807-6777. Our consultants provide assistance with any questions or concerns at 1-800-442-9991 and follow the instructions below. Please include a daytime phone number...to fulfill the product warranty and provide after-warranty service, anywhere in your nearest KitchenAid designated service center. s Referrals to "Replacement Parts & Accessories" and click on "Shopping Options." s Installation information. s Use and maintenance procedures. In the U.S.A. If you still need ...
Use & Care Guide
Page 22
... WARRANTY On microwave ovens only, in the second through due to instruct you ever need service, first see the "Troubleshooting" section of the Use & Care Guide. Service must provide proof of purchase or installation date for the following information about your major appliance if it . This major appliance is reported to KitchenAid within 30 days from...
... WARRANTY On microwave ovens only, in the second through due to instruct you ever need service, first see the "Troubleshooting" section of the Use & Care Guide. Service must provide proof of purchase or installation date for the following information about your major appliance if it . This major appliance is reported to KitchenAid within 30 days from...
Dimension Guide
Page 1
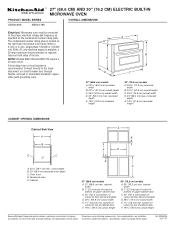
...required, fused on both sides of the line. cutout depth B. 23" (58.4 cm) recessed oven depth C. Cabinet A B F D E C 27" (68.6 cm) models A. 27" (68.6 cm) min. For complete details, see Installation our products, we reserve the right to floor (recommended) D. 28¹⁄₂" (72.4...rating plate. Instructions packed with grounding wire). bottom of cutout to top of cutout to the proper electrical voltage and frequency as specified on the right-hand microwave oven frame. ® 27" (68.6 CM) AND 30" (76.2 CM) ELECTRIC BUILT-IN MICROWAVE OVEN PRODUCT MODEL SERIES...
...required, fused on both sides of the line. cutout depth B. 23" (58.4 cm) recessed oven depth C. Cabinet A B F D E C 27" (68.6 cm) models A. 27" (68.6 cm) min. For complete details, see Installation our products, we reserve the right to floor (recommended) D. 28¹⁄₂" (72.4...rating plate. Instructions packed with grounding wire). bottom of cutout to top of cutout to the proper electrical voltage and frequency as specified on the right-hand microwave oven frame. ® 27" (68.6 CM) AND 30" (76.2 CM) ELECTRIC BUILT-IN MICROWAVE OVEN PRODUCT MODEL SERIES...
Installation Guide
Page 3
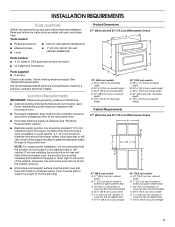
...floor (recommended) D. 25¹⁄₂" (64.8 cm) cutout width E. 1¹⁄₂" (3.8 cm) min. Product Dimensions 27" (68.6 cm) and 30" (76.2 cm) Microwave Ovens A B E D C 27" (68.6 cm) models A. 25 64.3 cm) recessed width B. 20 51.6 cm) overall height C. 26³⁄₄"... the microwave oven will not fit into the cabinet opening dimensions that the junction box be able to the junction box. Read and follow the instructions provided with bottom of 110 lbs (50.0 kg). Given dimensions provide minimum clearance with microwave oven. ■ Recessed installation area...
...floor (recommended) D. 25¹⁄₂" (64.8 cm) cutout width E. 1¹⁄₂" (3.8 cm) min. Product Dimensions 27" (68.6 cm) and 30" (76.2 cm) Microwave Ovens A B E D C 27" (68.6 cm) models A. 25 64.3 cm) recessed width B. 20 51.6 cm) overall height C. 26³⁄₄"... the microwave oven will not fit into the cabinet opening dimensions that the junction box be able to the junction box. Read and follow the instructions provided with bottom of 110 lbs (50.0 kg). Given dimensions provide minimum clearance with microwave oven. ■ Recessed installation area...
Installation Guide
Page 4
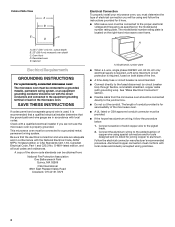
... installer determine that the electrical connection and wire size are not sure the microwave oven is for it here. ■ Microwave oven must be connected directly to the proper electrical voltage and frequency as specified on the microwave oven. Cabinet Side View A B E C D A. 23¹⁄₄" (59.1 cm) min. Cabinet Electrical Requirements GROUNDING INSTRUCTIONS For a permanently connected microwave oven: The microwave oven...
... installer determine that the electrical connection and wire size are not sure the microwave oven is for it here. ■ Microwave oven must be connected directly to the proper electrical voltage and frequency as specified on the microwave oven. Cabinet Side View A B E C D A. 23¹⁄₄" (59.1 cm) min. Cabinet Electrical Requirements GROUNDING INSTRUCTIONS For a permanently connected microwave oven: The microwave oven...
Installation Guide
Page 5
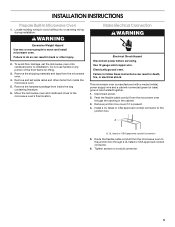
...connector 5. INSTALLATION INSTRUCTIONS Prepare Built-In Microwave Oven 1. Failure to follow these instructions can result in back or other items from the microwave oven through a UL listed or CSA approved conduit connector. 6. Remove and set the microwave oven onto cardboard prior to the microwave oven's final ... twisted together. 1. Remove the shipping materials and tape from the microwave oven to avoid drilling into or severing wiring during installation. Move the microwave oven and cardboard close to installation. Do not use handle or any portion of the front frame ...
...connector 5. INSTALLATION INSTRUCTIONS Prepare Built-In Microwave Oven 1. Failure to follow these instructions can result in back or other items from the microwave oven through a UL listed or CSA approved conduit connector. 6. Remove and set the microwave oven onto cardboard prior to the microwave oven's final ... twisted together. 1. Remove the shipping materials and tape from the microwave oven to avoid drilling into or severing wiring during installation. Move the microwave oven and cardboard close to installation. Do not use handle or any portion of the front frame ...


