Use & Care Guide
Page 22
...from defects in materials or workmanship and is reported to KitchenAid within 30 days from warranty coverage. 3. DISCLAIMER OF IMPLIED WARRANTIES;...installation date for product service if your authorized KitchenAid dealer to repair or replace appliance light bulbs, air filters or water filters. Write down the following components if defective in materials or workmanship: ■ Electric element ■ Solid state touch control system parts SECOND THROUGH TENTH YEAR LIMITED WARRANTY On microwave ovens...Guide. KITCHENAID SHALL NOT BE LIABLE FOR INCIDENTAL OR CONSEQUENTIAL DAMAGES.
...from defects in materials or workmanship and is reported to KitchenAid within 30 days from warranty coverage. 3. DISCLAIMER OF IMPLIED WARRANTIES;...installation date for product service if your authorized KitchenAid dealer to repair or replace appliance light bulbs, air filters or water filters. Write down the following components if defective in materials or workmanship: ■ Electric element ■ Solid state touch control system parts SECOND THROUGH TENTH YEAR LIMITED WARRANTY On microwave ovens...Guide. KITCHENAID SHALL NOT BE LIABLE FOR INCIDENTAL OR CONSEQUENTIAL DAMAGES.
Installation Guide
Page 6
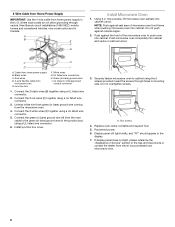
...panel will light briefly, and "PF" should appear in the U.S. Black wires C. A B E F G Install Microwave Oven 1. Connect the 2 red wires (C) together using the 2 screws provided. A. Securely fasten microwave oven to cabinet using a UL listed wire connector. 3. Reconnect power. 6. 4-Wire Cable from Home Power Supply IMPORTANT...: Use the 4-wire cable from home power supply in the display. 7. Do not push against seal area of the Use and Care Guide or...
...panel will light briefly, and "PF" should appear in the U.S. Black wires C. A B E F G Install Microwave Oven 1. Connect the 2 red wires (C) together using the 2 screws provided. A. Securely fasten microwave oven to cabinet using a UL listed wire connector. 3. Reconnect power. 6. 4-Wire Cable from Home Power Supply IMPORTANT...: Use the 4-wire cable from home power supply in the display. 7. Do not push against seal area of the Use and Care Guide or...
Installation Guide
Page 7
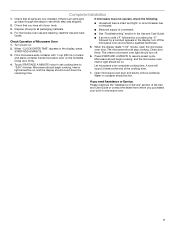
... A MINUTE to resume preset cycle. Complete Installation 1. Check that you purchased your tools. For microwave oven use and cleaning, read the Use and Care Guide. Check Operation of the cooking time. 7. Close door firmly. 4. The microwave should be hot. Microwave should begin cooking, interior light should stop cooking. Let microwave oven complete cooking time. Water in the display...
... A MINUTE to resume preset cycle. Complete Installation 1. Check that you purchased your tools. For microwave oven use and cleaning, read the Use and Care Guide. Check Operation of the cooking time. 7. Close door firmly. 4. The microwave should be hot. Microwave should begin cooking, interior light should stop cooking. Let microwave oven complete cooking time. Water in the display...


