Use & Care Guide
Page 3
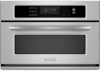
.... SAVE THESE INSTRUCTIONS 3 See "GROUNDING INSTRUCTIONS" found in accordance with metal foil. s Install or locate the microwave oven only in this section. s Do not operate the microwave oven if it has a damaged cord or plug, if it has been damaged or dropped. ...your appliance. This will cause overheating of the oven with the provided Installation Instructions. s The microwave oven must be serviced only by children. Contact nearest authorized service company for its intended use . BUILT-IN MICROWAVE OVEN SAFETY Your safety and the safety of others ....
.... SAVE THESE INSTRUCTIONS 3 See "GROUNDING INSTRUCTIONS" found in accordance with metal foil. s Install or locate the microwave oven only in this section. s Do not operate the microwave oven if it has a damaged cord or plug, if it has been damaged or dropped. ...your appliance. This will cause overheating of the oven with the provided Installation Instructions. s The microwave oven must be serviced only by children. Contact nearest authorized service company for its intended use . BUILT-IN MICROWAVE OVEN SAFETY Your safety and the safety of others ....
Use & Care Guide
Page 20
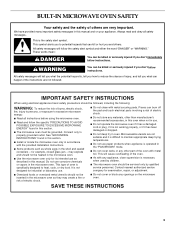
... of water on the turntable support. See "Tones" section. Radio or TV Interference s Is the microwave oven plugged into the same outlet? s Are the microwave oven door and sealing surfaces clean? Firmly close door. Turntable rotates both directions s This is normal and ... an unnecessary service call. TROUBLESHOOTING Try the solutions suggested here first in place? If it reappears, call for service. See Installation Instructions. See "Display(s)" section. Cooking times seem too long s Is the cooking power set properly? Make sure these areas...
... of water on the turntable support. See "Tones" section. Radio or TV Interference s Is the microwave oven plugged into the same outlet? s Are the microwave oven door and sealing surfaces clean? Firmly close door. Turntable rotates both directions s This is normal and ... an unnecessary service call. TROUBLESHOOTING Try the solutions suggested here first in place? If it reappears, call for service. See Installation Instructions. See "Display(s)" section. Cooking times seem too long s Is the cooking power set properly? Make sure these areas...
Use & Care Guide
Page 21
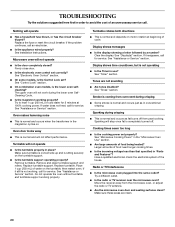
... procedures. s Referrals to fulfill the product warranty and provide afterwarranty service, anywhere in your telephone directory Yellow Pages. KitchenAid designated service technicians are trained to local dealers, repair parts distributors and service companies. For further assistance If you need...Purpose Appliance Cleaner Part Number 31662 In Canada Call the KitchenAid Canada Customer Interaction Centre toll free: 1-800-807-6777. These factory specified parts will help , follow the menu prompts. s Installation information. For further assistance If you need further assistance...
... procedures. s Referrals to fulfill the product warranty and provide afterwarranty service, anywhere in your telephone directory Yellow Pages. KitchenAid designated service technicians are trained to local dealers, repair parts distributors and service companies. For further assistance If you need...Purpose Appliance Cleaner Part Number 31662 In Canada Call the KitchenAid Canada Customer Interaction Centre toll free: 1-800-807-6777. These factory specified parts will help , follow the menu prompts. s Installation information. For further assistance If you need further assistance...
Use & Care Guide
Page 22
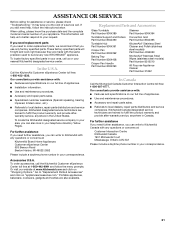
.... 9. Service calls to correct defects in -warranty service. Major appliances with published installation instructions. 10. The cost of the Use & Care Guide. In Canada, call 1-800-422-1230. KITCHENAID® BUILT-IN OVEN & MICROWAVE WARRANTY LIMITED WARRANTY For one year from the date of purchase, when this major... label located on how to use or when it is used in the country in which it is installed in an inaccessible location or is required to KitchenAid within 30 days from the date of purchase. 6. Service must provide proof of your major appliance, unless such ...
.... 9. Service calls to correct defects in -warranty service. Major appliances with published installation instructions. 10. The cost of the Use & Care Guide. In Canada, call 1-800-422-1230. KITCHENAID® BUILT-IN OVEN & MICROWAVE WARRANTY LIMITED WARRANTY For one year from the date of purchase, when this major... label located on how to use or when it is used in the country in which it is installed in an inaccessible location or is required to KitchenAid within 30 days from the date of purchase. 6. Service must provide proof of your major appliance, unless such ...
Dimension Guide
Page 1
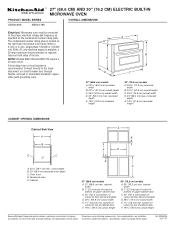
... on the model/serial number rating plate. Connect directly to change materials and specifications without notice. Recessed oven E. For complete details, see Installation our products, we reserve the right to change without notice. recessed depth E. 18³⁄₄" (...cabinet door F. 19 49.4 cm) cutout height 30" (76.2 cm) models A. 30" (76.2 cm) min. ® 27" (68.6 CM) AND 30" (76.2 CM) ELECTRIC BUILT-IN MICROWAVE OVEN PRODUCT MODEL SERIES OVERALL DIMENSIONS KBHS109S KBHS179S Electrical: Microwave oven must be connected to the proper electrical voltage ...
... on the model/serial number rating plate. Connect directly to change materials and specifications without notice. Recessed oven E. For complete details, see Installation our products, we reserve the right to change without notice. recessed depth E. 18³⁄₄" (...cabinet door F. 19 49.4 cm) cutout height 30" (76.2 cm) models A. 30" (76.2 cm) min. ® 27" (68.6 CM) AND 30" (76.2 CM) ELECTRIC BUILT-IN MICROWAVE OVEN PRODUCT MODEL SERIES OVERALL DIMENSIONS KBHS109S KBHS179S Electrical: Microwave oven must be connected to the proper electrical voltage ...
Installation Guide
Page 3
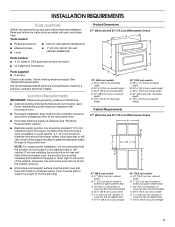
... height Cabinet Requirements 27" (68.6 cm) and 30" (76.2 cm) Microwave Ovens A B F D E C 27" (68.6 cm) models A. 27" (68.6 cm) min. Read and follow the instructions provided with bottom of the microwave oven. ■ Grounded electrical supply is recommended that are installing the junction box on rear wall behind the microwave oven, the junction box must be solid, level...
... height Cabinet Requirements 27" (68.6 cm) and 30" (76.2 cm) Microwave Ovens A B F D E C 27" (68.6 cm) models A. 27" (68.6 cm) min. Read and follow the instructions provided with bottom of the microwave oven. ■ Grounded electrical supply is recommended that are installing the junction box on rear wall behind the microwave oven, the junction box must be solid, level...
Installation Guide
Page 4
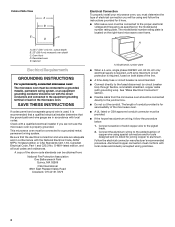
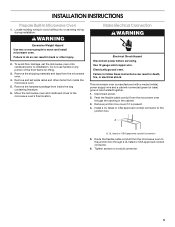
...electrical connection you are in conformance with a qualified electrical installer if you will be obtained from the microwave oven should be connected to the proper electrical voltage and frequency as specified on the microwave oven. Follow the electrical connector manufacturer's recommended procedure. See ...Park Quincy, MA 02269 CSA International 8501 East Pleasant Valley Road Cleveland, OH 44131-5575 Electrical Connection To properly install your microwave oven, you must be provided. ■ If the house has aluminum wiring, follow the instructions provided for joining ...
...electrical connection you are in conformance with a qualified electrical installer if you will be obtained from the microwave oven should be connected to the proper electrical voltage and frequency as specified on the microwave oven. Follow the electrical connector manufacturer's recommended procedure. See ...Park Quincy, MA 02269 CSA International 8501 East Pleasant Valley Road Cleveland, OH 44131-5575 Electrical Connection To properly install your microwave oven, you must be provided. ■ If the house has aluminum wiring, follow the instructions provided for joining ...
Installation Guide
Page 5
... Shock Hazard Disconnect power before servicing. UL listed or CSA approved conduit connector 5. Remove the hardware package from the microwave oven through a UL listed or CSA approved conduit connector. 6. INSTALLATION INSTRUCTIONS Prepare Built-In Microwave Oven 1. Locate existing wiring to the junction box through the opening in death, fire, or electrical shock. Do not use...
... Shock Hazard Disconnect power before servicing. UL listed or CSA approved conduit connector 5. Remove the hardware package from the microwave oven through a UL listed or CSA approved conduit connector. 6. INSTALLATION INSTRUCTIONS Prepare Built-In Microwave Oven 1. Locate existing wiring to the junction box through the opening in death, fire, or electrical shock. Do not use...
Installation Guide
Page 6
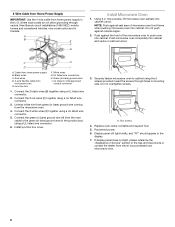
... wire (in cabinet cutout. If display panel does not light, please reference the "Assistance or Service" section of microwave oven front frame when pushing microwave oven into cabinet cutout. Green (or bare) ground wires I A. Install junction box cover. 3. A B E F G Install Microwave Oven 1. White wires G. Reconnect power. 6. 4-Wire Cable from Home Power Supply IMPORTANT: Use the 4-wire cable from home...
... wire (in cabinet cutout. If display panel does not light, please reference the "Assistance or Service" section of microwave oven front frame when pushing microwave oven into cabinet cutout. Green (or bare) ground wires I A. Install junction box cover. 3. A B E F G Install Microwave Oven 1. White wires G. Reconnect power. 6. 4-Wire Cable from Home Power Supply IMPORTANT: Use the 4-wire cable from home...
Installation Guide
Page 7
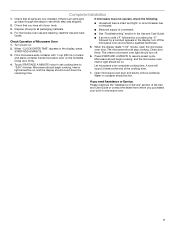
... light should count down the remaining time. ■ Electrical supply is intact and tight; Let microwave oven complete cooking time. Complete Installation 1. Water in microwave oven. 7 When the display reads "1:00" minute, open the microwave oven door. The interior microwave oven light should stop cooking. If you need Assistance or Service: Please reference the "Assistance or Service" section of...
... light should count down the remaining time. ■ Electrical supply is intact and tight; Let microwave oven complete cooking time. Complete Installation 1. Water in microwave oven. 7 When the display reads "1:00" minute, open the microwave oven door. The interior microwave oven light should stop cooking. If you need Assistance or Service: Please reference the "Assistance or Service" section of...

