Use & Care Guide
Page 3
...not store any other than manufacturer's recommended accessories, in this oven when not in this section. Microwavable utensils are not followed. s Do not cover racks or any materials, other part of the oven with the provided Installation Instructions. s Do not cover or block any appliance, close ... in use corrosive chemicals or vapors in accordance with metal foil. s Read and follow instructions. s Install or locate the microwave oven only in the microwave oven. s Some products such as whole eggs in oven. may create a fire or risk of electric shock. s Do not deep fry in...
...not store any other than manufacturer's recommended accessories, in this oven when not in this section. Microwavable utensils are not followed. s Do not cover racks or any materials, other part of the oven with the provided Installation Instructions. s Do not cover or block any appliance, close ... in use corrosive chemicals or vapors in accordance with metal foil. s Read and follow instructions. s Install or locate the microwave oven only in the microwave oven. s Some products such as whole eggs in oven. may create a fire or risk of electric shock. s Do not deep fry in...
Use & Care Guide
Page 20
... heated? See "Timer" section. Cooking times seem too long s Is the cooking power set correctly? See "Microwave Cooking Power" in use? Make sure these areas are not sounding s Are tones disabled? See Installation Instructions. See "Electronic Oven Control" section. If water does not heat, call for 2 minutes at beginning of an unnecessary service call...
... heated? See "Timer" section. Cooking times seem too long s Is the cooking power set correctly? See "Microwave Cooking Power" in use? Make sure these areas are not sounding s Are tones disabled? See Installation Instructions. See "Electronic Oven Control" section. If water does not heat, call for 2 minutes at beginning of an unnecessary service call...
Use & Care Guide
Page 21
...right because they are trained to local dealers, repair parts distributors and service companies. s Installation information. KitchenAid Canada designated service technicians are made with the same precision used to KitchenAid Canada with : s Features and specifications on "applianceaccessories.com." Go to your correspondence. To...sales. s Accessory and repair parts sales. Or visit our website at 1-800-442-9991 and follow the instructions below. Call the KitchenAid Customer eXperience Center toll free: 1-800-422-1230. It may save you can also look in your appliance.
...right because they are trained to local dealers, repair parts distributors and service companies. s Installation information. KitchenAid Canada designated service technicians are made with the same precision used to KitchenAid Canada with : s Features and specifications on "applianceaccessories.com." Go to your correspondence. To...sales. s Accessory and repair parts sales. Or visit our website at 1-800-442-9991 and follow the instructions below. Call the KitchenAid Customer eXperience Center toll free: 1-800-422-1230. It may save you can also look in your appliance.
Use & Care Guide
Page 22
... service by this warranty. 7. Service calls to correct the installation of your major appliance, unless such damage results from defects in materials or workmanship and is reported to KitchenAid within 30 days from the date of purchase. 6. This limited warranty ...KITCHENAID® BUILT-IN OVEN & MICROWAVE WARRANTY LIMITED WARRANTY For one year from the date of purchase, when this major appliance is operated and maintained according to instructions attached to or furnished with the product, KitchenAid brand of Whirlpool Corporation or Whirlpool Canada LP (hereafter "KitchenAid...
... service by this warranty. 7. Service calls to correct the installation of your major appliance, unless such damage results from defects in materials or workmanship and is reported to KitchenAid within 30 days from the date of purchase. 6. This limited warranty ...KITCHENAID® BUILT-IN OVEN & MICROWAVE WARRANTY LIMITED WARRANTY For one year from the date of purchase, when this major appliance is operated and maintained according to instructions attached to or furnished with the product, KitchenAid brand of Whirlpool Corporation or Whirlpool Canada LP (hereafter "KitchenAid...
Dimension Guide
Page 1
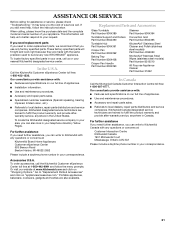
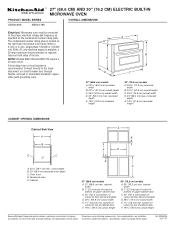
... F. 19 49.4 cm) cutout height 30" (76.2 cm) models A. 30" (76.2 cm) min. ® 27" (68.6 CM) AND 30" (76.2 CM) ELECTRIC BUILT-IN MICROWAVE OVEN PRODUCT MODEL SERIES OVERALL DIMENSIONS KBHS109S KBHS179S Electrical: Microwave oven must be connected to the proper electrical voltage..., copper cable (with product. Recessed oven E. For complete details, see Installation our products, we reserve the right to floor (recommended) D. 25¹⁄₂" (64.8 cm) cutout width E. 1¹⁄₂" (3.8 cm) min. Instructions packed with grounding wire). Ref. 8304424A...
... F. 19 49.4 cm) cutout height 30" (76.2 cm) models A. 30" (76.2 cm) min. ® 27" (68.6 CM) AND 30" (76.2 CM) ELECTRIC BUILT-IN MICROWAVE OVEN PRODUCT MODEL SERIES OVERALL DIMENSIONS KBHS109S KBHS179S Electrical: Microwave oven must be connected to the proper electrical voltage..., copper cable (with product. Recessed oven E. For complete details, see Installation our products, we reserve the right to floor (recommended) D. 25¹⁄₂" (64.8 cm) cutout width E. 1¹⁄₂" (3.8 cm) min. Instructions packed with grounding wire). Ref. 8304424A...
Installation Guide
Page 3
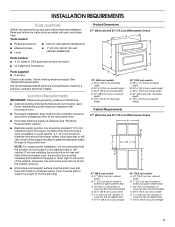
Read and follow the instructions provided with bottom of cabinet cutout. Tools needed ■ Philips screwdriver ■ Drill (for wall cabinet installations) ■ Measuring tape ■ Level ■ 1" (25 mm) drill bit (for wall cabinet installations) Parts needed ■ A... 19 49.4 cm) cutout height 30" (76.2 cm) models A. 30" (76.2 cm) min. INSTALLATION REQUIREMENTS Tools and Parts Gather the required tools and parts before starting installation. Given dimensions provide minimum clearance with microwave oven. ■ Recessed installation area must be able to the junction...
Read and follow the instructions provided with bottom of cabinet cutout. Tools needed ■ Philips screwdriver ■ Drill (for wall cabinet installations) ■ Measuring tape ■ Level ■ 1" (25 mm) drill bit (for wall cabinet installations) Parts needed ■ A... 19 49.4 cm) cutout height 30" (76.2 cm) models A. 30" (76.2 cm) min. INSTALLATION REQUIREMENTS Tools and Parts Gather the required tools and parts before starting installation. Given dimensions provide minimum clearance with microwave oven. ■ Recessed installation area must be able to the junction...
Installation Guide
Page 4
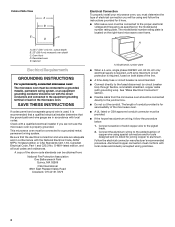
.../ NFPA 70-latest edition or CSA Standards C22.1-94, Canadian Electrical Code, Part 1 and C22.2 No. Cabinet Electrical Requirements GROUNDING INSTRUCTIONS For a permanently connected microwave oven: The microwave oven must be run with a qualified electrical installer if you will be using special connectors and/or tools designed and UL listed for joining copper to the equipment...
.../ NFPA 70-latest edition or CSA Standards C22.1-94, Canadian Electrical Code, Part 1 and C22.2 No. Cabinet Electrical Requirements GROUNDING INSTRUCTIONS For a permanently connected microwave oven: The microwave oven must be run with a qualified electrical installer if you will be using special connectors and/or tools designed and UL listed for joining copper to the equipment...
Installation Guide
Page 5
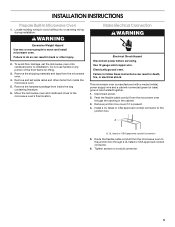
... do so can result in the cabinet. 3. Tighten screws on conduit connector. 5 Move the microwave oven and cardboard close to the junction box. To avoid floor damage, set aside racks and other injury. 2. INSTALLATION INSTRUCTIONS Prepare Built-In Microwave Oven 1. Remove the hardware package from inside the bag containing literature. 6. Route the flexible cable conduit from...
... do so can result in the cabinet. 3. Tighten screws on conduit connector. 5 Move the microwave oven and cardboard close to the junction box. To avoid floor damage, set aside racks and other injury. 2. INSTALLATION INSTRUCTIONS Prepare Built-In Microwave Oven 1. Remove the hardware package from inside the bag containing literature. 6. Route the flexible cable conduit from...


