
User Manual
Page 1
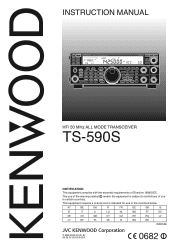
INSTRUCTION MANUAL HF/ 50 MHz ALL MODE TRANSCEIVER TS-590S NOTIFICATION This equipment complies with the essential requirements of use in certain countries. This equipment requires a licence and is subject to restrictions of Directive 1999/5/EC. AT BE DK FI FR DE GR IS IE IT LI LU NL NO PT ES SE CH GB CY CZ EE HU LV LT MT PL SK SI BG RO ISO3166 © B62-2243-30 (K, E) 09 08 07 06 05 04 03 The use of the warning symbol means the equipment is intended for use in the countries below.
INSTRUCTION MANUAL HF/ 50 MHz ALL MODE TRANSCEIVER TS-590S NOTIFICATION This equipment complies with the essential requirements of use in certain countries. This equipment requires a licence and is subject to restrictions of Directive 1999/5/EC. AT BE DK FI FR DE GR IS IE IT LI LU NL NO PT ES SE CH GB CY CZ EE HU LV LT MT PL SK SI BG RO ISO3166 © B62-2243-30 (K, E) 09 08 07 06 05 04 03 The use of the warning symbol means the equipment is intended for use in the countries below.
User Manual
Page 3
... port (B-type) • Drive output and RX only antenna connector • Direct band keys • Built-in the instruction manual. Confirm your car manufacturer and amateur radio equipment dealer for information on Disposal of handling these items and their waste byproducts. MARKET ...and QRN. This equipment generates, uses and can be disposed as a reference in locating a recycle facility nearest to operate this Kenwood TS-590S transceiver. Depending on a circuit different from the designers. Refer to process IF and AF signals. Information on the available operating ...
... port (B-type) • Drive output and RX only antenna connector • Direct band keys • Built-in the instruction manual. Confirm your car manufacturer and amateur radio equipment dealer for information on Disposal of handling these items and their waste byproducts. MARKET ...and QRN. This equipment generates, uses and can be disposed as a reference in locating a recycle facility nearest to operate this Kenwood TS-590S transceiver. Depending on a circuit different from the designers. Refer to process IF and AF signals. Information on the available operating ...
User Manual
Page 4
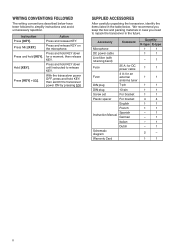
... [KEY]. for an external 1 1 antenna tuner DIN plug 7-pin 1 1 DIN plug 13-pin 1 1 Screw set For bracket 1 1 Plastic spacer For bracket 4 4 English 1 1 French 1 1 Spanish Instruction Manual German - 1 - 1 Italian - 1 Dutch - 1 Schematic diagram 2 - Press and hold KEY, then switch the transceiver power ON by pressing [ ]. Press and hold KEY down until instructed to...
... [KEY]. for an external 1 1 antenna tuner DIN plug 7-pin 1 1 DIN plug 13-pin 1 1 Screw set For bracket 1 1 Plastic spacer For bracket 4 4 English 1 1 French 1 1 Spanish Instruction Manual German - 1 - 1 Italian - 1 Dutch - 1 Schematic diagram 2 - Press and hold KEY, then switch the transceiver power ON by pressing [ ]. Press and hold KEY down until instructed to...
User Manual
Page 5
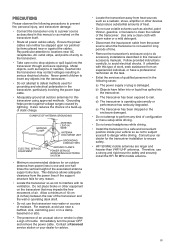
... configuration or menu setup while driving. • Do not wear headphones while driving. • Install the transceiver in this manual or accessory manuals. Consult your dealer for advice. • Locate the transceiver away from the power lines if the support structure fails for ... drop objects or spill liquid into the transceiver. Allow a minimum of 10 cm (4 inches) between the rear of trouble. Contact a Kenwood service station or your car dealer for grounding and electrical polarization in serious electrical shocks. c) The transceiver has been exposed to avoid electrical...
... configuration or menu setup while driving. • Do not wear headphones while driving. • Install the transceiver in this manual or accessory manuals. Consult your dealer for advice. • Locate the transceiver away from the power lines if the support structure fails for ... drop objects or spill liquid into the transceiver. Allow a minimum of 10 cm (4 inches) between the rear of trouble. Contact a Kenwood service station or your car dealer for grounding and electrical polarization in serious electrical shocks. c) The transceiver has been exposed to avoid electrical...
User Manual
Page 7
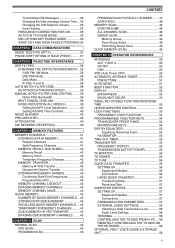
...FM/ AM Mode 38 CW/ FSK Mode 38 Data Mode 38 IF Filter A and B 38 AUTO NOTCH FILTER (SSB 39 AUTO NOTCH TRACKING SPEED 39 MANUAL NOTCH FILTER (SSB/ CW/ FSK)......... 39 Notch Filter Bandwidth 39 BEAT CANCEL (SSB/ AM 39 NOISE REDUCTION (ALL MODES 39 Setting the NR1 Level Adjustment...Equipment Needed 57 Connections 57 COMMUNICATION PARAMETERS 57 EXTERNAL AUDIO SETTINGS 58 Selecting a Data Transmission Line 58 Audio Level Settings 58 TERMINAL 58 CONTROLLING THE TS-590S FROM A PC .... 58 REMOTELY CONTROLLING THE TS-590S ON THE NETWORK 58 OPTIONAL VGS-1 VOICE GUIDE & STORAGE UNIT 58 v
...FM/ AM Mode 38 CW/ FSK Mode 38 Data Mode 38 IF Filter A and B 38 AUTO NOTCH FILTER (SSB 39 AUTO NOTCH TRACKING SPEED 39 MANUAL NOTCH FILTER (SSB/ CW/ FSK)......... 39 Notch Filter Bandwidth 39 BEAT CANCEL (SSB/ AM 39 NOISE REDUCTION (ALL MODES 39 Setting the NR1 Level Adjustment...Equipment Needed 57 Connections 57 COMMUNICATION PARAMETERS 57 EXTERNAL AUDIO SETTINGS 58 Selecting a Data Transmission Line 58 Audio Level Settings 58 TERMINAL 58 CONTROLLING THE TS-590S FROM A PC .... 58 REMOTELY CONTROLLING THE TS-590S ON THE NETWORK 58 OPTIONAL VGS-1 VOICE GUIDE & STORAGE UNIT 58 v

User Manual
Page 15
... {page 42}. Appears while in Menu mode {page 14}. Appears when the Noise Blanker 1 or 2 is ON {page 28}. " " appears when Manual Notch is set to Normal. Appears when the MHz Step function is ON {page 40}. " " or " " appears, depending on whether DSP Noise... While adjusting the IF filter bandwidth, the meter displays an adjustment state. -- Appears when the receiver pre-amplifier is selected {page 39}. " " appears when manual notch is set to Wide. " " appears when Auto Notch is ON {page 40}. " " appears when the Cross Tone function is ON {page 32...
... {page 42}. Appears while in Menu mode {page 14}. Appears when the Noise Blanker 1 or 2 is ON {page 28}. " " appears when Manual Notch is set to Normal. Appears when the MHz Step function is ON {page 40}. " " or " " appears, depending on whether DSP Noise... While adjusting the IF filter bandwidth, the meter displays an adjustment state. -- Appears when the receiver pre-amplifier is selected {page 39}. " " appears when manual notch is set to Wide. " " appears when Auto Notch is ON {page 40}. " " appears when the Cross Tone function is ON {page 32...
User Manual
Page 17
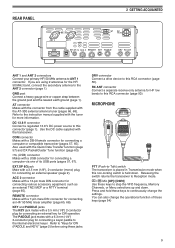
... {pages 57, 67}. COM connector Mates with a 13-pin male DIN connector for connecting a computer or compatible transceiver {pages 57, 65}. Refer to the instruction manual supplied with the transceiver. Refer to "Keys for CW (PADDLE and KEY)" {page 2} before using 2 antennas for more information. Use the DC cable supplied with...
... {pages 57, 67}. COM connector Mates with a 13-pin male DIN connector for connecting a computer or compatible transceiver {pages 57, 65}. Refer to the instruction manual supplied with the transceiver. Refer to "Keys for CW (PADDLE and KEY)" {page 2} before using 2 antennas for more information. Use the DC cable supplied with...

User Manual
Page 34
... mode has been selected on the VFO(s) {page 10}. • When using the same CTCSS tone. Freq. (Hz) No. You cannot transmit 1750 Hz tone manually. Note: Received signals are using [28 (9)] or [50 (0)]. 3 Select the desired frequency with the CTCSS function. ■ Selecting a Tone Frequency 1 While " " appears (Tone function is...
... mode has been selected on the VFO(s) {page 10}. • When using the same CTCSS tone. Freq. (Hz) No. You cannot transmit 1750 Hz tone manually. Note: Received signals are using [28 (9)] or [50 (0)]. 3 Select the desired frequency with the CTCSS function. ■ Selecting a Tone Frequency 1 While " " appears (Tone function is...
User Manual
Page 38
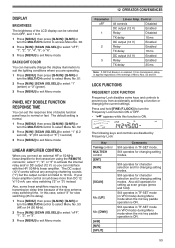
...ms) in steps of 5, or OFF. 5 Press [CLR] to store the parameter and exit the setting mode. ■ Anti-VOX Adjustment The TS-590S transceiver has a DSP IC to the sounds emitted from 0 to 9. • The setting should not allow the transceiver to drop back to detect ... 69. 3 Press [M.IN] to properly adjust the VOX gain. 7 COMMUNICATING AIDS TRANSMISSION VOX (VOICE-OPERATED TRANSMISSION) VOX eliminates the necessity of manually switching to the transmission mode each time you speak. • The selectable gain range is from the sound source. The transceiver automatically switches to ...
...ms) in steps of 5, or OFF. 5 Press [CLR] to store the parameter and exit the setting mode. ■ Anti-VOX Adjustment The TS-590S transceiver has a DSP IC to the sounds emitted from 0 to 9. • The setting should not allow the transceiver to drop back to detect ... 69. 3 Press [M.IN] to properly adjust the VOX gain. 7 COMMUNICATING AIDS TRANSMISSION VOX (VOICE-OPERATED TRANSMISSION) VOX eliminates the necessity of manually switching to the transmission mode each time you speak. • The selectable gain range is from the sound source. The transceiver automatically switches to ...
User Manual
Page 41
... [CLR] to send error-free CW that is enabled. 33 Selecting a speed that other station. 1 Press [CW/FSK (REV)] until you to transmit CW without manually switching between transmission and reception modes. The transceiver then returns to complete the setting. Mode A completes the current key sequence you are sending when you...
... [CLR] to send error-free CW that is enabled. 33 Selecting a speed that other station. 1 Press [CW/FSK (REV)] until you to transmit CW without manually switching between transmission and reception modes. The transceiver then returns to complete the setting. Mode A completes the current key sequence you are sending when you...
User Manual
Page 42
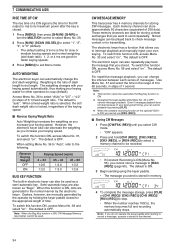
Semi-automatic keys are manually generated by the operator by holding the keyer paddle closed . 1 Press [MENU], then press [Q-M.IN]/ [Q-MR] or turn the MULTI/CH control to select Menu ...; If Constant Recording is ON, CW Message Memory (see below) cannot be played back to the following. Access Menu No. 36 to interrupt playback and manually inject your keying speed. The default is stored in the normal manner by pressing [CLR]. ◆ When the constant recording function of the optional VGS...
Semi-automatic keys are manually generated by the operator by holding the keyer paddle closed . 1 Press [MENU], then press [Q-M.IN]/ [Q-MR] or turn the MULTI/CH control to select Menu ...; If Constant Recording is ON, CW Message Memory (see below) cannot be played back to the following. Access Menu No. 36 to interrupt playback and manually inject your keying speed. The default is stored in the normal manner by pressing [CLR]. ◆ When the constant recording function of the optional VGS...
User Manual
Page 43
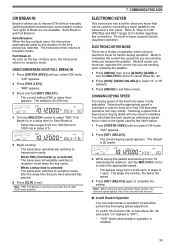
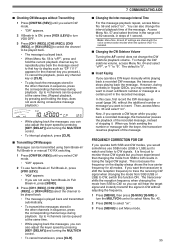
... monitor those CW signals but you want to "9". Note: Menu Nos. 56 and 57 settings are not using Semi Break-in/ Full Break-in or manual TX/ RX switching. 1 Press [CW/FSK (REV)] until you select CW mode. • "CW" appears. 2 If Break-in is ON, press [VOX (LEV)] to turn... this case, first record the CW message as "CP 1111" appears for all modes. Now, if you operate a CW keyer while you operate a CW keyer manually while playing back a recorded CW message, the transceiver stops playing back the message. If you may sometimes want the transceiver to shift the reception frequency...
... monitor those CW signals but you want to "9". Note: Menu Nos. 56 and 57 settings are not using Semi Break-in/ Full Break-in or manual TX/ RX switching. 1 Press [CW/FSK (REV)] until you select CW mode. • "CW" appears. 2 If Break-in is ON, press [VOX (LEV)] to turn... this case, first record the CW message as "CP 1111" appears for all modes. Now, if you operate a CW keyer while you operate a CW keyer manually while playing back a recorded CW message, the transceiver stops playing back the message. If you may sometimes want the transceiver to shift the reception frequency...
User Manual
Page 47
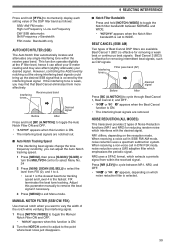
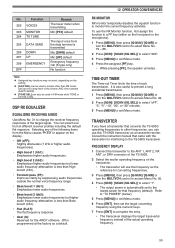
... toggle the Notch filter bandwidth between NR1, NR2, and OFF. • " " or " " appears, depending on the reception mode. MANUAL NOTCH FILTER (SSB/ CW/ FSK) Use manual notch when you want to vary the width of Beat Cancel DSP filters are removed. When receiving a voice call in SSB/ FM.../ AM) Two types of the notch while verifying the interfering signal. 1 Press [NOTCH (WIDE)] to toggle the Manual Notch Filter ON and OFF. • " " appears when this parameter manually to remove the beat signal if necessary. 3 Press [MENU] to exit Menu mode. If the interfering tone is ...
... toggle the Notch filter bandwidth between NR1, NR2, and OFF. • " " or " " appears, depending on the reception mode. MANUAL NOTCH FILTER (SSB/ CW/ FSK) Use manual notch when you want to vary the width of Beat Cancel DSP filters are removed. When receiving a voice call in SSB/ FM.../ AM) Two types of the notch while verifying the interfering signal. 1 Press [NOTCH (WIDE)] to toggle the Manual Notch Filter ON and OFF. • " " appears when this parameter manually to remove the beat signal if necessary. 3 Press [MENU] to exit Menu mode. If the interfering tone is ...
User Manual
Page 58
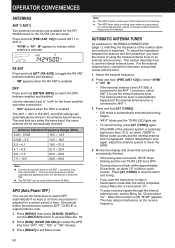
... want the transceiver to toggle the RX ANT between enabled and disabled. When this function is important. For the external antenna tuner, consult the instruction manual that tuning has successfully finished. • If the tuning was successful, " " stops blinking and the red TX-RX LED turns OFF. • If tuning does...
... want the transceiver to toggle the RX ANT between enabled and disabled. When this function is important. For the external antenna tuner, consult the instruction manual that tuning has successfully finished. • If the tuning was successful, " " stops blinking and the red TX-RX LED turns OFF. • If tuning does...
User Manual
Page 61
... "1", "2", or "3" to 10 mA. Press and hold ). The default setting is limited to activate the internal relay and/ or DC output (12 V) so you can manually change the display illumination to suit the lighting conditions where you from OFF, and 1 to 6 . 1 Press [MENU], then press [Q-M.IN]/ [Q-MR] or turn the MULTI...
... "1", "2", or "3" to 10 mA. Press and hold ). The default setting is limited to activate the internal relay and/ or DC output (12 V) so you can manually change the display illumination to suit the lighting conditions where you from OFF, and 1 to 6 . 1 Press [MENU], then press [Q-M.IN]/ [Q-MR] or turn the MULTI...
User Manual
Page 63
... of the target signal. It is ON, DSP RX EQUALIZER EQUALIZING RECEIVING AUDIO Use Menu No. 31 to the TS-590S transceiver. Consult the instruction manual that converts the TS-590S operating frequencies to other than Bass boost1 (bb1). • Flat (FLAT): The flat frequency response. •... Note: ◆ Assigned key functions may not work, depending on the transceiver. • The transverter will use this TS-590S transceiver as a transverter exciter. TRANSVERTER If you can use the RX Monitor function, first assign the function to monitor the current frequency activities...
... of the target signal. It is ON, DSP RX EQUALIZER EQUALIZING RECEIVING AUDIO Use Menu No. 31 to the TS-590S transceiver. Consult the instruction manual that converts the TS-590S operating frequencies to other than Bass boost1 (bb1). • Flat (FLAT): The flat frequency response. •... Note: ◆ Assigned key functions may not work, depending on the transceiver. • The transverter will use this TS-590S transceiver as a transverter exciter. TRANSVERTER If you can use the RX Monitor function, first assign the function to monitor the current frequency activities...
User Manual
Page 65
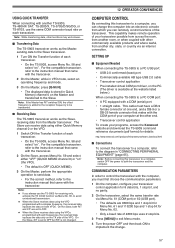
... perform the appropriate operation to send data. • For the correct method, refer to the instruction manual that came with other functions may work slower. ■ Transferring Data The TS-590S transceiver works as the Slave, receiving data from another city, state, or country via Menu No. ...transceiver to a computer, switch OFF the power to the instruction manual that came with split frequencies, the received data replaces the data only on the TX side of your programs, access the Kenwood website and download the TS-590S command reference documents (pdf format) for Menu No. 62. ...
... perform the appropriate operation to send data. • For the correct method, refer to the instruction manual that came with other functions may work slower. ■ Transferring Data The TS-590S transceiver works as the Slave, receiving data from another city, state, or country via Menu No. ...transceiver to a computer, switch OFF the power to the instruction manual that came with split frequencies, the received data replaces the data only on the TX side of your programs, access the Kenwood website and download the TS-590S command reference documents (pdf format) for Menu No. 62. ...
User Manual
Page 71
...-D72/ TM-D710/ RC-D710/ TM-D700, refer to their respective instruction manuals. CROSSBAND REPEATER If you have a Kenwood FM transceiver (K type) with the same frequency. the transmission is controlled by monitoring the squelch status only. Note: The firmware of the TS-590S transceiver remains unchanged. Note: ◆ RIT/XIT turns OFF automatically when...
...-D72/ TM-D710/ RC-D710/ TM-D700, refer to their respective instruction manuals. CROSSBAND REPEATER If you have a Kenwood FM transceiver (K type) with the same frequency. the transmission is controlled by monitoring the squelch status only. Note: The firmware of the TS-590S transceiver remains unchanged. Note: ◆ RIT/XIT turns OFF automatically when...

User Manual
Page 72
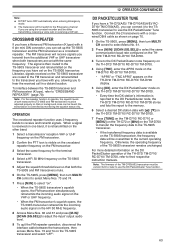
...RC-D710, or TM-D700A transceiver as a "Transporter" and connect all the necessary cables to the TS-590S transceiver. 2 Select a frequency (HF/ 50 MHz band) on how to the respective instruction manuals of Sky Command System II may not been permitted in your car, living room, or patio, instead ...of actually operating inside your TS-590S transceiver. SKY COMMAND SYSTEM II DIAGRAM VHF freq. Note: Operation of the ...
...RC-D710, or TM-D700A transceiver as a "Transporter" and connect all the necessary cables to the TS-590S transceiver. 2 Select a frequency (HF/ 50 MHz band) on how to the respective instruction manuals of Sky Command System II may not been permitted in your car, living room, or patio, instead ...of actually operating inside your TS-590S transceiver. SKY COMMAND SYSTEM II DIAGRAM VHF freq. Note: Operation of the ...
User Manual
Page 78
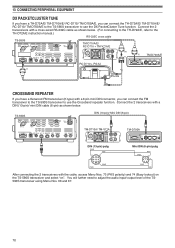
...) as shown below . 13 CONNECTING PERIPHERAL EQUIPMENT DX PACKETCLUSTER TUNE If you have a Kenwood FM transceiver (K type) with a 6 pin mini DIN connector, you can connect the FM transceiver to the TS-590S transceiver to use the DX PacketCluster Tune function. Connect the 2 transceivers with a cross-...wired RS-232C cable as shown below . (For connecting to the TH-D72A/E, refer to the TH-D72A/E instruction manual.) RS-232C cross cable TS-590S TM-D710A/E/ RC-D710 + TM-V71A/E (m) (f) TM-D700A/E (f) RC-D710 + PG-5J (f) PG-5G CROSSBAND REPEATER If you ...
...) as shown below . 13 CONNECTING PERIPHERAL EQUIPMENT DX PACKETCLUSTER TUNE If you have a Kenwood FM transceiver (K type) with a 6 pin mini DIN connector, you can connect the FM transceiver to the TS-590S transceiver to use the DX PacketCluster Tune function. Connect the 2 transceivers with a cross-...wired RS-232C cable as shown below . (For connecting to the TH-D72A/E, refer to the TH-D72A/E instruction manual.) RS-232C cross cable TS-590S TM-D710A/E/ RC-D710 + TM-V71A/E (m) (f) TM-D700A/E (f) RC-D710 + PG-5J (f) PG-5G CROSSBAND REPEATER If you ...
