

Installation Manual
Page 1
KVT-817DVD KVT-717DVD KVT-747DVD MONITOR WITH DVD RECEIVER INSTALLATION MANUAL MONITEUR AVEC REPTEUR DVD MANUEL D'INSTALLATION MONITOR CON RECEPTOR DVD MANUAL DE INSTALACION MONITOR COM RECEPTOR DVD MANUAL DE INSTALAÇAO © B54-4464-00/00 (KV/RV)
KVT-817DVD KVT-717DVD KVT-747DVD MONITOR WITH DVD RECEIVER INSTALLATION MANUAL MONITEUR AVEC REPTEUR DVD MANUEL D'INSTALLATION MONITOR CON RECEPTOR DVD MANUAL DE INSTALACION MONITOR COM RECEPTOR DVD MANUAL DE INSTALAÇAO © B54-4464-00/00 (KV/RV)
Installation Manual
Page 3
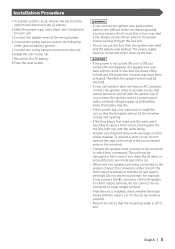
... rear). battery. 8.Press the reset button. 2WARNING • If you connect the ignition wire (red) and the battery wire (yellow) to the car chassis (ground), you connect the ignition wire to a power source with a constant voltage supply, as with battery wires, the battery may start a fire. Installation Procedure 1.To prevent a short circuit, remove the key from the ignition wire (red) and the battery wire (yellow). battery. 2.Make the proper input and output wire connections for each unit. 3.Connect the speaker wires of the unconnected wires...
... rear). battery. 8.Press the reset button. 2WARNING • If you connect the ignition wire (red) and the battery wire (yellow) to the car chassis (ground), you connect the ignition wire to a power source with a constant voltage supply, as with battery wires, the battery may start a fire. Installation Procedure 1.To prevent a short circuit, remove the key from the ignition wire (red) and the battery wire (yellow). battery. 2.Make the proper input and output wire connections for each unit. 3.Connect the speaker wires of the unconnected wires...
Installation Manual
Page 4
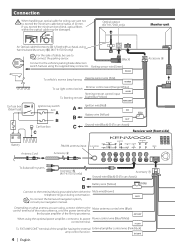
... SUB R R VIDEO [MONO] PRE OUTPUT REAR L FRONT L R R POWER Antenna Cord Accessory 5 To Subwoofer system Accessory % (KVT-817DVD only) C Accessory 1 Ground wire (Black) - (To car chassis) Battery wire (Yellow) B (10A) Connect to the terminal that is fixed with a chassis using , connect either the Mute wire (Brown) telephone rings or during conversation. CONT To "EXT.AMP.CONT." Connect to the vehicle's parking brake detection switch harness using the optional power amplifier, connect to exceed the minimum cable bend radius of the amplifier having the external External...
... SUB R R VIDEO [MONO] PRE OUTPUT REAR L FRONT L R R POWER Antenna Cord Accessory 5 To Subwoofer system Accessory % (KVT-817DVD only) C Accessory 1 Ground wire (Black) - (To car chassis) Battery wire (Yellow) B (10A) Connect to the terminal that is fixed with a chassis using , connect either the Mute wire (Brown) telephone rings or during conversation. CONT To "EXT.AMP.CONT." Connect to the vehicle's parking brake detection switch harness using the optional power amplifier, connect to exceed the minimum cable bend radius of the amplifier having the external External...
Installation Manual
Page 5
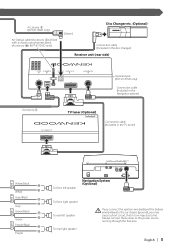
... is fixed with a chassis using harness band (Accessory ^). (KVT-817DVD only) (Green) Disc Changer etc. (Optional) Connection cable (Included in the disc changer) Receiver unit (rear side) TO NAVIGATION I/F TO TV TUNER I/F OPTICAL IN TO MONITOR I/F TO 5L I/F Accessory 2 Optical input (KVT-817DVD only) Connection cable (Included in the Navigation system) TV tuner (Optional) TV ANTENNA INPUT Connection cable (Included in the TV tuner) TO MONITOR UNIT FRONT L FRONT R REAR L White/Black White + Gray/Black + Gray Green/Black + Green Purple/Black + Purple To front left speaker...
... is fixed with a chassis using harness band (Accessory ^). (KVT-817DVD only) (Green) Disc Changer etc. (Optional) Connection cable (Included in the disc changer) Receiver unit (rear side) TO NAVIGATION I/F TO TV TUNER I/F OPTICAL IN TO MONITOR I/F TO 5L I/F Accessory 2 Optical input (KVT-817DVD only) Connection cable (Included in the Navigation system) TV tuner (Optional) TV ANTENNA INPUT Connection cable (Included in the TV tuner) TO MONITOR UNIT FRONT L FRONT R REAR L White/Black White + Gray/Black + Gray Green/Black + Green Purple/Black + Purple To front left speaker...
Installation Manual
Page 6
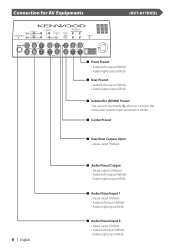
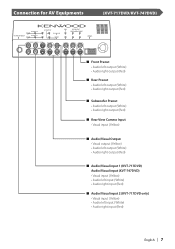
...VIDEO CENTER SUB [MONO] PRE OUTPUT REAR FRONT L L R R POWER (KVT-817DVD) 6 | English ■ Front Preout • Audio left output (White) • Audio right output (Red) ■ Rear Preout • Audio left output (White) • Audio right output (Red) ■ Subwoofer (MONO) Preout You can use Accessory % when to connect the subwoofer system input terminals is stereo. ■ Center Preout ■ Rear View Camera Input • Visual input (Yellow) ■ Audio/Visual Output • Visual output (Yellow) • Audio left output (White) • Audio right output (Red...
...VIDEO CENTER SUB [MONO] PRE OUTPUT REAR FRONT L L R R POWER (KVT-817DVD) 6 | English ■ Front Preout • Audio left output (White) • Audio right output (Red) ■ Rear Preout • Audio left output (White) • Audio right output (Red) ■ Subwoofer (MONO) Preout You can use Accessory % when to connect the subwoofer system input terminals is stereo. ■ Center Preout ■ Rear View Camera Input • Visual input (Yellow) ■ Audio/Visual Output • Visual output (Yellow) • Audio left output (White) • Audio right output (Red...
Installation Manual
Page 7
... V-IN R R VIDEO SUB L R PRE OUTPUT REAR FRONT L L R R POWER ■ Front Preout • Audio left output (White) • Audio right output (Red) ■ Rear Preout • Audio left output (White) • Audio right output (Red) ■ Subwoofer Preout • Audio left output (White) • Audio right output (Red) ■ Rear View Camera Input • Visual input (Yellow) ■ Audio/Visual Output • Visual output (Yellow) • Audio left output (White) • Audio right output (Red) ■ Audio/Visual input 1 (KVT-717DVD) Audio/Visual input (KVT-747DVD...
... V-IN R R VIDEO SUB L R PRE OUTPUT REAR FRONT L L R R POWER ■ Front Preout • Audio left output (White) • Audio right output (Red) ■ Rear Preout • Audio left output (White) • Audio right output (Red) ■ Subwoofer Preout • Audio left output (White) • Audio right output (Red) ■ Rear View Camera Input • Visual input (Yellow) ■ Audio/Visual Output • Visual output (Yellow) • Audio left output (White) • Audio right output (Red) ■ Audio/Visual input 1 (KVT-717DVD) Audio/Visual input (KVT-747DVD...
Installation Manual
Page 8
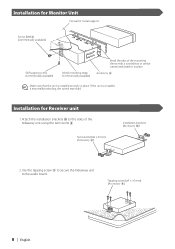
... similar utensil and attach it may malfunction (eg, the sound may skip). Installation for Receiver unit 1.Attach the installation brackets 0 to the audio board. Installation for Monitor Unit Firewall or metal support Screw (M4X8) (commercially available) Self-tapping screw (commercially available) Metal mounting strap (commercially available) Bend the tabs of the hideaway unit using the sems bolts 8. Tapping screw (ø4 × 16...
... similar utensil and attach it may malfunction (eg, the sound may skip). Installation for Receiver unit 1.Attach the installation brackets 0 to the audio board. Installation for Monitor Unit Firewall or metal support Screw (M4X8) (commercially available) Self-tapping screw (commercially available) Metal mounting strap (commercially available) Bend the tabs of the hideaway unit using the sems bolts 8. Tapping screw (ø4 × 16...
Installation Manual
Page 9
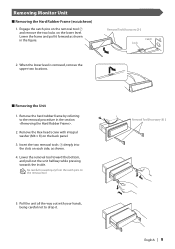
... lower level is removed, remove the upper two locations. ■ Removing the Unit 1. Lower the frame and pull it . Removing Monitor Unit ■ Removing the Hard Rubber Frame (escutcheon) 1. Be careful to the removal procedure in the figure. Insert the two removal tools 7 deeply into the slots on the lower level. Engage the catch pins on the removal tool 7 and remove the two locks on each...
... lower level is removed, remove the upper two locations. ■ Removing the Unit 1. Lower the frame and pull it . Removing Monitor Unit ■ Removing the Hard Rubber Frame (escutcheon) 1. Be careful to the removal procedure in the figure. Insert the two removal tools 7 deeply into the slots on the lower level. Engage the catch pins on the removal tool 7 and remove the two locks on each...
Installation Manual
Page 10
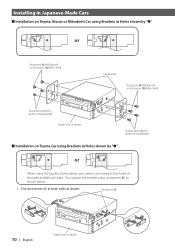
... right and left unit sides. Accessory ! 10 | English Audio unit or others Screws (included in audio unit package) ■ Installation on Toyota Car using Brackets at Holes shown by "●" or When using the bracket shown above, you cannot use screws at both sides as shown below. 1. as shown. Installing in Japanese-Made Cars ■ Installation on Toyota, Nissan or Mitsubishi Car using Brackets at...
... right and left unit sides. Accessory ! 10 | English Audio unit or others Screws (included in audio unit package) ■ Installation on Toyota Car using Brackets at Holes shown by "●" or When using the bracket shown above, you cannot use screws at both sides as shown below. 1. as shown. Installing in Japanese-Made Cars ■ Installation on Toyota, Nissan or Mitsubishi Car using Brackets at...
Installation Manual
Page 11
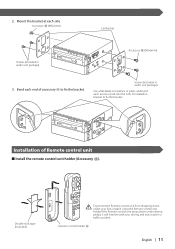
... @ (M5x6mm) Car Bracket Screws (included in a traffic accident. Bend each side. Installation of installation bracket to fix the bracket. Double-stick tape (included) To prevent the Remote control unit from dropping down under your foot, install it using the Remote control unit holder.If the Remote control unit drops down under driving pedals, it will interfere with your driving and may result in audio unit package) Accessory...
... @ (M5x6mm) Car Bracket Screws (included in a traffic accident. Bend each side. Installation of installation bracket to fix the bracket. Double-stick tape (included) To prevent the Remote control unit from dropping down under your foot, install it using the Remote control unit holder.If the Remote control unit drops down under driving pedals, it will interfere with your driving and may result in audio unit package) Accessory...


