
Instruction Manual
Page 43
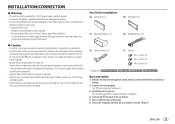
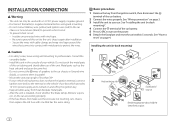
... old fuse with one that comes into contact with cable clamps and wrap vinyl tape around the wires that has the same rating. Part list for installation (A) Faceplate (×1) (B) Trim plate (×1) (C) Mounting sleeve (×1) (D) Wiring harness (×1) (E) Extraction key (×2) (F) Screws* M5 × 7 mm (×4) M5 ...use of less than 30º. • If your car. See "Wiring connection" on page 41. 3 Install the unit to your vehicle wiring harness does not have the ignition terminal, connect Ignition wire (red) to the terminal on the vehicle's fuse box which provides 12 ...
... old fuse with one that comes into contact with cable clamps and wrap vinyl tape around the wires that has the same rating. Part list for installation (A) Faceplate (×1) (B) Trim plate (×1) (C) Mounting sleeve (×1) (D) Wiring harness (×1) (E) Extraction key (×2) (F) Screws* M5 × 7 mm (×4) M5 ...use of less than 30º. • If your car. See "Wiring connection" on page 41. 3 Install the unit to your vehicle wiring harness does not have the ignition terminal, connect Ignition wire (red) to the terminal on the vehicle's fuse box which provides 12 ...

Instruction Manual
Page 45
... Remote Control unit (optional accessory) For the latest information on marine accessories, visit ENGLISH 41 Brown (Mute control wire) To connect the KENWOOD navigation system, refer your car audio dealer. Antenna terminal To front speaker (left) To front speaker (right) ...wire) Yellow (Battery wire) Black (Ground wire) To the metallic body or chassis of the car If no connections are made, do not let the wire come out from the tab. INSTALLATION/CONNECTION Wiring connection Fuse (10 A) IMPORTANT We recommend installing the unit with a commercially available custom wiring harness...
... Remote Control unit (optional accessory) For the latest information on marine accessories, visit ENGLISH 41 Brown (Mute control wire) To connect the KENWOOD navigation system, refer your car audio dealer. Antenna terminal To front speaker (left) To front speaker (right) ...wire) Yellow (Battery wire) Black (Ground wire) To the metallic body or chassis of the car If no connections are made, do not let the wire come out from the tab. INSTALLATION/CONNECTION Wiring connection Fuse (10 A) IMPORTANT We recommend installing the unit with a commercially available custom wiring harness...
Quick Start Guide
Page 6
... not touching car's chassis, then replace the old fuse with one that comes into contact with cable clamps and wrap vinyl tape around the wires that has the same rating. Installing the unit (in parallel. • Mount the unit at an angle of the car battery. 5 Press BSRC to ground ... to reset" on and off by the ignition key. • Keep all cables away from the ignition switch, then disconnect the terminal of your vehicle wiring harness does not have the ignition terminal, connect Ignition...
... not touching car's chassis, then replace the old fuse with one that comes into contact with cable clamps and wrap vinyl tape around the wires that has the same rating. Installing the unit (in parallel. • Mount the unit at an angle of the car battery. 5 Press BSRC to ground ... to reset" on and off by the ignition key. • Keep all cables away from the ignition switch, then disconnect the terminal of your vehicle wiring harness does not have the ignition terminal, connect Ignition...

Quick Start Guide
Page 7
...1 Remove the mounting sleeve and trim plate from the tab. Removing the unit Part list (supplied) (A) Faceplate (×1) (B) Trimplate (×1) (C) Mounting sleeve (×1) (D) Wiring harness (×1) (E) Extraction key (×2) (F) Screw (supplied for / / / ) M5 × 7 mm (×4) M5 × 6 mm (×4) M4 ×... 8 mm (×1) Car fuse box Ignition switch Car fuse box Battery a Brown: To connect the KENWOOD navigation system, refer your navigation manual b Blue/white: To the power control terminal when using the optional power amplifier or to...
...1 Remove the mounting sleeve and trim plate from the tab. Removing the unit Part list (supplied) (A) Faceplate (×1) (B) Trimplate (×1) (C) Mounting sleeve (×1) (D) Wiring harness (×1) (E) Extraction key (×2) (F) Screw (supplied for / / / ) M5 × 7 mm (×4) M5 × 6 mm (×4) M4 ×... 8 mm (×1) Car fuse box Ignition switch Car fuse box Battery a Brown: To connect the KENWOOD navigation system, refer your navigation manual b Blue/white: To the power control terminal when using the optional power amplifier or to...

Instruction Manual 1
Page 43
Consult the car audio dealer. • Install this unit in the console of your vehicle wiring harness does not have the ignition terminal, connect Ignition wire (red) to your car. on and off by the ignition key. • Keep all cables away from the ignition switch... the metal parts of this unit to professionals. Part list for installation (A) Faceplate (×1) (B) Trim plate (×1) (C) Mounting sleeve (×1) (D) Wiring harness (×1) (E) Extraction key (×2) (F) Screws* M5 × 7 mm (×4) M5 × 6 mm (×4) M4 × 8 mm (×1) * Supplied for...
Consult the car audio dealer. • Install this unit in the console of your vehicle wiring harness does not have the ignition terminal, connect Ignition wire (red) to your car. on and off by the ignition key. • Keep all cables away from the ignition switch... the metal parts of this unit to professionals. Part list for installation (A) Faceplate (×1) (B) Trim plate (×1) (C) Mounting sleeve (×1) (D) Wiring harness (×1) (E) Extraction key (×2) (F) Screws* M5 × 7 mm (×4) M5 × 6 mm (×4) M4 × 8 mm (×1) * Supplied for...

Instruction Manual 1
Page 45
... / / / / / ) To the steering wheel remote control adapter (For ) To KENWOOD Marine Remote Control unit (optional accessory) For the latest information on marine accessories, visit ENGLISH 41 INSTALLATION/CONNECTION Wiring connection Fuse (10 A) IMPORTANT We recommend installing the unit with a commercially available custom wiring harness specific for your safety. Antenna terminal To front speaker (left...
... / / / / / ) To the steering wheel remote control adapter (For ) To KENWOOD Marine Remote Control unit (optional accessory) For the latest information on marine accessories, visit ENGLISH 41 INSTALLATION/CONNECTION Wiring connection Fuse (10 A) IMPORTANT We recommend installing the unit with a commercially available custom wiring harness specific for your safety. Antenna terminal To front speaker (left...


