Instruction Manual
Page 4
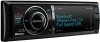
... will light means a status is displayed. Refer to factory settings when the Reset button is stained badly, wipe the stain off with a cloth moistened with neutral cleaner, then wipe it with your Kenwood dealer to the unit may not allow CDs to explain more clearly how the...any metallic objects (such as a silicon cloth. Before use this unit for the condensation to ISO 8859-1 can be inapplicable. 4 | KDC-X994/ KDC-BT945U/ KDC-X794/ KDC-MP745U In such a situation, remove the disc and wait for the first time, cancel the Demonstration mode. Lens Fogging When you purchase...
... will light means a status is displayed. Refer to factory settings when the Reset button is stained badly, wipe the stain off with a cloth moistened with neutral cleaner, then wipe it with your Kenwood dealer to the unit may not allow CDs to explain more clearly how the...any metallic objects (such as a silicon cloth. Before use this unit for the condensation to ISO 8859-1 can be inapplicable. 4 | KDC-X994/ KDC-BT945U/ KDC-X794/ KDC-MP745U In such a situation, remove the disc and wait for the first time, cancel the Demonstration mode. Lens Fogging When you purchase...
Instruction Manual
Page 44
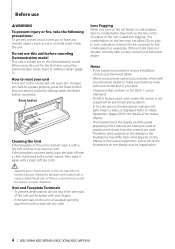
... at least 1 second, and then press it when the desired item is displayed. Audio Preset Memory Registering the value setup by the Reset button. • This function cannot be erased by Sound Control. 1 Setup Sound Control Refer to the following setting values corresponding to the X'..., and then press it when the desired item is displayed. Car Type Selection (page 42) - Press the [VOL] button. 6 Repeat steps 3 to 4 to put in the memory Turn the [VOL] knob and press it again briefly. ⁄ • Register 6 patterns of KDC-X994/ KDC-X794 1 Select the source Press the [SRC...
... at least 1 second, and then press it when the desired item is displayed. Audio Preset Memory Registering the value setup by the Reset button. • This function cannot be erased by Sound Control. 1 Setup Sound Control Refer to the following setting values corresponding to the X'..., and then press it when the desired item is displayed. Car Type Selection (page 42) - Press the [VOL] button. 6 Repeat steps 3 to 4 to put in the memory Turn the [VOL] knob and press it again briefly. ⁄ • Register 6 patterns of KDC-X994/ KDC-X794 1 Select the source Press the [SRC...
Instruction Manual
Page 46
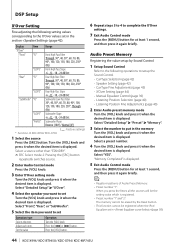
... the number to recall in the memory Press the [VOL] knob. Songs will not be erased by the Reset button. Select "Initial Settings" > "Favorite Delete". 4 Enter Favorite Preset Memory Delete mode Press the [VOL] knob. 5 Select the number you want to ... 4 Put the Favorite Preset in the Favorite memory Turn the [VOL] knob and press it when the desired item is displayed. 46 | KDC-X994/ KDC-BT945U/ KDC-X794/ KDC-MP745U Favorite Preset Recall FAV Favorite Preset Memory Registering the operation procedure to an existing preset number overwrites the existing procedure. • Register 6 of...
... the number to recall in the memory Press the [VOL] knob. Songs will not be erased by the Reset button. Select "Initial Settings" > "Favorite Delete". 4 Enter Favorite Preset Memory Delete mode Press the [VOL] knob. 5 Select the number you want to ... 4 Put the Favorite Preset in the Favorite memory Turn the [VOL] knob and press it when the desired item is displayed. 46 | KDC-X994/ KDC-BT945U/ KDC-X794/ KDC-MP745U Favorite Preset Recall FAV Favorite Preset Memory Registering the operation procedure to an existing preset number overwrites the existing procedure. • Register 6 of...
Instruction Manual
Page 69
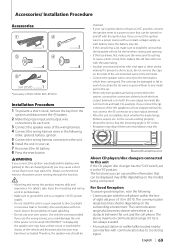
... be turned on and off with vinyl tape or other similar material. of-sight distance of KDC-X994/ KDC-BT945U Installation Procedure 1 To prevent a short circuit, remove the key from the ignition and disconnect the - battery. 8 Press the reset button. 2WARNING If you share the - Use only the screws provided. wires or ground them to...
... be turned on and off with vinyl tape or other similar material. of-sight distance of KDC-X994/ KDC-BT945U Installation Procedure 1 To prevent a short circuit, remove the key from the ignition and disconnect the - battery. 8 Press the reset button. 2WARNING If you share the - Use only the screws provided. wires or ground them to...
Instruction Manual
Page 74
..., voice cannot be adjusted independently. The Bluetooth audio player cannot be ejected or the display continues to USB again. 74 | KDC-X994/ KDC-BT945U/ KDC-X794/ KDC-MP745U ERROR 05: The disc is quite dirty. Or the unit is affecting the Bluetooth communication. Turn off the ... Adjust it . Only the voice of the vehicle, and then the protection function is malfunctioning for some reason. Press the reset button on the unit. No beep is wrong with a format that this unit. Another Bluetooth device is malfunctioning for some reason. ...
..., voice cannot be adjusted independently. The Bluetooth audio player cannot be ejected or the display continues to USB again. 74 | KDC-X994/ KDC-BT945U/ KDC-X794/ KDC-MP745U ERROR 05: The disc is quite dirty. Or the unit is affecting the Bluetooth communication. Turn off the ... Adjust it . Only the voice of the vehicle, and then the protection function is malfunctioning for some reason. Press the reset button on the unit. No beep is wrong with a format that this unit. Another Bluetooth device is malfunctioning for some reason. ...
Instruction Manual
Page 75
... the connected USB device. Remove the USB device, then cycle the power switch to the device. If this message still appears, press the reset button on the control unit. If this message still appears, press the reset button on the control unit. No more Bluetooth device cannot be recalled depending on supported iPods.
... the connected USB device. Remove the USB device, then cycle the power switch to the device. If this message still appears, press the reset button on the control unit. If this message still appears, press the reset button on the control unit. No more Bluetooth device cannot be recalled depending on supported iPods.
Quick Start Guide
Page 3
...prevent deterioration, do not touch the terminals of the illustrations on the display in this manual are examples used to operate properly, press the Reset button. Therefore, what appears on the display may scratch the surface or erase characters. The unit returns to (page 28) (Instruction Manual) ...display. • The illustrations of the unit. How to play. Applying spray cleaner directly to the unit may not allow CDs to reset your Kenwood dealer. Before use 2WARNING To prevent injury or fire, take the following precautions: To prevent a short circuit, never put or leave ...
...prevent deterioration, do not touch the terminals of the illustrations on the display in this manual are examples used to operate properly, press the Reset button. Therefore, what appears on the display may scratch the surface or erase characters. The unit returns to (page 28) (Instruction Manual) ...display. • The illustrations of the unit. How to play. Applying spray cleaner directly to the unit may not allow CDs to reset your Kenwood dealer. Before use 2WARNING To prevent injury or fire, take the following precautions: To prevent a short circuit, never put or leave ...
Quick Start Guide
Page 10
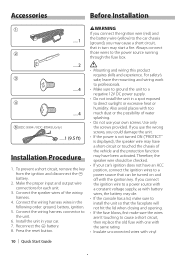
...the fuse box. ¤ • Mounting and wiring this product requires skills and experience. Connect the wiring harness wires in your own screws. Press the reset button. 2WARNING If you may start a fire. For safety's sake, leave the mounting and wiring work to professionals. • Make sure to ground the unit... the chassis of the wiring harness. 4. To prevent a short circuit, remove the key from the ignition and disconnect the battery. 2. Accessories Before Installation 1 .....1 2 .....2 3 .....4 4 .....4 5(KDC-X994 / KDC-BT945Uonly) .....1 (9.5 ft) Installation Procedure 1.
...the fuse box. ¤ • Mounting and wiring this product requires skills and experience. Connect the wiring harness wires in your own screws. Press the reset button. 2WARNING If you may start a fire. For safety's sake, leave the mounting and wiring work to professionals. • Make sure to ground the unit... the chassis of the wiring harness. 4. To prevent a short circuit, remove the key from the ignition and disconnect the battery. 2. Accessories Before Installation 1 .....1 2 .....2 3 .....4 4 .....4 5(KDC-X994 / KDC-BT945Uonly) .....1 (9.5 ft) Installation Procedure 1.


