Instruction Manual
Page 2
... [SETTINGS] mode settings Listening to the other external components 9 Listening to a Disc/ USB device/ iPod 10 Start playing a disc Start playing a USB device or iPod Removing the USB device or iPod Start playing the disc changer Selecting Repeat Play Selecting Random Play All Random Play Selecting Magazine Random Play Selecting Scan...
... [SETTINGS] mode settings Listening to the other external components 9 Listening to a Disc/ USB device/ iPod 10 Start playing a disc Start playing a USB device or iPod Removing the USB device or iPod Start playing the disc changer Selecting Repeat Play Selecting Random Play All Random Play Selecting Magazine Random Play Selecting Scan...
Instruction Manual
Page 3
..., consult your model and in the U.S. and other countries. ■ iTunes is not responsible for the operation of Apple Inc., registered in your Kenwood dealer to know... ■ To prevent a short circuit, never put or leave any use of the unit and faceplate. This may affect wireless ...an electronic accessory has been designed to connect specifically to the monitor or unit. In this case, remove the disc and wait for iPhone" mean that the use of such marks by Kenwood Corporation is a trademark of Dolby Laboratories. ■ The Bluetooth word mark and logos are those ...
..., consult your model and in the U.S. and other countries. ■ iTunes is not responsible for the operation of Apple Inc., registered in your Kenwood dealer to know... ■ To prevent a short circuit, never put or leave any use of the unit and faceplate. This may affect wireless ...an electronic accessory has been designed to connect specifically to the monitor or unit. In this case, remove the disc and wait for iPhone" mean that the use of such marks by Kenwood Corporation is a trademark of Dolby Laboratories. ■ The Bluetooth word mark and logos are those ...

Instruction Manual
Page 10
...on the power. 2 Insert a disc into the loading slot. Press again to select a source other than "USB" or "iPod". 2 Remove the USB device or iPod. Playback starts automatically. The source automatically switches, and playback starts. USB device (commercially available) CA-U1EX (optional accessory...) Apple iPod (commercially available) KCA-iP102 (optional accessory) Removing the USB device or iPod 1 Press SRC to resume playback. Start playing the disc changer 1 Press SRC to turn on the power....
...on the power. 2 Insert a disc into the loading slot. Press again to select a source other than "USB" or "iPod". 2 Remove the USB device or iPod. Playback starts automatically. The source automatically switches, and playback starts. USB device (commercially available) CA-U1EX (optional accessory...) Apple iPod (commercially available) KCA-iP102 (optional accessory) Removing the USB device or iPod 1 Press SRC to resume playback. Start playing the disc changer 1 Press SRC to turn on the power....
Instruction Manual
Page 13
... a disc. See the following table for the disc. ■ Clean from the unit. Adjust [SETTINGS] mode settings While listening to an iPod or KENWOOD Music Editor media ... 1 Press the volume knob to enter [FUNCTION] mode. 2 Turn the volume knob to select [SETTINGS], then press to enter.... out horizontally. ■ Remove the rims from the iPod. ■ This mode is "iPod". The display will show "iPod MODE". MPLIST YES: Deletes the saved My Playlist. ; About Audio file ■ Playable Audio file : MP3 (.mp3), WMA (.wma) : AAC-LC (.m4a) KDC-BT648U/ KDC-X695 only ■ Playable disc...
... a disc. See the following table for the disc. ■ Clean from the unit. Adjust [SETTINGS] mode settings While listening to an iPod or KENWOOD Music Editor media ... 1 Press the volume knob to enter [FUNCTION] mode. 2 Turn the volume knob to select [SETTINGS], then press to enter.... out horizontally. ■ Remove the rims from the iPod. ■ This mode is "iPod". The display will show "iPod MODE". MPLIST YES: Deletes the saved My Playlist. ; About Audio file ■ Playable Audio file : MP3 (.mp3), WMA (.wma) : AAC-LC (.m4a) KDC-BT648U/ KDC-X695 only ■ Playable disc...
Instruction Manual
Page 30
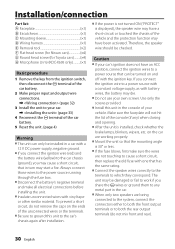
...the system, connect the connectors either to both the front output terminals or to both the rear output terminals (do not remove the caps on and off with the ignition key. The unit may be damaged or fail to work if you may ...Installation/connection Part list: A Faceplate 1) B Escutcheon 1) C Mounting sleeve 1) D Wiring harness 1) E Removal tool 2) F Flat head screw (for Nissan cars 4) G Round head screw (for Toyota cars 4) H Microphone (3 m) (KDC-X695 only 1) Basic procedure 1 Remove the key from the ignition switch, then disconnect the · terminal of the car battery. 2 Make ...
...the system, connect the connectors either to both the front output terminals or to both the rear output terminals (do not remove the caps on and off with the ignition key. The unit may be damaged or fail to work if you may ...Installation/connection Part list: A Faceplate 1) B Escutcheon 1) C Mounting sleeve 1) D Wiring harness 1) E Removal tool 2) F Flat head screw (for Nissan cars 4) G Round head screw (for Toyota cars 4) H Microphone (3 m) (KDC-X695 only 1) Basic procedure 1 Remove the key from the ignition switch, then disconnect the · terminal of the car battery. 2 Make ...
Instruction Manual
Page 33
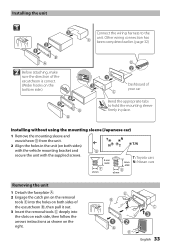
... hooks on both sides of your car Bend the appropriate tabs to the C unit. A Installing without using the mounting sleeve (Japanese car) 1 Remove the mounting sleeve and escutcheon B from the unit. 2 Align the holes in place. G ø5mm T: Toyota cars N: Nissan cars... Removing the unit 1 Detach the faceplate A. 2 Engage the catch pin on the removal tools E into the holes on both sides) with the vehicle mounting bracket and secure the unit with the supplied screws. E...
... hooks on both sides of your car Bend the appropriate tabs to the C unit. A Installing without using the mounting sleeve (Japanese car) 1 Remove the mounting sleeve and escutcheon B from the unit. 2 Align the holes in place. G ø5mm T: Toyota cars N: Nissan cars... Removing the unit 1 Detach the faceplate A. 2 Engage the catch pin on the removal tools E into the holes on both sides) with the vehicle mounting bracket and secure the unit with the supplied screws. E...
Instruction Manual
Page 34
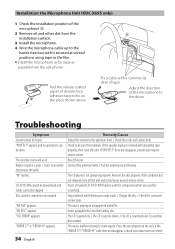
... The unit is poor. / Static noise while listening to be done. "NO DISC" appears. "TOC ERROR" appears. Installation the Microphone Unit (KDC-X695 only) 1 Check the installation position of the microphone H. 2 Remove oil and other dirt from the cell-phone. Peel the release coated paper of the microphone to the optimum level. / Check...
... The unit is poor. / Static noise while listening to be done. "NO DISC" appears. "TOC ERROR" appears. Installation the Microphone Unit (KDC-X695 only) 1 Check the installation position of the microphone H. 2 Remove oil and other dirt from the cell-phone. Peel the release coated paper of the microphone to the optimum level. / Check...
Instruction Manual
Page 35
... USB devices. The number of your cell-phone. Bluetooth Symptom Remedy/Cause The hands-free talk volume is generated. No USB device is not correct. Remove the USB device, turn the unit off, then turn it cannot be recognized. Elapsed playing time is connected. contained in "SONGS" Podcast files are recorded...
... USB devices. The number of your cell-phone. Bluetooth Symptom Remedy/Cause The hands-free talk volume is generated. No USB device is not correct. Remove the USB device, turn the unit off, then turn it cannot be recognized. Elapsed playing time is connected. contained in "SONGS" Podcast files are recorded...


