Instruction Manual
Page 2
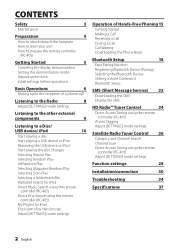
... [SETTINGS] mode settings Listening to the other external components 9 Listening to a Disc/ USB device/ iPod 10 Start playing a disc Start playing a USB device or iPod Removing the USB device or iPod Start playing the disc changer Selecting Repeat Play Selecting Random Play All Random Play Selecting Magazine Random Play Selecting Scan...
... [SETTINGS] mode settings Listening to the other external components 9 Listening to a Disc/ USB device/ iPod 10 Start playing a disc Start playing a USB device or iPod Removing the USB device or iPod Start playing the disc changer Selecting Repeat Play Selecting Random Play All Random Play Selecting Magazine Random Play Selecting Scan...
Instruction Manual
Page 3
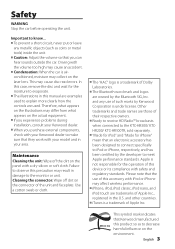
...is airconditioned, moisture may cause disc read errors. Other trademarks and trade names are trademarks of Apple Inc., registered in this case, remove the disc and wait for the operation of their respective owners. ■ Ready to receive HD Radio™ broadcasts when connected to...Apple performance standards. Cleaning the connector: Wipe off the dirt on the actual equipment. ■ If you experience problems during installation, consult your Kenwood dealer. ■ When you can hear sounds outside the car. Apple is under license. and other countries. ■ iTunes is a ...
...is airconditioned, moisture may cause disc read errors. Other trademarks and trade names are trademarks of Apple Inc., registered in this case, remove the disc and wait for the operation of their respective owners. ■ Ready to receive HD Radio™ broadcasts when connected to...Apple performance standards. Cleaning the connector: Wipe off the dirt on the actual equipment. ■ If you experience problems during installation, consult your Kenwood dealer. ■ When you can hear sounds outside the car. Apple is under license. and other countries. ■ iTunes is a ...

Instruction Manual
Page 10
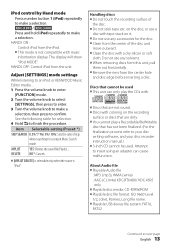
.... ■ Press to select next folder of CD changer. USB terminal Press to select a source other than "USB" or "iPod". 2 Remove the USB device or iPod. The source automatically switches, and playback starts. USB device (commercially available) CA-U1EX (optional accessory) Apple iPod (...commercially available) KCA-iP102 (optional accessory) Removing the USB device or iPod 1 Press SRC to pause. Start playing a disc 1 Press SRC to turn on the power. 2 Insert a disc...
.... ■ Press to select next folder of CD changer. USB terminal Press to select a source other than "USB" or "iPod". 2 Remove the USB device or iPod. The source automatically switches, and playback starts. USB device (commercially available) CA-U1EX (optional accessory) Apple iPod (...commercially available) KCA-iP102 (optional accessory) Removing the USB device or iPod 1 Press SRC to pause. Start playing a disc 1 Press SRC to turn on the power. 2 Insert a disc...
Instruction Manual
Page 13
The display will show "iPod MODE". MPLIST YES: Deletes the saved My Playlist. ; Adjust [SETTINGS] mode settings While listening to an iPod or KENWOOD Music Editor media ... 1 Press the volume knob to enter [FUNCTION] mode. 2 Turn the volume knob to select [SETTINGS], then press to enter. ...from this unit, pull them out horizontally. ■ Remove the rims from the unit. on the disc, or use a disc with a dry silicon or soft cloth. About Audio file ■ Playable Audio file : MP3 (.mp3), WMA (.wma) : AAC-LC (.m4a) KDC-BT648U/ KDC-X695 only ■ Playable disc media: CD-R/RW/ROM...
The display will show "iPod MODE". MPLIST YES: Deletes the saved My Playlist. ; Adjust [SETTINGS] mode settings While listening to an iPod or KENWOOD Music Editor media ... 1 Press the volume knob to enter [FUNCTION] mode. 2 Turn the volume knob to select [SETTINGS], then press to enter. ...from this unit, pull them out horizontally. ■ Remove the rims from the unit. on the disc, or use a disc with a dry silicon or soft cloth. About Audio file ■ Playable Audio file : MP3 (.mp3), WMA (.wma) : AAC-LC (.m4a) KDC-BT648U/ KDC-X695 only ■ Playable disc media: CD-R/RW/ROM...
Instruction Manual
Page 30
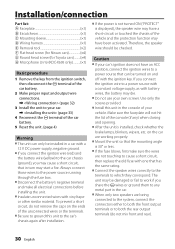
.../connection Part list: A Faceplate 1) B Escutcheon 1) C Mounting sleeve 1) D Wiring harness 1) E Removal tool 2) F Flat head screw (for Nissan cars 4) G Round head screw (for Toyota cars 4) H Microphone (3 m) (KDC-X695 only 1) Basic procedure 1 Remove the key from the ignition switch, then disconnect the · terminal of the car battery. 2 Make...has the same rating. ■ Connect the speaker wires correctly to the terminals to both the rear output terminals (do not remove the caps on the ends of the unconnected wires or the terminals. ■ Be sure to ground this unit in turn...
.../connection Part list: A Faceplate 1) B Escutcheon 1) C Mounting sleeve 1) D Wiring harness 1) E Removal tool 2) F Flat head screw (for Nissan cars 4) G Round head screw (for Toyota cars 4) H Microphone (3 m) (KDC-X695 only 1) Basic procedure 1 Remove the key from the ignition switch, then disconnect the · terminal of the car battery. 2 Make...has the same rating. ■ Connect the speaker wires correctly to the terminals to both the rear output terminals (do not remove the caps on the ends of the unconnected wires or the terminals. ■ Be sure to ground this unit in turn...
Instruction Manual
Page 33
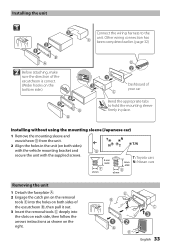
...5mm 8mm MAX. T N NT T/N B 8 mm MAX. G ø5mm T: Toyota cars N: Nissan cars Removing the unit 1 Detach the faceplate A. 2 Engage the catch pin on the removal tools E into the slots on each side, then follow the arrows instructions as shown on both sides of your car ... is correct. (Wider hooks on the 3 bottom side.) 4 5 B D 2 1 C Dashboard of the escutcheon B, then pull it out. 3 Insert the removal tools E deeply into the holes on both sides) with the vehicle mounting bracket and secure the unit with the supplied screws. Installing the unit 1 2 1 3 Connect...
...5mm 8mm MAX. T N NT T/N B 8 mm MAX. G ø5mm T: Toyota cars N: Nissan cars Removing the unit 1 Detach the faceplate A. 2 Engage the catch pin on the removal tools E into the slots on each side, then follow the arrows instructions as shown on both sides of your car ... is correct. (Wider hooks on the 3 bottom side.) 4 5 B D 2 1 C Dashboard of the escutcheon B, then pull it out. 3 Insert the removal tools E deeply into the holes on both sides) with the vehicle mounting bracket and secure the unit with the supplied screws. Installing the unit 1 2 1 3 Connect...
Instruction Manual
Page 34
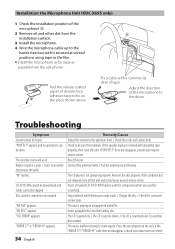
... a playable disc into the loading slot. Press the reset button on rough roads. / Change the disc. / Check the cords and connections. Installation the Microphone Unit (KDC-X695 only) 1 Check the installation position of the microphone H. 2 Remove oil and other dirt from the cell-phone.
... a playable disc into the loading slot. Press the reset button on rough roads. / Change the disc. / Check the cords and connections. Installation the Microphone Unit (KDC-X695 only) 1 Check the installation position of the microphone H. 2 Remove oil and other dirt from the cell-phone.
Instruction Manual
Page 35
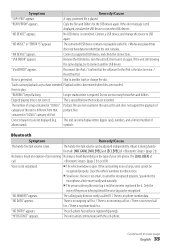
.../Cause "COPY PRO" appears. Copy the files and folders for the iPod is not correct. "NO DEVICE" appears. Connect a USB device, and change the disc. Remove the USB device, turn the unit off, then turn it during handsfree talk. [MIC GAIN], [NR LEVEL] and [EC LEVEL] of album name). Tracks cannot...
.../Cause "COPY PRO" appears. Copy the files and folders for the iPod is not correct. "NO DEVICE" appears. Connect a USB device, and change the disc. Remove the USB device, turn the unit off, then turn it during handsfree talk. [MIC GAIN], [NR LEVEL] and [EC LEVEL] of album name). Tracks cannot...


