Instruction Manual
Page 2
... features 7 Power Selecting the Source Volume Attenuator Audio Control Adjusting the detail of Audio Control Audio Setup Speaker Setting Switching Display Subwoofer Output Theft Deterrent Faceplate TEL Mute Tuner features 12 Tuning Tuning Mode Direct Access Tuning Station Preset Memory Auto Memory Entry Preset Tuning CD/USB device/Audio file/External...
... features 7 Power Selecting the Source Volume Attenuator Audio Control Adjusting the detail of Audio Control Audio Setup Speaker Setting Switching Display Subwoofer Output Theft Deterrent Faceplate TEL Mute Tuner features 12 Tuning Tuning Mode Direct Access Tuning Station Preset Memory Auto Memory Entry Preset Tuning CD/USB device/Audio file/External...
Instruction Manual
Page 3
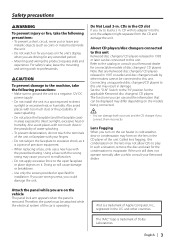
... such a situation, remove the disc and wait for the condensation to the catalog or consult your fingers. • Do not subject the faceplate to this unit Kenwood disc changers/ CD players released in 1998 or later can use wrong screws, you turn on the car heater in cold weather, dew or... the possibility of water splashing. • To prevent deterioration, do not touch the terminals of water splashing. • Do not place the faceplate (and the faceplate case) in areas exposed to this condensation on the lens may form on the lens in the CD player of Apple Computer, Inc., registered...
... such a situation, remove the disc and wait for the condensation to the catalog or consult your fingers. • Do not subject the faceplate to this unit Kenwood disc changers/ CD players released in 1998 or later can use wrong screws, you turn on the car heater in cold weather, dew or... the possibility of water splashing. • To prevent deterioration, do not touch the terminals of water splashing. • Do not place the faceplate (and the faceplate case) in areas exposed to this condensation on the lens may form on the lens in the CD player of Apple Computer, Inc., registered...
Instruction Manual
Page 4
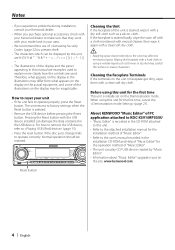
...upgrade is put on the Demonstration mode. Wiping the faceplate with a hard cloth or using this unit is pressed. • Remove the USB device before pressing the Reset button. About KENWOOD "Music Editor" of PC application attached to KDC-X591/MP535U • "Music Editor" is recorded in ...the CD-ROM attached to this manual are examples used . Notes • If you experience problems during installation, consult your Kenwood dealer. • When you...
...upgrade is put on the Demonstration mode. Wiping the faceplate with a hard cloth or using this unit is pressed. • Remove the USB device before pressing the Reset button. About KENWOOD "Music Editor" of PC application attached to KDC-X591/MP535U • "Music Editor" is recorded in ...the CD-ROM attached to this manual are examples used . Notes • If you experience problems during installation, consult your Kenwood dealer. • When you...
Instruction Manual
Page 11
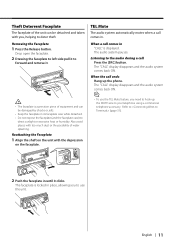
... unit can be detached and taken with the depression on the unit with you, helping to forward and remove it clicks. Reattaching the Faceplate 1 Align the shaft on the faceplate. English | 11 TEL Mute The audio system automatically mutes when a call comes in place, allowing you need to hook up the MUTE...
... unit can be detached and taken with the depression on the unit with you, helping to forward and remove it clicks. Reattaching the Faceplate 1 Align the shaft on the faceplate. English | 11 TEL Mute The audio system automatically mutes when a call comes in place, allowing you need to hook up the MUTE...
Instruction Manual
Page 14
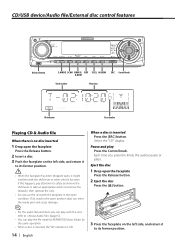
... files and discs you press the knob, the audio pauses or plays. Eject the disc 1 Drop open position dust can play the file made by KENWOOD Music Editor by the same operation. • When a disc is inserted, the "IN" indicator is ON. 14 | English When a disc is no disc ...inserted 1 Drop open the faceplate Press the Release button. 2 Insert a disc. 3 Push the faceplate on the left side, and return it might interfere with the faceplate in the open the faceplate Press the Release button. 2 Eject the disc Press the [0] button. 3 Press the...
... files and discs you press the knob, the audio pauses or plays. Eject the disc 1 Drop open position dust can play the file made by KENWOOD Music Editor by the same operation. • When a disc is inserted, the "IN" indicator is ON. 14 | English When a disc is no disc ...inserted 1 Drop open the faceplate Press the Release button. 2 Insert a disc. 3 Push the faceplate on the left side, and return it might interfere with the faceplate in the open the faceplate Press the Release button. 2 Eject the disc Press the [0] button. 3 Press the...

Instruction Manual
Page 15
... cannot operate the iPod. • When the USB device is connected to this unit, it is not recognized. Removing the USB device 1 Drop open the faceplate Press the Release button. 2 Set the remove mode as the files contained in the USB device are all the same. • Be sure to (page...the point where you stopped its playback. When the USB device is displayed without displaying a folder name, etc. Pause and play the file made by KENWOOD Music Editor by the iPod is not connected Connect the USB device Playback of the file contained in the USB device starts. The 0 indicator blinks...
... cannot operate the iPod. • When the USB device is connected to this unit, it is not recognized. Removing the USB device 1 Drop open the faceplate Press the Release button. 2 Set the remove mode as the files contained in the USB device are all the same. • Be sure to (page...the point where you stopped its playback. When the USB device is displayed without displaying a folder name, etc. Pause and play the file made by KENWOOD Music Editor by the iPod is not connected Connect the USB device Playback of the file contained in the USB device starts. The 0 indicator blinks...
Instruction Manual
Page 23
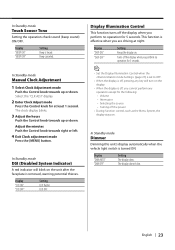
... the display when you cannot perform any key will blink on . Display "DISP ON" "DISP OFF" Setting Keeps the display on the unit after the faceplate is heard. The clock display blinks. 3 Adjust the hours Push the Control knob towards right or left. 4 Exit Clock adjustment mode Press the [MENU] button...
... the display when you cannot perform any key will blink on . Display "DISP ON" "DISP OFF" Setting Keeps the display on the unit after the faceplate is heard. The clock display blinks. 3 Adjust the hours Push the Control knob towards right or left. 4 Exit Clock adjustment mode Press the [MENU] button...

Instruction Manual
Page 30
... closing and opening. • If the fuse blows, first make sure to a front output terminal, do not connect the - connector to a power source that the faceplate will become unavailable. 30 | English To prevent a short circuit, remove the key from the ignition and disconnect the - wires or ground them to any metal...
... closing and opening. • If the fuse blows, first make sure to a front output terminal, do not connect the - connector to a power source that the faceplate will become unavailable. 30 | English To prevent a short circuit, remove the key from the ignition and disconnect the - wires or ground them to any metal...
Instruction Manual
Page 33
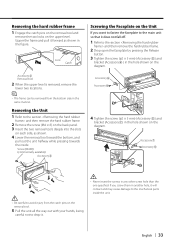
...and remove the two locks on each side, as shown in any other screw hole than the one specified. If you want to fasten the faceplate to the main unit so that it will contact and may cause damage to the mechanical parts inside . Screw (M4X8) (commercially available) ...) in the same manner. English | 33 Accessory7 Accessory5 ¤ • Be careful to the section and then remove the hard rubber frame. 2 Drop open the faceplate by pressing the Release button. 3 Tighten the screw (ø2 × 5 mm) (Accessory 5) and bracket (Accessory6 ) in the hole shown on the diagram. ...
...and remove the two locks on each side, as shown in any other screw hole than the one specified. If you want to fasten the faceplate to the main unit so that it will contact and may cause damage to the mechanical parts inside . Screw (M4X8) (commercially available) ...) in the same manner. English | 33 Accessory7 Accessory5 ¤ • Be careful to the section and then remove the hard rubber frame. 2 Drop open the faceplate by pressing the Release button. 3 Tighten the screw (ø2 × 5 mm) (Accessory 5) and bracket (Accessory6 ) in the hole shown on the diagram. ...
Instruction Manual
Page 36
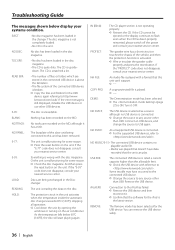
kenwood.com/usb/. NO TRACK: No tracks are recorded on the unit. If the "E-77" code does not disappear, consult your nearest service center. If the "E-... connected USB device is broken. ➪ Copy the files and folders for the iPod is reading the data on the air conditioner. NO PANEL: The faceplate of the vehicle, and then the protection function is played with a format that the software for the USB device again referring to . READING: The unit...
kenwood.com/usb/. NO TRACK: No tracks are recorded on the unit. If the "E-77" code does not disappear, consult your nearest service center. If the "E-... connected USB device is broken. ➪ Copy the files and folders for the iPod is reading the data on the air conditioner. NO PANEL: The faceplate of the vehicle, and then the protection function is played with a format that the software for the USB device again referring to . READING: The unit...

