Instruction Manuals
Page 18
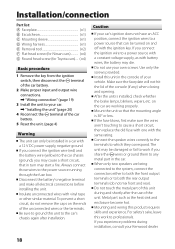
... unit to the car's chassis again after the use your Kenwood dealer. 18 After the unit is 30° or less. Do not touch the metal part of the unit. Insulate unconnected wires with the ignition key. If you experience problems during and ... If the fuse blows, first make all electrical connections before installing the unit. Installation/connection Part list: A Faceplate 1) B Escutcheon 1) C Mounting sleeve 1) D Wiring harness 1) E Removal tool 2) F Flat head screw (for Nissan cars 4) G Round head screw (for Toyota cars).... (×4) Basic procedure 1 Remove the key ...
... unit to the car's chassis again after the use your Kenwood dealer. 18 After the unit is 30° or less. Do not touch the metal part of the unit. Insulate unconnected wires with the ignition key. If you experience problems during and ... If the fuse blows, first make all electrical connections before installing the unit. Installation/connection Part list: A Faceplate 1) B Escutcheon 1) C Mounting sleeve 1) D Wiring harness 1) E Removal tool 2) F Flat head screw (for Nissan cars 4) G Round head screw (for Toyota cars).... (×4) Basic procedure 1 Remove the key ...
Instruction Manuals
Page 20
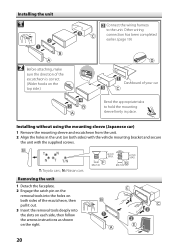
Installing the unit 1 Connect the wiring harness to hold the mounting sleeve firmly in the unit (on the right. 20 Other wiring connection has been completed earlier. (page 19) 2 Before attaching, make sure the direction of the escutcheon is correct. (Wider hooks on the top side.) Dashboard ...
Installing the unit 1 Connect the wiring harness to hold the mounting sleeve firmly in the unit (on the right. 20 Other wiring connection has been completed earlier. (page 19) 2 Before attaching, make sure the direction of the escutcheon is correct. (Wider hooks on the top side.) Dashboard ...


