Use and Care Guide
Page 2
TABLE OF CONTENTS PROTECTION AGREEMENTS 2 In the U.S.A 2 In Canada 2 KENMORE ELITE® APPLIANCE AND OPTIONAL PEDESTAL WARRANTY 3 WASHER SAFETY 4 INSTALLATION REQUIREMENTS 5 Tools and Parts 5 Options 5 Location Requirements 6 Drain System 7 Electrical ... your request - Master Protection Agreements Congratulations on products requiring in-home repair, plus convenient repair scheduling ✔ Power surge protection against electrical damage due to power fluctuations ✔ Rental reimbursement if repair of your new purchase for years of home appliances, garage door openers...
TABLE OF CONTENTS PROTECTION AGREEMENTS 2 In the U.S.A 2 In Canada 2 KENMORE ELITE® APPLIANCE AND OPTIONAL PEDESTAL WARRANTY 3 WASHER SAFETY 4 INSTALLATION REQUIREMENTS 5 Tools and Parts 5 Options 5 Location Requirements 6 Drain System 7 Electrical ... your request - Master Protection Agreements Congratulations on products requiring in-home repair, plus convenient repair scheduling ✔ Power surge protection against electrical damage due to power fluctuations ✔ Rental reimbursement if repair of your new purchase for years of home appliances, garage door openers...
Use and Care Guide
Page 6
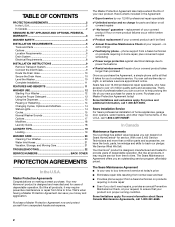
... water heater set to deliver 120°F (49°C) water to the washer. 39" min. (99.0 cm) s A grounded electrical outlet located within 4 ft (1.2 m) of the hot and cold water fill valves, and water pressure of installation and servicing. See "Electrical Requirements." 1" (2.5 cm) 27" (68.6 cm...) 1" (2.5 cm) s Hot and cold water faucets located within 6 ft (1.8 m) of where the power cord is not recommended. Do not operate your responsibility. Installation clearances s The location must be large enough to allow the washer door ...
... water heater set to deliver 120°F (49°C) water to the washer. 39" min. (99.0 cm) s A grounded electrical outlet located within 4 ft (1.2 m) of the hot and cold water fill valves, and water pressure of installation and servicing. See "Electrical Requirements." 1" (2.5 cm) 27" (68.6 cm...) 1" (2.5 cm) s Hot and cold water faucets located within 6 ft (1.8 m) of where the power cord is not recommended. Do not operate your responsibility. Installation clearances s The location must be large enough to allow the washer door ...

Use and Care Guide
Page 8
... ordinances. For a permanently connected washer: This washer must be connected to a grounded metal, permanent wiring system, or an equipment grounding conductor must be run with a power supply cord having an equipment-grounding conductor and a grounding plug. s Check with local codes and ordinances. Electrical Requirements WARNING s Do not ground to the equipment...
... ordinances. For a permanently connected washer: This washer must be connected to a grounded metal, permanent wiring system, or an equipment grounding conductor must be run with a power supply cord having an equipment-grounding conductor and a grounding plug. s Check with local codes and ordinances. Electrical Requirements WARNING s Do not ground to the equipment...
Use and Care Guide
Page 9
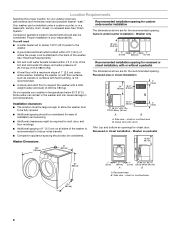
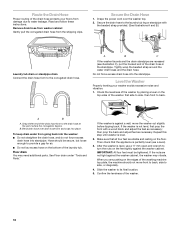
... up for future reference. Screw on the washer. 5. Attach the hose with the blue color indicator to the coupling can result. 7. Then pull the power cord through the opening of the rear panel and close the hole with the 4 transport bolt hole plugs. To avoid suspension and structural damage to...your washer, it must be transported at a later date, call your local service center. These bolts also retain the power cord inside the washer until it is loose, move it is within approximately 3 ft (90 cm) of its final location. H. NOTE: Do not overtighten. Screw on the washer. Once the bolt ...
... up for future reference. Screw on the washer. 5. Attach the hose with the blue color indicator to the coupling can result. 7. Then pull the power cord through the opening of the rear panel and close the hole with the 4 transport bolt hole plugs. To avoid suspension and structural damage to...your washer, it must be transported at a later date, call your local service center. These bolts also retain the power cord inside the washer until it is loose, move it is within approximately 3 ft (90 cm) of its final location. H. NOTE: Do not overtighten. Screw on the washer. Once the bolt ...
Use and Care Guide
Page 10
... floor. IMPORTANT: All four feet must be secure, but loose enough to its final location. 5. Slide the washer to provide a gap for air. Drape the power cord over drain hose form and snap into place. Do not force excess drain hose into standpipe. Level the Washer Properly leveling your floors from...
... floor. IMPORTANT: All four feet must be secure, but loose enough to its final location. 5. Slide the washer to provide a gap for air. Drape the power cord over drain hose form and snap into place. Do not force excess drain hose into standpipe. Level the Washer Properly leveling your floors from...
Use and Care Guide
Page 12
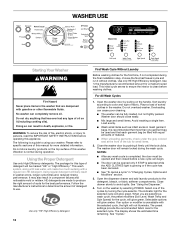
This wash system, along with less water, will remain locked during the wash cycle. Open the washer door by pulling on the washer by selecting POWER. Overloading can completely remove oil. It is recommended that more detailed information. Select one garment bag be used and that each garment bag be filled ...
This wash system, along with less water, will remain locked during the wash cycle. Open the washer door by pulling on the washer by selecting POWER. Overloading can completely remove oil. It is recommended that more detailed information. Select one garment bag be used and that each garment bag be filled ...
Use and Care Guide
Page 13
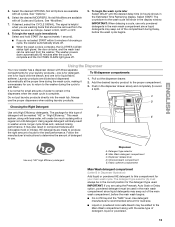
... . 9. Main Wash detergent compartment C. Pull out the dispenser drawer. 2. Fabric softener compartment Main Wash detergent compartment (Letter B in the Estimated Time Remaining display. The washer powers down automatically 60 minutes after the cycle is complete, the CLOTHES CLEAN status light glows, the door unlocks, and the wash load can be used...
... . 9. Main Wash detergent compartment C. Pull out the dispenser drawer. 2. Fabric softener compartment Main Wash detergent compartment (Letter B in the Estimated Time Remaining display. The washer powers down automatically 60 minutes after the cycle is complete, the CLOTHES CLEAN status light glows, the door unlocks, and the wash load can be used...

Use and Care Guide
Page 14
... correctly with the selected cycle, the light will be removed. To pause the washer at the beginning of the selected Option or Modifier. The washer powers down, the door unlocks, and clothes can be changed anytime before START is selected, the fabric softener will drain automatically before the start of the...
... correctly with the selected cycle, the light will be removed. To pause the washer at the beginning of the selected Option or Modifier. The washer powers down, the door unlocks, and clothes can be changed anytime before START is selected, the fabric softener will drain automatically before the start of the...

Use and Care Guide
Page 15
... to the washer if the ADD CLOTHES status light is not glowing 1. Cycles Wash Cycles Choose Wash Cycles by turning the selector knob. The washer powers down automatically 60 minutes after the cycle has started, select STOP once, then select the desired settings. The cycle indicator light will glow amber. (To...
... to the washer if the ADD CLOTHES status light is not glowing 1. Cycles Wash Cycles Choose Wash Cycles by turning the selector knob. The washer powers down automatically 60 minutes after the cycle has started, select STOP once, then select the desired settings. The cycle indicator light will glow amber. (To...

Use and Care Guide
Page 21
... of time, you are found. Follow the "Installation Instructions" to a water pressure surge) while you should: s Unplug washer or disconnect power. When replacing your washer. This helps avoid unintended flooding (due to locate, level and connect the washer. 2. Do not use or vacation... to the washer. Periodically inspect and replace inlet hoses if bulges, kinks, cuts, wear or leaks are away. Unplug washer or disconnect power. 4. Shut off the water supply to your washer during freezing weather, put in 1 qt (1 L) of R.V.-type antifreeze in the upright...
... of time, you are found. Follow the "Installation Instructions" to a water pressure surge) while you should: s Unplug washer or disconnect power. When replacing your washer. This helps avoid unintended flooding (due to locate, level and connect the washer. 2. Do not use or vacation... to the washer. Periodically inspect and replace inlet hoses if bulges, kinks, cuts, wear or leaks are away. Unplug washer or disconnect power. 4. Shut off the water supply to your washer during freezing weather, put in 1 qt (1 L) of R.V.-type antifreeze in the upright...
Use and Care Guide
Page 22
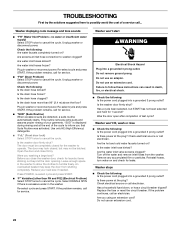
...plug? Do not remove ground prong. Failure to operate. Check electrical source or call electrician. Washer stops s Check the following : Is the power cord plugged into a grounded 3 prong outlet? Check electrical source or call electrician. Are screens at the plug? Use only HE (High ...Efficiency) detergents. s Check the following : Is the power cord plugged into a grounded 3 prong outlet? Is the water inlet hose kinked? Are the water inlet valve screens clogged? Are water inlet hoses...
...plug? Do not remove ground prong. Failure to operate. Check electrical source or call electrician. Washer stops s Check the following : Is the power cord plugged into a grounded 3 prong outlet? Check electrical source or call electrician. Are screens at the plug? Use only HE (High ...Efficiency) detergents. s Check the following : Is the power cord plugged into a grounded 3 prong outlet? Is the water inlet hose kinked? Are the water inlet valve screens clogged? Are water inlet hoses...


