
Use and Care Guide
Page 2
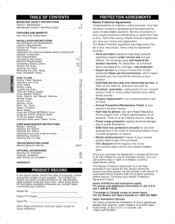
Your new Kenmore I I IMPORTANT SAFETY INSTRUCTIONS SAFETY MESSAGES 3 IMPORTANT SAFETY INSTRUCTIONS 3-6 FEATURES AND BENEFITS Key Parts and Components 7 INSTALLATION INSTRUCTIONS Key Dimension and Specifications Location Requirements Choose the Proper Location Clearances Installation with Optional Pedestal Base or Stacking Optional Accessories Gas Requirements Connecting Gas Dryers Electrical Requirements Connecting Electric Dryers Venting the Dryer Leveling the Dryer Reversing the...
Your new Kenmore I I IMPORTANT SAFETY INSTRUCTIONS SAFETY MESSAGES 3 IMPORTANT SAFETY INSTRUCTIONS 3-6 FEATURES AND BENEFITS Key Parts and Components 7 INSTALLATION INSTRUCTIONS Key Dimension and Specifications Location Requirements Choose the Proper Location Clearances Installation with Optional Pedestal Base or Stacking Optional Accessories Gas Requirements Connecting Gas Dryers Electrical Requirements Connecting Electric Dryers Venting the Dryer Leveling the Dryer Reversing the...
Use and Care Guide
Page 6
... its length or at either end. Failure to do so can result in electrical shock or injury. • Refer to follow these instructions can result in this manual for specific electrical requirements for your dryer by a qualified electrician to persons when using this appliance, follow these instructions can...cord. Never unplug your model. Do not use a cord that have been previously cleaned in, washed in, soaked in fire or death. This will prevent injury and prevent damage to follow basic precautions, including the following : • Do not open the dryer door during or after ...
... its length or at either end. Failure to do so can result in electrical shock or injury. • Refer to follow these instructions can result in this manual for specific electrical requirements for your dryer by a qualified electrician to persons when using this appliance, follow these instructions can...cord. Never unplug your model. Do not use a cord that have been previously cleaned in, washed in, soaked in fire or death. This will prevent injury and prevent damage to follow basic precautions, including the following : • Do not open the dryer door during or after ...
Use and Care Guide
Page 7
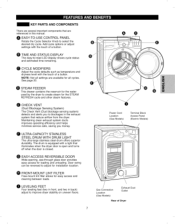
...AND STATUS DISPLAY The easy-to select the desired dry cycle. STEAM FEEDER This drawer contains the reservoir for the water used by the dryer to adjust for installation location. CYCLE MODIFIERS Adjust the cycle defaults such as temperature and dryness level with the touch of a button. ... swing can be reversed to create steam for all settings are referenced in this manual. Power Cord Location (Gas Models) Terminal Block Access Panel (Electric Models) Gas Connection Location (Gas Models) Exhaust Duct Outlet Rear of a button. el LEVELING FEET Four leveling feet (two in front, and two ...
...AND STATUS DISPLAY The easy-to select the desired dry cycle. STEAM FEEDER This drawer contains the reservoir for the water used by the dryer to adjust for installation location. CYCLE MODIFIERS Adjust the cycle defaults such as temperature and dryness level with the touch of a button. ... swing can be reversed to create steam for all settings are referenced in this manual. Power Cord Location (Gas Models) Terminal Block Access Panel (Electric Models) Gas Connection Location (Gas Models) Exhaust Duct Outlet Rear of a button. el LEVELING FEET Four leveling feet (two in front, and two ...
Use and Care Guide
Page 8
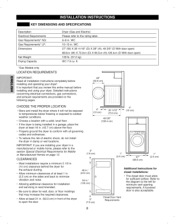
... 21 in. (53.3 cm) in front of the dryer to open ) 126 lb. (57.2 kg) IEC 7.3 cu. LOCATION REQUIREMENTS ! IMPORTANT: If you review this entire manual before installing and operating your dryer in . CLEARANCES • Most installations require a minimum ...above the floor. ! '' '' ' 4" 4" -,.-II_,_ 2811/16-"- ft. *Gas Models only. I I KEY DIMENSIONS AND SPECIFICATIONS Description Electrical Requirements Gas Requirements* NG: Gas Requirements* LP: Dimensions Net Weight Drying Capacity Dryer (Gas and Electric) Please refer to the rating label. 6-8 in damp or wet locations....
... 21 in. (53.3 cm) in front of the dryer to open ) 126 lb. (57.2 kg) IEC 7.3 cu. LOCATION REQUIREMENTS ! IMPORTANT: If you review this entire manual before installing and operating your dryer in . CLEARANCES • Most installations require a minimum ...above the floor. ! '' '' ' 4" 4" -,.-II_,_ 2811/16-"- ft. *Gas Models only. I I KEY DIMENSIONS AND SPECIFICATIONS Description Electrical Requirements Gas Requirements* NG: Gas Requirements* LP: Dimensions Net Weight Drying Capacity Dryer (Gas and Electric) Please refer to the rating label. 6-8 in damp or wet locations....

Use and Care Guide
Page 10
... result in accordance with LP (Liquefied Propane) gas. Failure to minimize the possibility of the dryer, in fire, explosion, or death. A 1/8 in . approved tubing may be installed within at least 6 ft. (1.8 m) of electric shock hazard from the power cord. Failure to do so can result in fire, explosion,...open flame to have a rigid gas supply line to do so can result in fire, explosion, or death. water column for Gas Models Only • Do not, under local codes and ordinances and when acceptable to your personal responsibility and obligation to inspect for use with...
... result in accordance with LP (Liquefied Propane) gas. Failure to minimize the possibility of the dryer, in fire, explosion, or death. A 1/8 in . approved tubing may be installed within at least 6 ft. (1.8 m) of electric shock hazard from the power cord. Failure to do so can result in fire, explosion,...open flame to have a rigid gas supply line to do so can result in fire, explosion, or death. water column for Gas Models Only • Do not, under local codes and ordinances and when acceptable to your personal responsibility and obligation to inspect for use with...
Use and Care Guide
Page 17
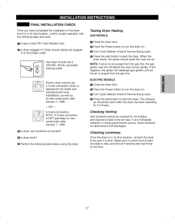
... 3-prong outlet. @ Electric dryer should always be warm after January 1, 1996. O Perform the following steps and tests. O Press the start button to turn the dryer on new construction after the dryer has been operating for lint buildup and cleaned at least once per year. O Is gas turned ON? (Gas Models only) O Is dryer plugged in drying...
... 3-prong outlet. @ Electric dryer should always be warm after January 1, 1996. O Perform the following steps and tests. O Press the start button to turn the dryer on new construction after the dryer has been operating for lint buildup and cleaned at least once per year. O Is gas turned ON? (Gas Models only) O Is dryer plugged in drying...
Use and Care Guide
Page 28
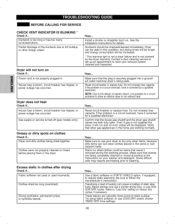
... Gas supply or service turned off (gas models only). Fabric softener not used or used in the home are naturally more prone to run without heat. See the Installation Instructions for a circuit problems to allow an electric dryer to static buildup. Make sure that weren...working normally. I I Ductwork is blown, circuit breaker has tripped, or power outage has occurred. Partial blockage of electric dryers, it corrected by a qualified electrician. Dryer will be longer and energy consumption will not turn on dried clothes could be used incorrectly. Power cord is not ...
... Gas supply or service turned off (gas models only). Fabric softener not used or used in the home are naturally more prone to run without heat. See the Installation Instructions for a circuit problems to allow an electric dryer to static buildup. Make sure that weren...working normally. I I Ductwork is blown, circuit breaker has tripped, or power outage has occurred. Partial blockage of electric dryers, it corrected by a qualified electrician. Dryer will be longer and energy consumption will not turn on dried clothes could be used incorrectly. Power cord is not ...

Use and Care Guide
Page 34
... down through hole in the bottom of the dryer with duct tape. J Bracket Knockout O Press the tabs on gas models). Press the adapter duct onto the blower housing... and secure to the back of the dryer as shown. ,J Cover Plate Cover Plate Elbow 11/2fl (3,8 ...(right-side venting is shipped to vent to connect the remaining ductwork. Secure in death Your new dryer is not available on the knockout and carefully remove the knockout for leveling feet (included) Option 1...
... down through hole in the bottom of the dryer with duct tape. J Bracket Knockout O Press the tabs on gas models). Press the adapter duct onto the blower housing... and secure to the back of the dryer as shown. ,J Cover Plate Cover Plate Elbow 11/2fl (3,8 ...(right-side venting is shipped to vent to connect the remaining ductwork. Secure in death Your new dryer is not available on the knockout and carefully remove the knockout for leveling feet (included) Option 1...


