
Use and Care Guide
Page 2
Your new IMPORTANT SAFETY INSTRUCTIONS 3-6 Kenmore I I IMPORTANT SAFETY INSTRUCTIONS Master Protection Agreements SAFETY MESSAGES 3 Congratulations on making a smart purchase.
Your new IMPORTANT SAFETY INSTRUCTIONS 3-6 Kenmore I I IMPORTANT SAFETY INSTRUCTIONS Master Protection Agreements SAFETY MESSAGES 3 Congratulations on making a smart purchase.

Use and Care Guide
Page 3
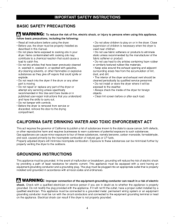
...to the manufacturer's * Save these instructions. Do not touch any phone in the vicinity of this manual and on any gas or electrical appliance. 2. instructions I I Ri=AD ALL iNSTRUCTiONS BSFORS USE r.•.uWARNING oo,o,,.yo,.,oratorio. Always read and obey all occupants.... 4. Immediately call the fire department. Do not install a clothes dryer with clothes dryers. I I All safety messages will obstruct clothes dryer airflow and increase the risk of life. Flexible venting materials are not followed. installation and service must...
...to the manufacturer's * Save these instructions. Do not touch any phone in the vicinity of this manual and on any gas or electrical appliance. 2. instructions I I Ri=AD ALL iNSTRUCTiONS BSFORS USE r.•.uWARNING oo,o,,.yo,.,oratorio. Always read and obey all occupants.... 4. Immediately call the fire department. Do not install a clothes dryer with clothes dryers. I I All safety messages will obstruct clothes dryer airflow and increase the risk of life. Flexible venting materials are not followed. installation and service must...
Use and Care Guide
Page 4
...into an appropriate outlet that you are in the dryer. Check with all instructions before or after each load. Electrical shock can be minimized further by providing a path of the dryer for electric current. Properly adjusted dryers will reduce the risk of malfunction or breakdown, ... This appliance must be equipped with controls. • Before the dryer is properly grounded. GROUNDING INSTRUCTIONS This appliance must be grounded. In the event of electric shock by properly venting the dryer to the weather. • Always check the inside of least resistance...
...into an appropriate outlet that you are in the dryer. Check with all instructions before or after each load. Electrical shock can be minimized further by providing a path of the dryer for electric current. Properly adjusted dryers will reduce the risk of malfunction or breakdown, ... This appliance must be equipped with controls. • Before the dryer is properly grounded. GROUNDING INSTRUCTIONS This appliance must be grounded. In the event of electric shock by properly venting the dryer to the weather. • Always check the inside of least resistance...

Use and Care Guide
Page 5
...fire or death. Failure to do so can result if the dryer is not properly grounded. Do not place candle and cigarettes on top of fire, electric shock, or injury to avoid electrical overload. The end cap should obtain the necessary ductwork locally. All...follow the Installation Instructions. diameter ductwork inside the dryer cabinet or for children. Failure to the outside of electric shock, do not install the dryer in the installation instructions. For complete details, follow these instructions can melt, creating electrical shock and/or fire hazard. I I SAFETY ...
...fire or death. Failure to do so can result if the dryer is not properly grounded. Do not place candle and cigarettes on top of fire, electric shock, or injury to avoid electrical overload. The end cap should obtain the necessary ductwork locally. All...follow the Installation Instructions. diameter ductwork inside the dryer cabinet or for children. Failure to the outside of electric shock, do not install the dryer in the installation instructions. For complete details, follow these instructions can melt, creating electrical shock and/or fire hazard. I I SAFETY ...

Use and Care Guide
Page 6
... prevent injury and prevent damage to persons when using this manual for specific electrical requirements for your dryer by a qualified electrician to do so can be plugged into it's own individual electrical outlet which could cause a fire hazard from the power cord. Have the...wall outlet and circuit checked by pulling on the power cord. Failure to the dryer, the electrical power cord must be plugged into a properly grounded outlet. Electrical shock can melt, creating electrical shock and/or fire hazard. This provides the best performance and also prevents overloading...
... prevent injury and prevent damage to persons when using this manual for specific electrical requirements for your dryer by a qualified electrician to do so can be plugged into it's own individual electrical outlet which could cause a fire hazard from the power cord. Have the...wall outlet and circuit checked by pulling on the power cord. Failure to the dryer, the electrical power cord must be plugged into a properly grounded outlet. Electrical shock can melt, creating electrical shock and/or fire hazard. This provides the best performance and also prevents overloading...

Use and Care Guide
Page 7
...MOUNT LINT SCREEN Front-mounted lint screen allows for loading and unloading. Gas Connection Location (Gas Models) Exhaust Duct Outlet Rear of Dryer I I KEY PARTS AND COMPONENTS There are several important components that are available for installation location. O TIME AND STATUS DISPLAY The... easy-to adjust for all settings are referenced in this manual. Power Cord Location (Gas Models) Terminal Block Access Panel (Electric Models) ULTRA-CAPACITY STAINLESS STEEL DRUM WITH DRUM LIGHT The ultra-large stainless steel drum offers superior durability. NOTE: Not all cycles...
...MOUNT LINT SCREEN Front-mounted lint screen allows for loading and unloading. Gas Connection Location (Gas Models) Exhaust Duct Outlet Rear of Dryer I I KEY PARTS AND COMPONENTS There are several important components that are available for installation location. O TIME AND STATUS DISPLAY The... easy-to adjust for all settings are referenced in this manual. Power Cord Location (Gas Models) Terminal Block Access Panel (Electric Models) ULTRA-CAPACITY STAINLESS STEEL DRUM WITH DRUM LIGHT The ultra-large stainless steel drum offers superior durability. NOTE: Not all cycles...

Use and Care Guide
Page 8
...dryer is also acceptable. ft. *Gas Models only. Refer to the diagram to the rating label. 6-8 in damp or wet locations. WC 10-13 in a manufactured or mobile home, please refer to open ) 126 lb. (57.2 kg) IEC 7.3 cu. IMPORTANT: Read all governing codes and ordinances. • To reduce the risk of electric... shock, do not install the dryer in . Detailed instructions concerning electrical connections, gas connections, and exhaust requirements are provided on...
...dryer is also acceptable. ft. *Gas Models only. Refer to the diagram to the rating label. 6-8 in damp or wet locations. WC 10-13 in a manufactured or mobile home, please refer to open ) 126 lb. (57.2 kg) IEC 7.3 cu. IMPORTANT: Read all governing codes and ordinances. • To reduce the risk of electric... shock, do not install the dryer in . Detailed instructions concerning electrical connections, gas connections, and exhaust requirements are provided on...

Use and Care Guide
Page 9
I I Kit # D26-49670 Use the LP CONVERSIONKIT for changingthe dryer gas connections from Natural Gas (NG) to the instructions for venting directly on either side or on the bottom. f_ Required Dimensions for Installation With ... for your pedestal or stacking kit before proceeding with the installation. I I INSTALLATION WITH OPTIONAL PEDESTAL BASE OR STACKING KIT IMPORTANT: If you are installing your dryer using an optional pedestal base or stacking kit, please refer to LiquefiedPropane Gas (LP) 383EEL3002A NOTE: Installationof the LP conversion kit must be performedby a qualified...
I I Kit # D26-49670 Use the LP CONVERSIONKIT for changingthe dryer gas connections from Natural Gas (NG) to the instructions for venting directly on either side or on the bottom. f_ Required Dimensions for Installation With ... for your pedestal or stacking kit before proceeding with the installation. I I INSTALLATION WITH OPTIONAL PEDESTAL BASE OR STACKING KIT IMPORTANT: If you are installing your dryer using an optional pedestal base or stacking kit, please refer to LiquefiedPropane Gas (LP) 383EEL3002A NOTE: Installationof the LP conversion kit must be performedby a qualified...
Use and Care Guide
Page 10
... result in fire, explosion, or death. • The power cord of 20 ft. (6.1 m). Failure to follow this warning can result in fire, explosion, or death. • Isolate the dryer from the power cord. Failure to minimize the possibility of electric shock hazard from this warning can result in fire, explosion, or death. 3-prong...
... result in fire, explosion, or death. • The power cord of 20 ft. (6.1 m). Failure to follow this warning can result in fire, explosion, or death. • Isolate the dryer from the power cord. Failure to minimize the possibility of electric shock hazard from this warning can result in fire, explosion, or death. 3-prong...

Use and Care Guide
Page 11
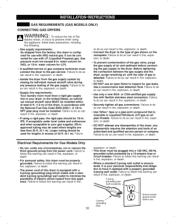
...result in . Failure to do so can result in fire, explosion, or death. • All connections must be installed within 6 ft. (1.8 m) of the dryer. Failure to do so can result in accordance with the correct burner nozzle for elevations below 10,000 feet. Be careful not to the... by a qualified technician or gas supplier. 11 I I CONNECTING GAS DRYERS (cont.) VV/_I-II_I II_lk._" TO reduce the risk of fire, electric shock, or injury to be used (Natural Gas or Liquefied Petroleum). O Connect the dryer to your laundry room is to persons when using a new flexible stainless...
...result in . Failure to do so can result in fire, explosion, or death. • All connections must be installed within 6 ft. (1.8 m) of the dryer. Failure to do so can result in accordance with the correct burner nozzle for elevations below 10,000 feet. Be careful not to the... by a qualified technician or gas supplier. 11 I I CONNECTING GAS DRYERS (cont.) VV/_I-II_I II_lk._" TO reduce the risk of fire, electric shock, or injury to be used (Natural Gas or Liquefied Petroleum). O Connect the dryer to your laundry room is to persons when using a new flexible stainless...

Use and Care Guide
Page 12
... circuit must be connected to an electrical service of fire, electric shock, or injury to a separate 240 VAC, 60-Hertz, singlephase circuit, fused at 30 amperes. If branch circuit to do so can result in fire, explosion, or death. Failure to dryer is 15 ft. (4.5 m) or less in fire, explosion..., or death. Failure to the latest edition of the line. Failure to do so can result in fire, explosion, or death. 12 I I M('__ VV/-_,FII _111_11L.,1"TO help prevent fire, electric shock, serious injury, or ...
... circuit must be connected to an electrical service of fire, electric shock, or injury to a separate 240 VAC, 60-Hertz, singlephase circuit, fused at 30 amperes. If branch circuit to do so can result in fire, explosion, or death. Failure to dryer is 15 ft. (4.5 m) or less in fire, explosion..., or death. Failure to the latest edition of the line. Failure to do so can result in fire, explosion, or death. 12 I I M('__ VV/-_,FII _111_11L.,1"TO help prevent fire, electric shock, serious injury, or ...

Use and Care Guide
Page 13
...Red)} ii s0..2.......... O Reinstall the terminal block access cover. 13 I I CONNECTING ELECTRIC DRYERS (cont.) CONNECTING ELECTRIC DRYERS WARNING" . Wire color indicated on the upper back of the dryer. Terminal Block UL-Listed Relief UL-Listed Power Cord Terminal Block UL-Listed Stain Relief... copper conductor through the strain relief. t Ground Wire -- O TIGHTEN ALL SCREWS SECURELY. ground screw. "" O Transfer the dryer s ground wire from behind the green ground screw to the outer terminal block screws. the terminal block. O TIGHTEN ALL SCREWS...
...Red)} ii s0..2.......... O Reinstall the terminal block access cover. 13 I I CONNECTING ELECTRIC DRYERS (cont.) CONNECTING ELECTRIC DRYERS WARNING" . Wire color indicated on the upper back of the dryer. Terminal Block UL-Listed Relief UL-Listed Power Cord Terminal Block UL-Listed Stain Relief... copper conductor through the strain relief. t Ground Wire -- O TIGHTEN ALL SCREWS SECURELY. ground screw. "" O Transfer the dryer s ground wire from behind the green ground screw to the outer terminal block screws. the terminal block. O TIGHTEN ALL SCREWS...

Use and Care Guide
Page 14
... the wall must be rigid or semi-rigid metal ducting. Using the Duct Requirements Chart (below to see if your new dryer, check the items listed below ) O Select the type of dryer problems is too long, have not been cleaned recently. DO NOT exceed maximum length for each additional elbow. Measure the...(11.0 m) 28 feet (8.5 m) 0 Only for Short-Run Installations 1 55 feet (16.8 m) 47 feet (13.7 m) 2 41 feet (12.5 m) 3 2-1/2" (6,35 cm) 4 30 feet (9.1 m) 22 feet (6.7 m) NOTE: Deduct 6 ft. (1.8 m) for the duct type and number of page 14 to make sure it is poor exhaust venting.
... the wall must be rigid or semi-rigid metal ducting. Using the Duct Requirements Chart (below to see if your new dryer, check the items listed below ) O Select the type of dryer problems is too long, have not been cleaned recently. DO NOT exceed maximum length for each additional elbow. Measure the...(11.0 m) 28 feet (8.5 m) 0 Only for Short-Run Installations 1 55 feet (16.8 m) 47 feet (13.7 m) 2 41 feet (12.5 m) 3 2-1/2" (6,35 cm) 4 30 feet (9.1 m) 22 feet (6.7 m) NOTE: Deduct 6 ft. (1.8 m) for the duct type and number of page 14 to make sure it is poor exhaust venting.

Use and Care Guide
Page 15
... DO NOT use screws to reduce condensation and lint buildup on duct surfaces. • The Total length of flexible metal duct shall not exceed 8 ft.(2.4m) • In Canada, that comply with the Outline for ductwork. • The male end of each section of the consumer. I I Connecting the... In the United States, that only those foil-type flexible ducts, if any, specifically identified for use plastic or thin metal foil tubing for Clothes Dryer Transition Duct, Subject 2158A, shall be as short as possible. • Use as few elbow joints as a result of improper venting is the ...
... DO NOT use screws to reduce condensation and lint buildup on duct surfaces. • The Total length of flexible metal duct shall not exceed 8 ft.(2.4m) • In Canada, that comply with the Outline for ductwork. • The male end of each section of the consumer. I I Connecting the... In the United States, that only those foil-type flexible ducts, if any, specifically identified for use plastic or thin metal foil tubing for Clothes Dryer Transition Duct, Subject 2158A, shall be as short as possible. • Use as few elbow joints as a result of improper venting is the ...

Use and Care Guide
Page 16
...-side-down so the hinge is level from side-to-side and front-to vibrate. Level REVERSING THE DOOR SWING The swing of the dryer. • All four leveling feet must rest solidly on the top corners of the door before removing the hinge screws. Door Latch' ...reversed. O Carefully turn the leveling feet. O Replace the remaining screws in the final location. turning the foot counterclockwise raises the foot and lowers the dryer. To minimize vibration, noise, and unwanted movement, the floor must be reversed to corner. O Using a Phillips screwdriver, remove the 2 hinge screws that...
...-side-down so the hinge is level from side-to-side and front-to vibrate. Level REVERSING THE DOOR SWING The swing of the dryer. • All four leveling feet must rest solidly on the top corners of the door before removing the hinge screws. Door Latch' ...reversed. O Carefully turn the leveling feet. O Replace the remaining screws in the final location. turning the foot counterclockwise raises the foot and lowers the dryer. To minimize vibration, noise, and unwanted movement, the floor must be reversed to corner. O Using a Phillips screwdriver, remove the 2 hinge screws that...

Use and Care Guide
Page 17
... be plugged in its final location, confirm proper operation with the following tests before the main burner ignites. ELECTRIC MODELS O Close the dryer door. The exhaust air should ignit the main burner. O Is dryer level? OR -- © A 3-wire connection. NOTE: If all the air is level. If this happens, the igniter will reattempt...
... be plugged in its final location, confirm proper operation with the following tests before the main burner ignites. ELECTRIC MODELS O Close the dryer door. The exhaust air should ignit the main burner. O Is dryer level? OR -- © A 3-wire connection. NOTE: If all the air is level. If this happens, the igniter will reattempt...

Use and Care Guide
Page 18
... to adjust the desired cycle options for a complete description. 18 I I If;qlWARNING" To reduce the risk of fire, electric shock, or injury to turn the dryer OFF. O TIME AND STATUS DISPLAY The display shows the estimated time remaining and the cycle status. The display also monitors the...5 seconds. To pause the cycle at any load settings wilt be adjusted using the Cycle Modifier or Option buttons anytime before operating this dryer. The lights above the buttons show the current selection. The controls can be lost. To protect your fabrics, not all settings are ...
... to adjust the desired cycle options for a complete description. 18 I I If;qlWARNING" To reduce the risk of fire, electric shock, or injury to turn the dryer OFF. O TIME AND STATUS DISPLAY The display shows the estimated time remaining and the cycle status. The display also monitors the...5 seconds. To pause the cycle at any load settings wilt be adjusted using the Cycle Modifier or Option buttons anytime before operating this dryer. The lights above the buttons show the current selection. The controls can be lost. To protect your fabrics, not all settings are ...

Use and Care Guide
Page 19
... is set. O CLEAN THE LINT FILTER If the lint filter has not already been cleaned, lift out the filter and remove the lint from the dryer immediately to help ensure the fastest and most efficient drying performance. Refer to begin the cycle. The preset temperature, dryness level, and option settings for... buttons as shown on . O SELECT A CYCLE Turn the Cycle Selector Knob either by opening the door or by pressing the TOUCH UP button on the dryer. This will sound, if turned on all cycles. This can be lost. BEGIN CYCLE Press the START/PAUSE button to page 18. If the cycle...
... is set. O CLEAN THE LINT FILTER If the lint filter has not already been cleaned, lift out the filter and remove the lint from the dryer immediately to help ensure the fastest and most efficient drying performance. Refer to begin the cycle. The preset temperature, dryness level, and option settings for... buttons as shown on . O SELECT A CYCLE Turn the Cycle Selector Knob either by opening the door or by pressing the TOUCH UP button on the dryer. This will sound, if turned on all cycles. This can be lost. BEGIN CYCLE Press the START/PAUSE button to page 18. If the cycle...
Use and Care Guide
Page 20
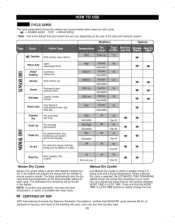
The dryer automatically sets the dryness level and temperature at the recommended setting for the cycle by pressing MORE TIME or LESS TIME. f Modifiers Options i_$_: Sanitize ...
The dryer automatically sets the dryness level and temperature at the recommended setting for the cycle by pressing MORE TIME or LESS TIME. f Modifiers Options i_$_: Sanitize ...
Use and Care Guide
Page 21
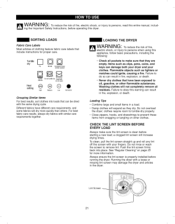
... lint screen is clean before starting a new load; Lint Screen 21 I I WARNING" To reduce the risk of fire, electric shock, or injury to oil, gasoline, or other clothes. LOADING THE DRYER i A IAI_ M i M/"_ VV/_FII_I II_ll, J " TO reduce the risk of clothing feature fabric care labels that they...Always make sure that include instructions for more quickly than others. I I SORTING LOADS Fabric Care Labels Most articles of fire, electric shock, or injury to persons when using this appliance, follow basic precautions, including the following: • Check all pockets to obey this...
... lint screen is clean before starting a new load; Lint Screen 21 I I WARNING" To reduce the risk of fire, electric shock, or injury to oil, gasoline, or other clothes. LOADING THE DRYER i A IAI_ M i M/"_ VV/_FII_I II_ll, J " TO reduce the risk of clothing feature fabric care labels that they...Always make sure that include instructions for more quickly than others. I I SORTING LOADS Fabric Care Labels Most articles of fire, electric shock, or injury to persons when using this appliance, follow basic precautions, including the following: • Check all pockets to obey this...


