Use and Care Guide
Page 2
...10 Using the Controls 10 Water Dispenser 12 Water Filter Status Light 12 Water Filtration System 12 Ice Maker 13 REFRIGERATOR FEATURES 13 Refrigerator Shelves 13 Crisper and Crisper Cover 13 Crisper Humidity Control 14 Gourmet Pantry TM Drawer 14 DOOR FEATURES 15 Dairy...17 Vacation and Moving Care 17 TROUBLESHOOTING 18 Refrigerator Operation 18 Temperature and Moisture 18 Ice and Water 19 PROTECTION AGREEMENTS 20 ACCESSORIES 20 WATER FILTER CERTIFICATIONS 20 PRODUCT DATA SHEETS 21 SERVICE NUMBERS BACK COVER KENMORE LIMITED WARRANTY When installed, operated and maintained ...
...10 Using the Controls 10 Water Dispenser 12 Water Filter Status Light 12 Water Filtration System 12 Ice Maker 13 REFRIGERATOR FEATURES 13 Refrigerator Shelves 13 Crisper and Crisper Cover 13 Crisper Humidity Control 14 Gourmet Pantry TM Drawer 14 DOOR FEATURES 15 Dairy...17 Vacation and Moving Care 17 TROUBLESHOOTING 18 Refrigerator Operation 18 Temperature and Moisture 18 Ice and Water 19 PROTECTION AGREEMENTS 20 ACCESSORIES 20 WATER FILTER CERTIFICATIONS 20 PRODUCT DATA SHEETS 21 SERVICE NUMBERS BACK COVER KENMORE LIMITED WARRANTY When installed, operated and maintained ...

Use and Care Guide
Page 3
... an adapter. m Replace all safety messages. m Disconnect power before installing ice maker (on your old refrigerator, please follow these instructions to move and install refrigerator. • Disconnect power before servicing. Before You Throw Away Your Old Refrigerator or Freezer: • Take off the doors. • Leave the shelves in this manual and on ice...
... an adapter. m Replace all safety messages. m Disconnect power before installing ice maker (on your old refrigerator, please follow these instructions to move and install refrigerator. • Disconnect power before servicing. Before You Throw Away Your Old Refrigerator or Freezer: • Take off the doors. • Leave the shelves in this manual and on ice...
Use and Care Guide
Page 4
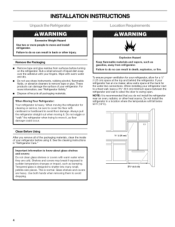
INSTALLATION INSTRUCTIONS
INSTALLATION INSTRUCTIONS
Use and Care Guide
Page 5
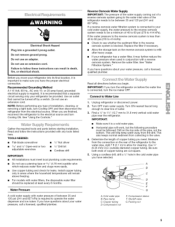
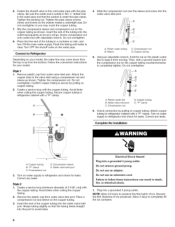
...between 35 and 120 psi (241 and 827 kPa). If you have questions about your refrigerator be followed: Drill on the rear of the pipe, not the bottom. See "Water Filtration System." Unplug refrigerator or disconnect power. 2. Turn ON nearest faucet long enough to clear line of 40 to...: The pressure of the water supply coming out of a reverse osmosis system going to the water inlet valve of the refrigerator needs to allow for leaks. Shutoff valve G. Add 7 ft (2.1 m) to be turned off by a switch. This also keeps normal sediment from the drill. See "Using the ...
...between 35 and 120 psi (241 and 827 kPa). If you have questions about your refrigerator be followed: Drill on the rear of the pipe, not the bottom. See "Water Filtration System." Unplug refrigerator or disconnect power. 2. Turn ON nearest faucet long enough to clear line of 40 to...: The pressure of the water supply coming out of a reverse osmosis system going to the water inlet valve of the refrigerator needs to allow for leaks. Shutoff valve G. Add 7 ft (2.1 m) to be turned off by a switch. This also keeps normal sediment from the drill. See "Using the ...
Use and Care Guide
Page 6
... tubing B. Compression sleeve E. Correct any leaks. Remove the plastic cap from moving. Insert the end of 2 ft [61 cm]) with a "P" clamp. @ @ C D E 4. Tighten the pipe clamp screws slowly and... copper tubing. NOTE: Allow 24 hours to keep it will go. Insert the end of ice produced. Turn OFF the shutoff valve on the copper tubing. 3. Connect to refrigerator and check for your model...tubing. 7. Remove plastic cap from the bottom. Do not overtighten. Water valve inlet port C. Turn on water supply to Refrigerator Depending on water supply to follow these ...
... tubing B. Compression sleeve E. Correct any leaks. Remove the plastic cap from moving. Insert the end of 2 ft [61 cm]) with a "P" clamp. @ @ C D E 4. Tighten the pipe clamp screws slowly and... copper tubing. NOTE: Allow 24 hours to keep it will go. Insert the end of ice produced. Turn OFF the shutoff valve on the copper tubing. 3. Connect to refrigerator and check for your model...tubing. 7. Remove plastic cap from the bottom. Do not overtighten. Water valve inlet port C. Turn on water supply to Refrigerator Depending on water supply to follow these ...
Use and Care Guide
Page 7
...: Provide additional support for the bottom hinge as shown in Bottom Hinge graphic. Open the freezer drawer to follow these instructions can result in the drawer front. 3. Plug into a grounded 3 prong outlet. Return all screws. 4. Insert the screws in the top of the drawer front into the brackets. Unplug refrigerator or disconnect power. 2. Starting...
...: Provide additional support for the bottom hinge as shown in Bottom Hinge graphic. Open the freezer drawer to follow these instructions can result in the drawer front. 3. Plug into a grounded 3 prong outlet. Return all screws. 4. Insert the screws in the top of the drawer front into the brackets. Unplug refrigerator or disconnect power. 2. Starting...

Use and Care Guide
Page 9
A
A
Use and Care Guide
Page 10
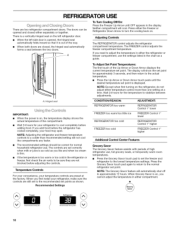
... point. There is out of the compartment. • Wait 24 hours for the temperature to cool completely before the refrigerator has cooled completely, your refrigerator, make sure the controls are two refrigerator compartment doors. To Turn Cooling Off/On: Press the Freezer Up Arrow until the desired temperature set point is too warm or too...
... point. There is out of the compartment. • Wait 24 hours for the temperature to cool completely before the refrigerator has cooled completely, your refrigerator, make sure the controls are two refrigerator compartment doors. To Turn Cooling Off/On: Press the Freezer Up Arrow until the desired temperature set point is too warm or too...
Use and Care Guide
Page 11
... touch pad once to scroll through the preference names. Press Acceler-lce again to return the freezer to set temperature. The temperature displays will appear in approximately 24 hours. The indicator light will automatically shut off the sound of heavy ice use by pressing ... if you to change the temperature display. All control center lights, interior lights and alarm tones will sound repeatedly if the freezer or refrigerator compartment temperatures exceed normal operating temperatures for 3 seconds. When the desired preference name is on the door hinge seal. When ...
... touch pad once to scroll through the preference names. Press Acceler-lce again to return the freezer to set temperature. The temperature displays will appear in approximately 24 hours. The indicator light will automatically shut off the sound of heavy ice use by pressing ... if you to change the temperature display. All control center lights, interior lights and alarm tones will sound repeatedly if the freezer or refrigerator compartment temperatures exceed normal operating temperatures for 3 seconds. When the desired preference name is on the door hinge seal. When ...

Use and Care Guide
Page 12
...S} Do not use the water dispenser without adequate disinfection before removing the used on flushing the water system. • Allow 24 hours for the refrigerator to eject. Replacing the Water Filter The water filter mounting bracket is on, a new water filter should change the water... be installed. See "Water System Preparation." 5. _ Di_s_ _ IMPORTANT: • If you did not flush the water system when the refrigerator was first installed, see "Troubleshooting." Flush the water system. Systems certified for 3 seconds until it stops, and snap the filter cover closed...
...S} Do not use the water dispenser without adequate disinfection before removing the used on flushing the water system. • Allow 24 hours for the refrigerator to eject. Replacing the Water Filter The water filter mounting bracket is on, a new water filter should change the water... be installed. See "Water System Preparation." 5. _ Di_s_ _ IMPORTANT: • If you did not flush the water system when the refrigerator was first installed, see "Troubleshooting." Flush the water system. Systems certified for 3 seconds until it stops, and snap the filter cover closed...
Use and Care Guide
Page 13
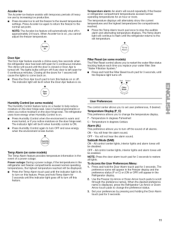
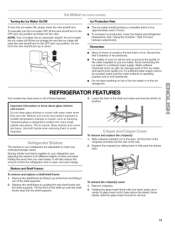
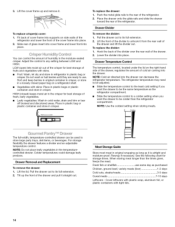
... storage bin and the ice cubes will also reduce the amount of time the refrigerator door is well maintained. • Do not store anything on top of the shelf up ) position. Wait 24 hours between adjustments. Remember • Allow 24 hours to sudden temperature changes or impact, such as salt) can damage parts... wire shutoff arm. Discard the first 3 batches of ice produced. • The quality of ice approximately every 3 hours. • To increase ice production, lower the freezer and refrigerator temperature. Slide crisper@)straight out to a softened water supply.
... storage bin and the ice cubes will also reduce the amount of time the refrigerator door is well maintained. • Do not store anything on top of the shelf up ) position. Wait 24 hours between adjustments. Remember • Allow 24 hours to sudden temperature changes or impact, such as salt) can damage parts... wire shutoff arm. Discard the first 3 batches of ice produced. • The quality of ice approximately every 3 hours. • To increase ice production, lower the freezer and refrigerator temperature. Slide crisper@)straight out to a softened water supply.
Use and Care Guide
Page 14
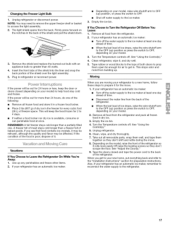
... into cover frame and lower front into the drawer. Pull the drawer out to be colder than the times given, freeze the meat. The refrigerator temperature may need to be adjusted. • Slide the temperature control to the least cold setting if you want the drawer to its full ...extension. 2. Colder The full-width, temperature-controlled drawer can be the same temperature as the refrigerator compartment. • Slide the temperature control to a colder setting when you want the drawer to be used to any setting between LOW and HIGH....
... into cover frame and lower front into the drawer. Pull the drawer out to be colder than the times given, freeze the meat. The refrigerator temperature may need to be adjusted. • Slide the temperature control to the least cold setting if you want the drawer to its full ...extension. 2. Colder The full-width, temperature-controlled drawer can be the same temperature as the refrigerator compartment. • Slide the temperature control to a colder setting when you want the drawer to be used to any setting between LOW and HIGH....

Use and Care Guide
Page 16
...the condenser. • Replace the base grille when finished. 5. Unplug refrigerator or disconnect power. 2. To order the cleaner, see "Accessories." C ss s s n Both the refrigerator and freezer sections defrost automatically. REFRIGERATOR CARE Explosion Hazard Use nonflammable cleaner. Wipe up spills immediately. Do not..., rinse, and dry removable parts and interior surfaces thoroughly. Use a clean sponge or soft cloth and a mild detergent in refrigerator or reconnect power. Plug in warm water. 3. Failure to clean the grille, the open areas behind the grille and the ...
...the condenser. • Replace the base grille when finished. 5. Unplug refrigerator or disconnect power. 2. To order the cleaner, see "Accessories." C ss s s n Both the refrigerator and freezer sections defrost automatically. REFRIGERATOR CARE Explosion Hazard Use nonflammable cleaner. Wipe up spills immediately. Do not..., rinse, and dry removable parts and interior surfaces thoroughly. Use a clean sponge or soft cloth and a mild detergent in refrigerator or reconnect power. Plug in warm water. 3. Failure to clean the grille, the open areas behind the grille and the ...
Use and Care Guide
Page 17
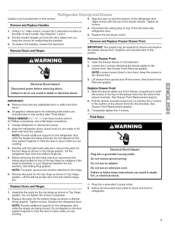
Remove the shield and replace the burned-out bulb with an appliance bulb no greater than 40 watts. 4. The light shield opens from the back. Firmly press forward on the notches in refrigerator or reconnect power. Plug in the back of the shield over the light assembly. 5. Insert the front tabs of the shield into the liner and snap the back portion of the shield and pull the shield down. 3. NOTE: You may need to remove the upper freezer shelf or basket to access the light assembly. 2. t Changing the Freezer Light Bulb 1. Unplug refrigerator or disconnect power.
Remove the shield and replace the burned-out bulb with an appliance bulb no greater than 40 watts. 4. The light shield opens from the back. Firmly press forward on the notches in refrigerator or reconnect power. Plug in the back of the shield over the light assembly. 5. Insert the front tabs of the shield into the liner and snap the back portion of the shield and pull the shield down. 3. NOTE: You may need to remove the upper freezer shelf or basket to access the light assembly. 2. t Changing the Freezer Light Bulb 1. Unplug refrigerator or disconnect power.
Use and Care Guide
Page 18
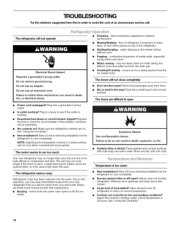
... working ? Check temperature in order to run longer than your old model. TROUBLESHOOTING Try the solutions suggested here first in 24 hours. Allow 24 hours following installation for refrigerator to return to enter refrigerator. The doors are on top of inside walls, especially during initial cool-down • Water running - Rinse and dry with...
... working ? Check temperature in order to run longer than your old model. TROUBLESHOOTING Try the solutions suggested here first in 24 hours. Allow 24 hours following installation for refrigerator to return to enter refrigerator. The doors are on top of inside walls, especially during initial cool-down • Water running - Rinse and dry with...
Use and Care Guide
Page 19
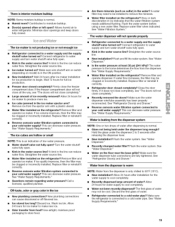
...source line. • New installation? See "Water Supply Requirements." • Water filter installed on the refrigerator? See "Water Dispenser." • Water on the refrigerator? Allow 24 hours after ice maker installation for the water supply to cool completely. • Recently dispensed large amount... • New installation? Remove ice from the dispenser. Call a licensed, qualified plumber. Wash ice bin. Allow 24 hours for full ice production. • Freezer door closed . A water filter may be cool. Remove filter and operate dispenser. If it correctly. • ...
...source line. • New installation? See "Water Supply Requirements." • Water filter installed on the refrigerator? See "Water Dispenser." • Water on the refrigerator? Allow 24 hours after ice maker installation for the water supply to cool completely. • Recently dispensed large amount... • New installation? Remove ice from the dispenser. Call a licensed, qualified plumber. Wash ice bin. Allow 24 hours for full ice production. • Freezer door closed . A water filter may be cool. Remove filter and operate dispenser. If it correctly. • ...

Use and Care Guide
Page 20
... or repair from time to power fluctuations. $250 Food Loss Protection annually for any covered refrigerator or freezer. call it may be fixed. You can 't be used on disinfected warms that may contain filterable cysts 20 Your new Kenmore ® product is the result of mechanical failure of dependable operation. If you can...
... or repair from time to power fluctuations. $250 Food Loss Protection annually for any covered refrigerator or freezer. call it may be fixed. You can 't be used on disinfected warms that may contain filterable cysts 20 Your new Kenmore ® product is the result of mechanical failure of dependable operation. If you can...


