Use and Care Guide
Page 4
Your new Kenmore ® product is a risk free purchase. That's when having a Master Protection Agreement can -cel for any food spoilage that is the result of mechanical failure of any covered refrigerator or freezer. [_ Rental reimbursement if repair of your covered product takes longer than 10... of more product failures occur within twelve months. [_ Product replacement if your covered product can call Sears Canada at your product. Model No. No deductibles, no extra charge. [d Fast help keep products operating properly under normal use, not just defects. For prices...
Your new Kenmore ® product is a risk free purchase. That's when having a Master Protection Agreement can -cel for any food spoilage that is the result of mechanical failure of any covered refrigerator or freezer. [_ Rental reimbursement if repair of your covered product takes longer than 10... of more product failures occur within twelve months. [_ Product replacement if your covered product can call Sears Canada at your product. Model No. No deductibles, no extra charge. [d Fast help keep products operating properly under normal use, not just defects. For prices...
Use and Care Guide
Page 5
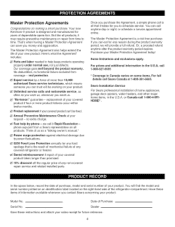
...properly installed in accordance with the Attention Installer Instructions that were taped to the front of the refrigerator. •After your refrigerator is in operation, do not touch the cold surfaces in the freezer compartment when hands are damp or wet. Always read and obey all instructions before cleaning or making...or fuse box in order to avoid contact with a live wire filament. (A burned-out light bulb may break when being replaced.) NOTE: Some models have thawed completely. It will identify the hazard, tell you how to reduce the chance of injury, and tell you or others, or cause ...
...properly installed in accordance with the Attention Installer Instructions that were taped to the front of the refrigerator. •After your refrigerator is in operation, do not touch the cold surfaces in the freezer compartment when hands are damp or wet. Always read and obey all instructions before cleaning or making...or fuse box in order to avoid contact with a live wire filament. (A burned-out light bulb may break when being replaced.) NOTE: Some models have thawed completely. It will identify the hazard, tell you how to reduce the chance of injury, and tell you or others, or cause ...
Use and Care Guide
Page 6
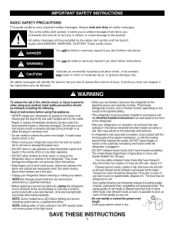
...minimum) and 120 volts. Have the wall outlet and the circuit checked by a qualified technician. NOTE: Some models have it is your old refrigerator, make sure the outlet is properly grounded. 3g-rporuonndgingtype wall receptacle _ grounding 3p-lupgro-n_g- _ __ ...prevent accidents (Child entrapment and suffocation). If you are finished, reconnect the refrigerator to the electrical source and reset the control (Thermostat, Refrigerator Control, or Freezer Control, depending on the model) to have LED interior lighting and service should always be properly grounded. IMPORTANT...
...minimum) and 120 volts. Have the wall outlet and the circuit checked by a qualified technician. NOTE: Some models have it is your old refrigerator, make sure the outlet is properly grounded. 3g-rporuonndgingtype wall receptacle _ grounding 3p-lupgro-n_g- _ __ ...prevent accidents (Child entrapment and suffocation). If you are finished, reconnect the refrigerator to the electrical source and reset the control (Thermostat, Refrigerator Control, or Freezer Control, depending on the model) to have LED interior lighting and service should always be properly grounded. IMPORTANT...

Use and Care Guide
Page 7
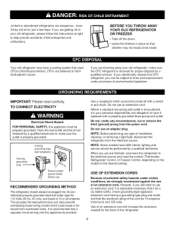
...) 0 Filter(Inside()p.27) (_ RefrigeratoSrhelves(p.23) _) DoorBins(p.25) HumidityControlleCd risper(p.24) Glide'N'Serv(ep.24) (_ CubeIceMaker(p.30) _) IceBin(p.25) tO Pull out Drawer (p. 26) Freezer Drawer Bin (p. 26) Divider (p. 26) Tilt-Out Door Basket (p. 26) _) Dairy Bin (p. 25) Bottle Holder (795.7855,, 7872* Models Only) (p. 23) (_ Utility/Egg Box (p. 25) Water Tank Cover herefrigeratoyrouhavepurchasedmayhavesomeor allofthe itemslistedbelow.Thelocationsof...
...) 0 Filter(Inside()p.27) (_ RefrigeratoSrhelves(p.23) _) DoorBins(p.25) HumidityControlleCd risper(p.24) Glide'N'Serv(ep.24) (_ CubeIceMaker(p.30) _) IceBin(p.25) tO Pull out Drawer (p. 26) Freezer Drawer Bin (p. 26) Divider (p. 26) Tilt-Out Door Basket (p. 26) _) Dairy Bin (p. 25) Bottle Holder (795.7855,, 7872* Models Only) (p. 23) (_ Utility/Egg Box (p. 25) Water Tank Cover herefrigeratoyrouhavepurchasedmayhavesomeor allofthe itemslistedbelow.Thelocationsof...

Use and Care Guide
Page 8
... or service, be adversely affected. 3. Do not remove any warning-type labels, the model and serial number label, or the TechSheet that is heavy. To remove any temporary labels...floor. Allow the clearance of installation, proper air circulation and electrical connections. When Moving Your Refrigerator: Your refrigerator is attached to compensate for better cooling efficiency, ease of at least 2 or 3 hours ...Keep flammable materials and vapors, such as ice cube bin, drawers, shelves, etc., in the freezer compartment to lower it , as floor damage could occur. Allow at least 24 in. (61 ...
... or service, be adversely affected. 3. Do not remove any warning-type labels, the model and serial number label, or the TechSheet that is heavy. To remove any temporary labels...floor. Allow the clearance of installation, proper air circulation and electrical connections. When Moving Your Refrigerator: Your refrigerator is attached to compensate for better cooling efficiency, ease of at least 2 or 3 hours ...Keep flammable materials and vapors, such as ice cube bin, drawers, shelves, etc., in the freezer compartment to lower it , as floor damage could occur. Allow at least 24 in. (61 ...
Use and Care Guide
Page 9
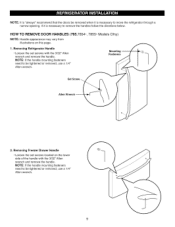
...is necessartyo removethehandlesfollowthedirectionsbelow. NOTE: If the handle mounting fasteners need to be tightened or removed, use a 1/4" Allen wrench. 7855* Models Olny) Mounting -Fasteners Set Allen Wrench -- 2. HOW TO REMOVE DOOR HANDLES NOTE: Handle appearance may vary from illustrations on ... wrench and remove the handle. Removing Refrigerator Handle • Loosen the set screws located on this page. (795.7854*, 1. NOTE: If the handle mounting fasteners need to be tightened or removed, use a 1/4" Allen wrench. Removing Freezer Drawer Handle • Loosen the set...
...is necessartyo removethehandlesfollowthedirectionsbelow. NOTE: If the handle mounting fasteners need to be tightened or removed, use a 1/4" Allen wrench. 7855* Models Olny) Mounting -Fasteners Set Allen Wrench -- 2. HOW TO REMOVE DOOR HANDLES NOTE: Handle appearance may vary from illustrations on ... wrench and remove the handle. Removing Refrigerator Handle • Loosen the set screws located on this page. (795.7854*, 1. NOTE: If the handle mounting fasteners need to be tightened or removed, use a 1/4" Allen wrench. Removing Freezer Drawer Handle • Loosen the set...
Use and Care Guide
Page 10
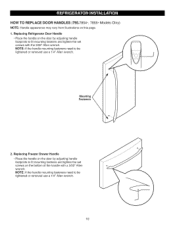
... 2. HOW TO REPLACE DOOR HANDLES (795.7854*, 7855* Models Olny) NOTE: Handle appearance may vary from illustrations on the door by adjusting handle footprints to fit mounting fastners and tighten the set screws with a 3/32" Allen wrench. Replacing Freezer Drawer Handle • Place the handle on...on the bottom of the handle with the 3/32" Allen wrench. NOTE: tf the handle mounting fasteners need to be tightened or removed use a 1/4" Allen wrench. 10 NOTE: If the handle mounting fasteners need to be tightened or removed use a 1/4" Allen wrench. Replacing Refrigerator Door ...
... 2. HOW TO REPLACE DOOR HANDLES (795.7854*, 7855* Models Olny) NOTE: Handle appearance may vary from illustrations on the door by adjusting handle footprints to fit mounting fastners and tighten the set screws with a 3/32" Allen wrench. Replacing Freezer Drawer Handle • Place the handle on...on the bottom of the handle with the 3/32" Allen wrench. NOTE: tf the handle mounting fasteners need to be tightened or removed use a 1/4" Allen wrench. 10 NOTE: If the handle mounting fasteners need to be tightened or removed use a 1/4" Allen wrench. Replacing Refrigerator Door ...
Use and Care Guide
Page 11
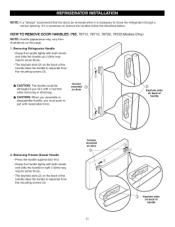
...• The keyhole slots (2) on back of handle 2. Removing Refrigerator Handle • Grasp the handle tightly with both hands and slide the handle up (1)(this page. (795. 78712, 78713, 78722, 78723 Models Olny) 1. Removing Freezer Drawer Handle • Press the handle against door first. •...; Grasp the handle tightly with both hands and slide the handle to move the refrigerator through a narrow opening. If it is necessary to ...
...• The keyhole slots (2) on back of handle 2. Removing Refrigerator Handle • Grasp the handle tightly with both hands and slide the handle up (1)(this page. (795. 78712, 78713, 78722, 78723 Models Olny) 1. Removing Freezer Drawer Handle • Press the handle against door first. •...; Grasp the handle tightly with both hands and slide the handle to move the refrigerator through a narrow opening. If it is necessary to ...

Use and Care Guide
Page 12
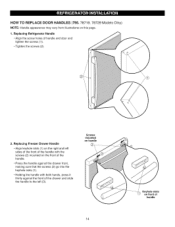
Replacing Refrigerator Handle • Align keyhole slots (1) on the top and bottom of the back of the handle with the screws (2) mounted on the front of the door. • Press the handle against the door front, making ... to the left sides of the back of handle Screws mounted on door ® 12 Keyhole slots on this page. (795. 78712, 78713, 78722, 78723 Models Olny) 1. HOW TO REPLACE DOOR HANDLES NOTE: Handle appearance may vary from illustrations on back of the handle with the screws (5) mounted on door 2. Replacing...
Replacing Refrigerator Handle • Align keyhole slots (1) on the top and bottom of the back of the handle with the screws (2) mounted on the front of the door. • Press the handle against the door front, making ... to the left sides of the back of handle Screws mounted on door ® 12 Keyhole slots on this page. (795. 78712, 78713, 78722, 78723 Models Olny) 1. HOW TO REPLACE DOOR HANDLES NOTE: Handle appearance may vary from illustrations on back of the handle with the screws (5) mounted on door 2. Replacing...

Use and Care Guide
Page 13
... handle, you must push or pull with both hands and slide the handle to right (1) (this page. (795. 78719, 78729 Models Olny) 1. Removing Refrigerator Handle • Remove the screws (1) on handle 2. Removing Freezer Drawer Handle • Press the handle against door first. • Grasp the handle tightly with reasonable force. Screws mounted on...
... handle, you must push or pull with both hands and slide the handle to right (1) (this page. (795. 78719, 78729 Models Olny) 1. Removing Refrigerator Handle • Remove the screws (1) on handle 2. Removing Freezer Drawer Handle • Press the handle against door first. • Grasp the handle tightly with reasonable force. Screws mounted on...
Use and Care Guide
Page 14
... HANDLES (795. 78719, 78729 Models Olny) NOTE: Handle appearance may vary from illustrations on front of handle Replacing Refrigerator Handle • Align the screw holes of the drawer and slide the handle to the left (3). Screws mounted on handle ® 14 Keyhole slots on this page. 1. Replacing Freezer Drawer Handle • Align keyhole...
... HANDLES (795. 78719, 78729 Models Olny) NOTE: Handle appearance may vary from illustrations on front of handle Replacing Refrigerator Handle • Align the screw holes of the drawer and slide the handle to the left (3). Screws mounted on handle ® 14 Keyhole slots on this page. 1. Replacing Freezer Drawer Handle • Align keyhole...

Use and Care Guide
Page 23
...back half of (1) and lift it stops. BO'B'LE HOLDER (795.7855*, 7872* Models Only) Bottles can slide glass shelves in and out of your refrigerator as bumping. Storing similar food items together in your refrigerator and adjusting the shelves to any shelf. • To reinstall a shelf--Tilt the ...shelves are made with warm water when they are cold. Pull the shelf out. Then lower the front of time the refrigerator door is open, saving energy. Your model may have glass or wire shelves. Adjusting Shelves Remove shelves from one side to a full shelf. Bottle holder can be...
...back half of (1) and lift it stops. BO'B'LE HOLDER (795.7855*, 7872* Models Only) Bottles can slide glass shelves in and out of your refrigerator as bumping. Storing similar food items together in your refrigerator and adjusting the shelves to any shelf. • To reinstall a shelf--Tilt the ...shelves are made with warm water when they are cold. Pull the shelf out. Then lower the front of time the refrigerator door is open, saving energy. Your model may have glass or wire shelves. Adjusting Shelves Remove shelves from one side to a full shelf. Bottle holder can be...
Use and Care Guide
Page 28
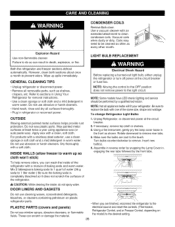
... soda and warm water. INSIDE WALLS (allow freezer to warm up spills immediately. Mix 2 tablespoons baking soda to 1 quart of the same size, shape and wattage. NOTE: Some models have LED interior lighting and service should be cleaned as often as every other month. To change Refrigerator Light Bulbs 1. Use a vacuum cleaner with...
... soda and warm water. INSIDE WALLS (allow freezer to warm up spills immediately. Mix 2 tablespoons baking soda to 1 quart of the same size, shape and wattage. NOTE: Some models have LED interior lighting and service should be cleaned as often as every other month. To change Refrigerator Light Bulbs 1. Use a vacuum cleaner with...
Use and Care Guide
Page 29
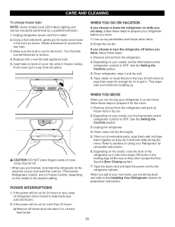
...if you are finished, reconnect the refrigerator to the electrical source and reset the controls. (Thermostat, Refrigerator Control, and or Freezer Control, depending on the model) to help foods stay cold and frozen. 2. CAUTION: DO NOT place fingers inside of the refrigerator so it rolls more than 24 hours... 1. Clean, wipe and dry thoroughly. 5. To change freezer light NOTE: Some models have LED interior lighting and service should be out for more easily OR screw in . Insert tabs on your model, set the thermostat control (refrigerator control) to sections in Using your new home, put ...
...if you are finished, reconnect the refrigerator to the electrical source and reset the controls. (Thermostat, Refrigerator Control, and or Freezer Control, depending on the model) to help foods stay cold and frozen. 2. CAUTION: DO NOT place fingers inside of the refrigerator so it rolls more than 24 hours... 1. Clean, wipe and dry thoroughly. 5. To change freezer light NOTE: Some models have LED interior lighting and service should be out for more easily OR screw in . Insert tabs on your model, set the thermostat control (refrigerator control) to sections in Using your new home, put ...
Use and Care Guide
Page 31
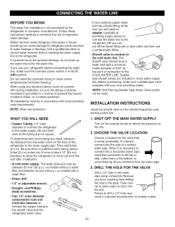
... the connection to the top or side, rather than at the point of 5/32" at the bottom, to the water supply pipe. When using a sharp bit. BEFORE YOU BEGIN This water line installation...the water pipe using any burrs resulting from the water valve on models with a minimum inside diameter of connection to the refrigerator. To prevent burns and product damage, do not hook up the... to connect into 3 turns of the refrigerator to avoid drawing off ) position. All installations must be sure the device is sufficient extra tubing (about 10" [25 cm] diameter) to allow water to ...
... the connection to the top or side, rather than at the point of 5/32" at the bottom, to the water supply pipe. When using a sharp bit. BEFORE YOU BEGIN This water line installation...the water pipe using any burrs resulting from the water valve on models with a minimum inside diameter of connection to the refrigerator. To prevent burns and product damage, do not hook up the... to connect into 3 turns of the refrigerator to avoid drawing off ) position. All installations must be sure the device is sufficient extra tubing (about 10" [25 cm] diameter) to allow water to ...
Use and Care Guide
Page 34
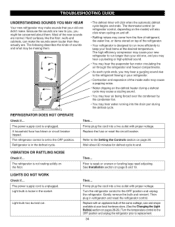
The thermostat control (or refrigerator control, depending on the model) will click when the automatic defrost cycle begins and ends. Wait about them . • The defrost timer will also click when cycling on and off. • Rattling noises may come from the flow of refrigerant, the water line, or items ... , and you may hear a pulsating or high-pitched sound. • You may hear the evaporator fan motor circulating the air through the refrigerator and freezer compartments. • As each cycle ends, you might be making them . The high efficiency compressor may cause your new...
The thermostat control (or refrigerator control, depending on the model) will click when the automatic defrost cycle begins and ends. Wait about them . • The defrost timer will also click when cycling on and off. • Rattling noises may come from the flow of refrigerant, the water line, or items ... , and you may hear a pulsating or high-pitched sound. • You may hear the evaporator fan motor circulating the air through the refrigerator and freezer compartments. • As each cycle ends, you might be making them . The high efficiency compressor may cause your new...
Use and Care Guide
Page 35
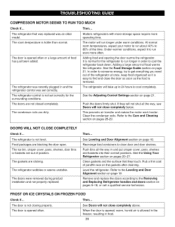
... run even more operating time. The refrigerator is opened often. Push bins all the way, see Doors will not close completely above. Clean gaskets and the surface that was replaced was an older model, The room temperature is normal for the surrounding conditions. It is hotter than ... will not close the door as soon as the food is allowed in the freezer, resulting in and the refrigerator control was recently plugged in frost. 35 Then... Refer to the Removing and Replacing Refrigerator handles and doors section on the gaskets after cleaning. When the door is opened...
... run even more operating time. The refrigerator is opened often. Push bins all the way, see Doors will not close completely above. Clean gaskets and the surface that was replaced was an older model, The room temperature is normal for the surrounding conditions. It is hotter than ... will not close the door as soon as the food is allowed in the freezer, resulting in and the refrigerator control was recently plugged in frost. 35 Then... Refer to the Removing and Replacing Refrigerator handles and doors section on the gaskets after cleaning. When the door is opened...


