
Use and Care Guide
Page 2
...this warranty applies for free repair. TABLE OF CONTENTS WARRANTY 2 DRYER SAFETY 3 INSTALLATION INSTRUCTIONS 4 Tools and Parts 4 Location Requirements 5 Electrical Requirements 6 Gas Supply Requirements 6 Venting Requirements 7 Plan Vent System 8 Install Vent ...Dryer Rack 19 DRYER CARE 20 Cleaning the Dryer Location 20 Cleaning the Lint Screen 20 Cleaning the Dryer Interior 20 Removing Accumulated Lint 21 Water Inlet Hoses 21 Vacation, Storage and Moving Care 21 Changing the Drum Light 21 TROUBLESHOOTING 22 PROTECTION AGREEMENTS 23 SERVICE NUMBERS BACK COVER KENMORE ELITE...
...this warranty applies for free repair. TABLE OF CONTENTS WARRANTY 2 DRYER SAFETY 3 INSTALLATION INSTRUCTIONS 4 Tools and Parts 4 Location Requirements 5 Electrical Requirements 6 Gas Supply Requirements 6 Venting Requirements 7 Plan Vent System 8 Install Vent ...Dryer Rack 19 DRYER CARE 20 Cleaning the Dryer Location 20 Cleaning the Lint Screen 20 Cleaning the Dryer Interior 20 Removing Accumulated Lint 21 Water Inlet Hoses 21 Vacation, Storage and Moving Care 21 Changing the Drum Light 21 TROUBLESHOOTING 22 PROTECTION AGREEMENTS 23 SERVICE NUMBERS BACK COVER KENMORE ELITE...
Use and Care Guide
Page 4
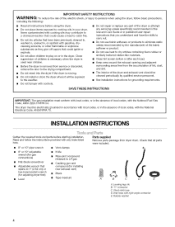
...have the skills to carry out. • Do not use heat to cooking oils in the dryer. Inlet hose with controls. • Do not repair or replace any part of the fabric softener or product. • Do not use fabric softeners or products to ... instructions for installing hex-head socket wrench o(fpoer nasdjutosti1n"g (2d.5ry4ercmfe)eot)r Level • nPeliewrsexhaust vent) • Tape measure Parts supplied Remove parts package from dryer drum. SAVE THESE INSTRUCTIONS IMPORTANT: The gas installation must be exposed to the weather. • Do not tamper with right-angle E.
...have the skills to carry out. • Do not use heat to cooking oils in the dryer. Inlet hose with controls. • Do not repair or replace any part of the fabric softener or product. • Do not use fabric softeners or products to ... instructions for installing hex-head socket wrench o(fpoer nasdjutosti1n"g (2d.5ry4ercmfe)eot)r Level • nPeliewrsexhaust vent) • Tape measure Parts supplied Remove parts package from dryer drum. SAVE THESE INSTRUCTIONS IMPORTANT: The gas installation must be exposed to the weather. • Do not tamper with right-angle E.
Use and Care Guide
Page 5
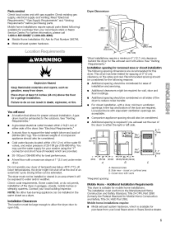
...Louvered doors with elbow. Side view - Mobile home installations require special parts (listed following reasons: • Additional spacing should be considered. • Cold water faucets located within 2 ft (61 cm) of 20-100 psi (138-690 kPa). You ...;F (7°C). Recommended spacing should be required for spacing of 1" (2.5 cm) under entire dryer. Read "Electrical Requirements," "Gas Supply Requirements" and "Venting Requirements" before purchasing parts. Parts needed ) which is suitable for proper exhaust installation. Mobile home installations require: • Metal...
...Louvered doors with elbow. Side view - Mobile home installations require special parts (listed following reasons: • Additional spacing should be considered. • Cold water faucets located within 2 ft (61 cm) of 20-100 psi (138-690 kPa). You ...;F (7°C). Recommended spacing should be required for spacing of 1" (2.5 cm) under entire dryer. Read "Electrical Requirements," "Gas Supply Requirements" and "Venting Requirements" before purchasing parts. Parts needed ) which is suitable for proper exhaust installation. Mobile home installations require: • Metal...

Use and Care Guide
Page 6
...dryer (see illustration). • 1/2"IPS pipeis recommended. • 3/8"approved aluminum or copper tubing is acceptable for test gauge connection, immediately upstream of electric shock. Gas Supply Line: • Must include 1/8"NPT minimum plugged tapping accessible for lengths under 20 ft (6.1 m) if local codes and gas..., explosion, or fire. Gas Type Natural Gas: This dryer is properly installed and grounded in accordance with a qualified electrician or service representative or personnel if you are in the door well of least resistance for Part Number 49572. No attempt ...
...dryer (see illustration). • 1/2"IPS pipeis recommended. • 3/8"approved aluminum or copper tubing is acceptable for test gauge connection, immediately upstream of electric shock. Gas Supply Line: • Must include 1/8"NPT minimum plugged tapping accessible for lengths under 20 ft (6.1 m) if local codes and gas..., explosion, or fire. Gas Type Natural Gas: This dryer is properly installed and grounded in accordance with a qualified electrician or service representative or personnel if you are in the door well of least resistance for Part Number 49572. No attempt ...
Use and Care Guide
Page 9
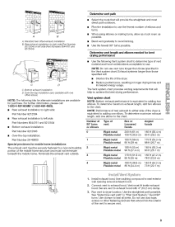
... installations The exhaust vent must be securely fastened to left side (Part Numbers 8544761 and 8212504). Connect vent to dryer location. Use clamps to the chart. Over-the-top installation (...ft (61 m) 185 ft (56.4 m) Flexible metal 100 ft (30.5 m) 93 ft (28.2 m) 1 Rigid metal 190 ft (58 m) 175 ft (53.3 m) Flexible metal 95 ft (29 m) 88 ft (26.7 m) 2 Rigid metal 180 ft (55 m) 165 ft (50.3 m) Flexible metal 90 ft (27.4 m) 83 ft (25.1 m) 3 Rigid metal 170 ft (51.8 m) 155 ft (47.2 m) Flexible metal 85 ft (26 m) 78 ft (23.6 m) 4 Rigid metal 160 ft (48.8 m) 145 ft...
... installations The exhaust vent must be securely fastened to left side (Part Numbers 8544761 and 8212504). Connect vent to dryer location. Use clamps to the chart. Over-the-top installation (...ft (61 m) 185 ft (56.4 m) Flexible metal 100 ft (30.5 m) 93 ft (28.2 m) 1 Rigid metal 190 ft (58 m) 175 ft (53.3 m) Flexible metal 95 ft (29 m) 88 ft (26.7 m) 2 Rigid metal 180 ft (55 m) 165 ft (50.3 m) Flexible metal 90 ft (27.4 m) 83 ft (25.1 m) 3 Rigid metal 170 ft (51.8 m) 155 ft (47.2 m) Flexible metal 85 ft (26 m) 78 ft (23.6 m) 4 Rigid metal 160 ft (48.8 m) 145 ft...
Use and Care Guide
Page 13
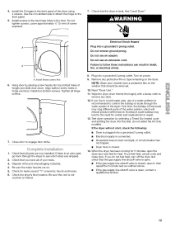
...remove any protective film or tape remaining on power. 9. Excessive scale buildup may clog different parts of your tools. 3. Instafl these instructions can result in the door. Turn on the dryer. Wipe the dryer drum interior thoroughly with a damp cloth to the need for 5 minutes, open , contact ...a qualified technician. 13 For this test, do not feel heat, turn off the dryer and check that the gas supply line shutoff valve is open. • If the gas supply line shutoff valve is recommended to follow these screws firsL 6. If you live in hinge and...
...remove any protective film or tape remaining on power. 9. Excessive scale buildup may clog different parts of your tools. 3. Instafl these instructions can result in the door. Turn on the dryer. Wipe the dryer drum interior thoroughly with a damp cloth to the need for 5 minutes, open , contact ...a qualified technician. 13 For this test, do not feel heat, turn off the dryer and check that the gas supply line shutoff valve is open. • If the gas supply line shutoff valve is recommended to follow these screws firsL 6. If you live in hinge and...
Use and Care Guide
Page 16
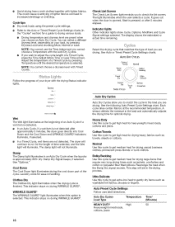
... Signal beeps, if selected. Cool Down The Cool Down light illuminates during WRINKLE GUARD ®. This indicator stays on during the cool down part of an Auto Cycle if a wet item is selected. Select the drying cycle that require very long drying times such as towels, sheets ...cotton or polyester fiber filled pillows. Clothes Dry The Clothes Dry light illuminates when the drying cycle is pressed, or after approximately 5 minutes, the dryer goes directly into Cool Down and the Cool Down and WRINKLE GUARD®indicators illuminate, if selected. • In a Timed Cycle, wet ...
... Signal beeps, if selected. Cool Down The Cool Down light illuminates during WRINKLE GUARD ®. This indicator stays on during the cool down part of an Auto Cycle if a wet item is selected. Select the drying cycle that require very long drying times such as towels, sheets ...cotton or polyester fiber filled pillows. Clothes Dry The Clothes Dry light illuminates when the drying cycle is pressed, or after approximately 5 minutes, the dryer goes directly into Cool Down and the Cool Down and WRINKLE GUARD®indicators illuminate, if selected. • In a Timed Cycle, wet ...


